Pixelblog - 46 - Anti-Gravity Racers by Raymond Schlitter

intro

Our story starts in 1991. Out of nowhere, my two older brothers come home with the newly released Super Nintendo. When I first saw the box, my excitement dampened nearly to anger. Like any healthy 8 year old boy, I was ready to move on from the the kiddy Mario brand, to the blood and guts offered by Sega. However, I was quickly convinced they made the right decision when I discovered F-Zero, which was also brought home that day, along with U.N. Squadron, and the pack-in Super Mario World. You’d never believe it, but the console came with 2 controllers and a game. And that was expected back then. Of all that goodness, F-Zero made the biggest impression with its striking mode 7 graphics, and astounding music. Ultimately, this day would go down as one of my best gaming memories.

Jump to 1995. My friends’ interests are moving on to sports and girls, but I’m committed to this gaming stuff. I’m saving my own allowance, so I can get the new Sony Playstation on day 1. The launch would not disappoint. Toshinden was fun, but the pack-in demo disc had me in awe of the potential of the console. Of those demos, Wipeout was most impressive. Again, another anti-gravity racer pushing the envelope on the stage of new tech. When I finally got the full game, I was in ag racing heaven. The music sounded too cool to be coming out of a video game. One of the most remarkable aspects of the game was the graphic design created by the British studio Designers Republic. It was so fresh, and immersed me in the world with no need for in game narrative.

Jump to today. Looking at my occupation and interests, I realize how great the influence of these games has been on me. My love for Wipeout runs especially deep, and I have enjoyed the series over the years. Recently obsessed with the psx era titles, my inspiration has been renewed. As much as I’d love to make an ag racing game, pixel art doesn’t lend itself well to the genre. But that can’t stop me from making a pure art expression for my love of ag racing. Take a lap with me. By the end of the course you’ll have all the tools to create your own ag racing scene with parallax animation.

Hovercrafts

First things first, show me the hovercrafts. Not veering too far from my points of inspiration, these crafts may appear vaguely familiar. It’s fun to think about the manufacturer’s philosophy, performance aspects, and how they might inform the design. Keeping things basic, Delta is the all-rounder. Omni has good acceleration and handling but low top speed, while Mega is the inverse. Well, that’s how I imagine it, but love to see someone come up with more extreme designs.

I break down the main components of the craft in outline form. This can help simplify the design, and get something going fast without worrying about color palette. However, I typically have a palette in mind and jump straight to solid forms, as I find the outlines can complicate the coloring process. I feel I’m in the minority on this, so don’t let me dissuade you from outline sketching if it works for you.

For size reference of each craft, not including thrust trail.
Delta 46x25px
Omni 33x24px
Mega 59x21px

Marble Architecture

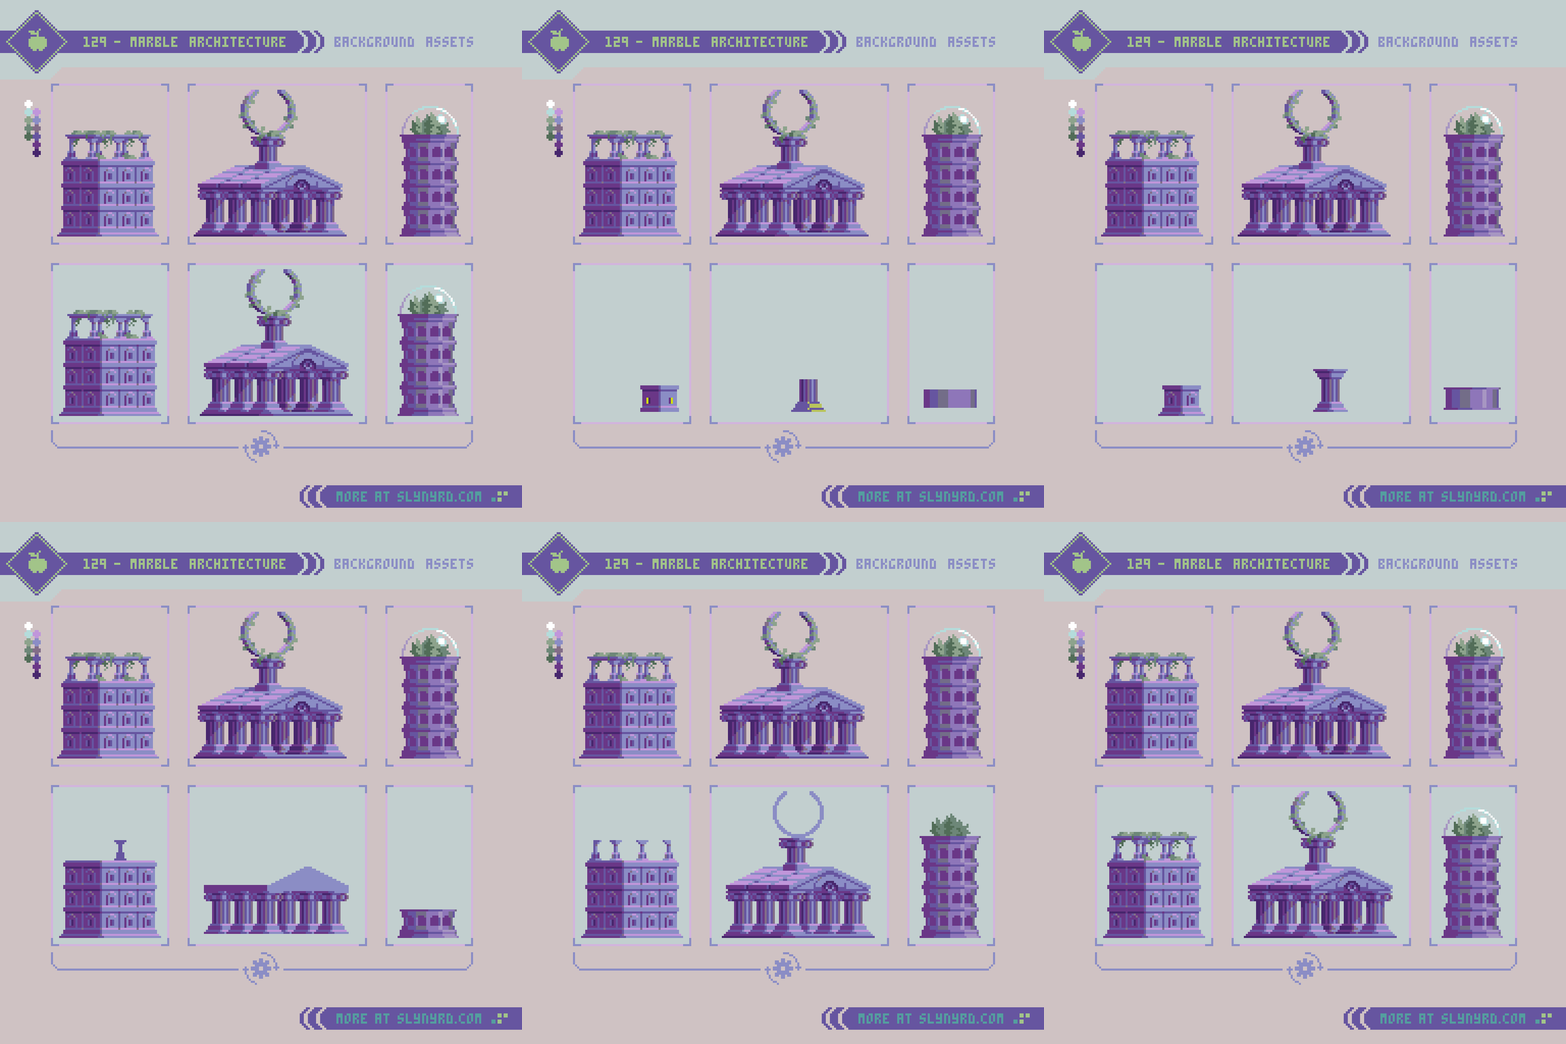
Equally important to the hovercrafts, any good ag racing fiction should be rich in world building, largely established by the race-side scenery. Some circuits feature outlandish sci-fi backdrops, while others represent a more believable vision of the future. Much like old school Wipeout, I tend to favor the latter vision with grounded elements that show a world not so distant from our own history. Furthermore, I went with the timeless aesthetic of Greek/Roman marble architecture. Combined with subtle hints of advanced technology, the style continues the spirit of olympic level competition into the future. I suppose you call this aesthetic marble punk. I love the atmosphere of this style and will definitely want to develop the vision more.

Note the building and temple are intended to be on the same plane, however the the darkest color and pink highlights are omitted from the tower to appear more distant.

Building 50x52px
Temple 75x72px
Tower 30x64px

Natural Scenery

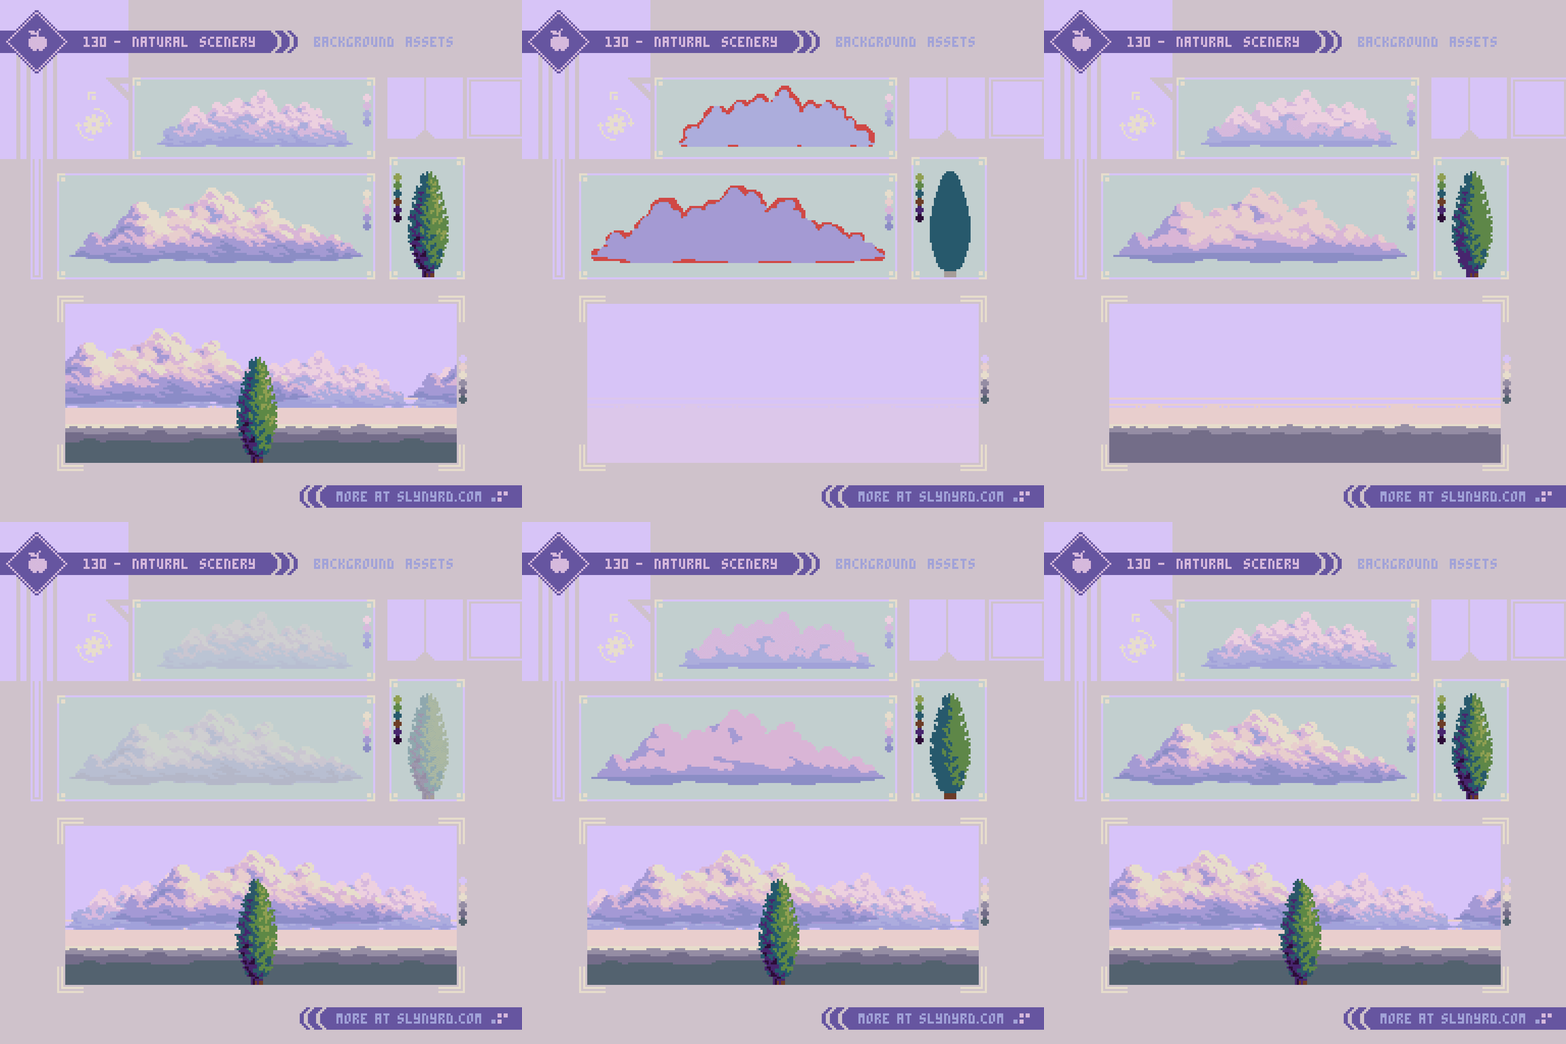
Well, we need a base environment to place things. Further driving the retro future Roman theme, I stuck with a simple natural landscape with proper italian cypress trees.

Understanding of atmospheric perspective is crucial to selecting the best colors to achieve depth in your landscapes. If you are not familiar with the concept you might want to take a detour to Pixelblog 11, for a jump start on landscape painting.

The approach for both the clouds and tree is the same. Rough shape, refine shape, shade with rough clustering, refine clusters. Admittingly, that last step is somewhat “draw the rest of the fucking owl”, but there’s no way around it. Get in there!

Small cloud 96x26px
Large cloud 144x37px

Parallax layers

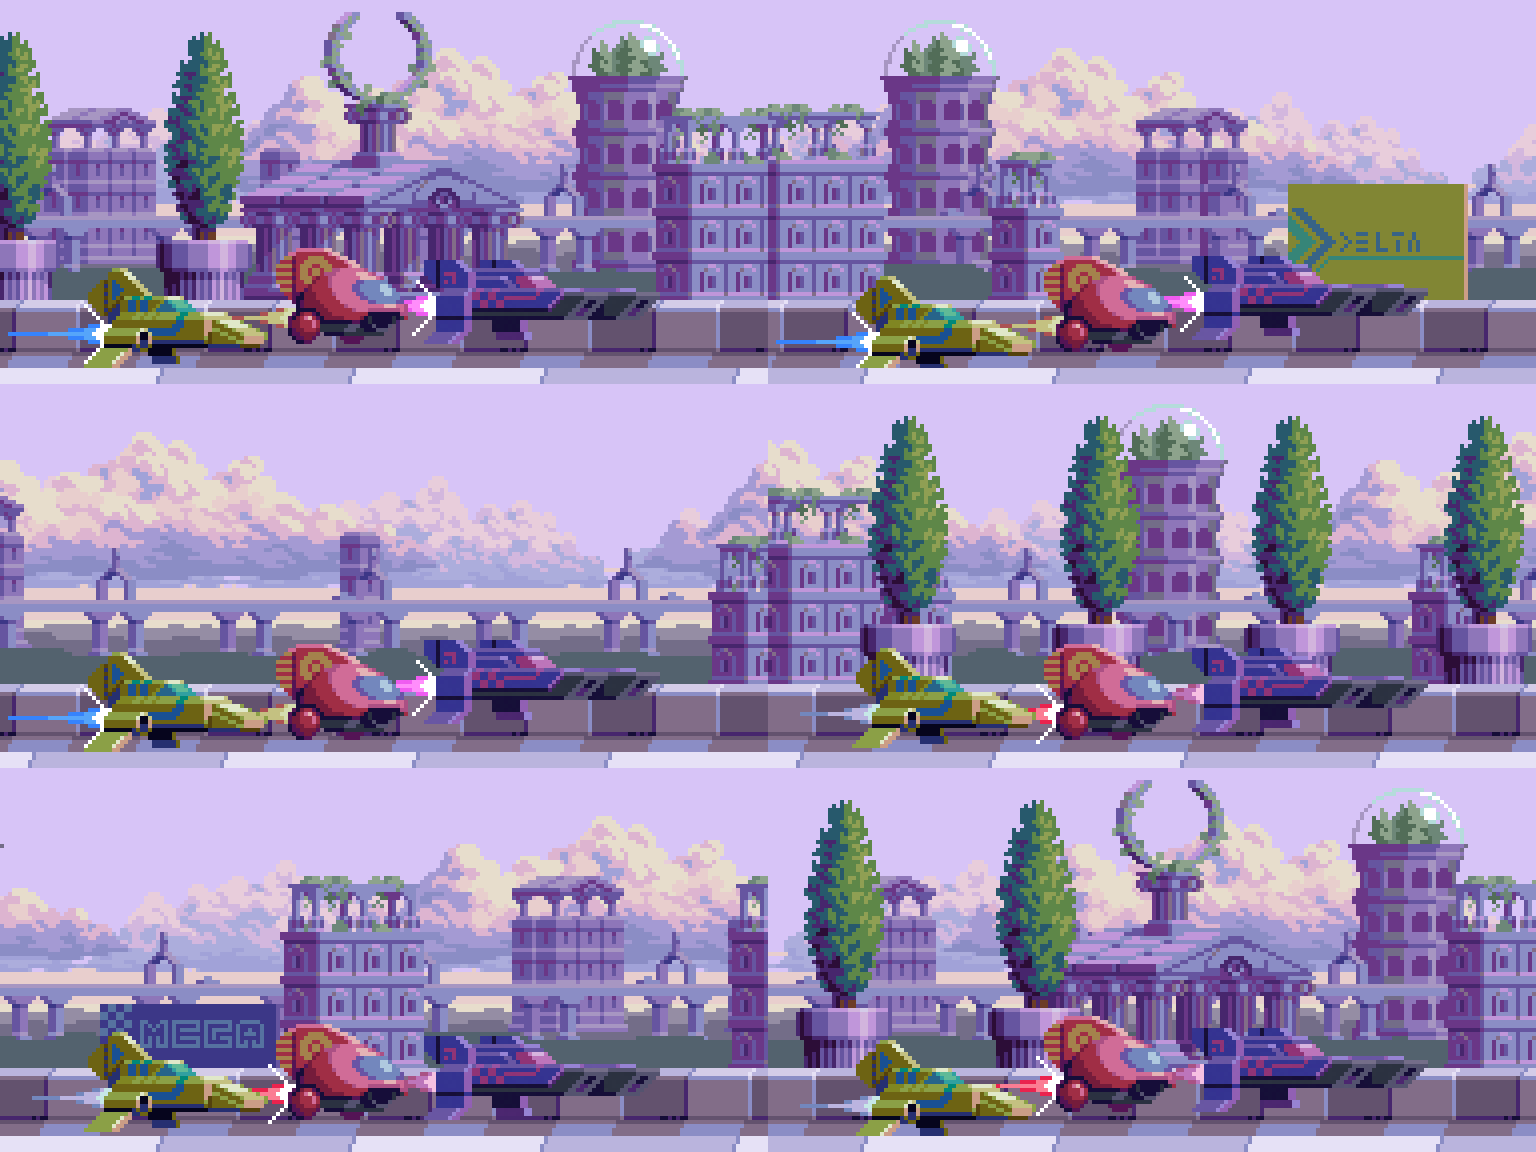
With all assets complete we can create a parallax animation using my perfect loop technique detailed in Pixelblog 23. Understanding of that particular method will help make sense of the following breakdown.

In a nutshell, the parallax scrolling effect is created by making objects that appear closer to the viewer move faster, while the distant objects move slower. In order to do this, I make several layers of various length and drag them across the scene within a set number of frames. To make it loop perfectly the movement rate per frame must evenly divide with the canvas dimension along the axis of movement. Furthermore, the possible smooth movement rates are determined by the canvas. Choose dimensions wisely.

Here’s the breakdown of the above scene.
Canvas - 192x96px
Frames - 192 frames played at 0.05 per frame
Layers - 9 layers of different movement speed.

The following layers are listed from nearest/fastest to most distant/slowest.
1. racetrack foreground - 32 (pixels moved per frame)
2. racetrack - 24
3. Trees - 16
4. ground + buildings - 6
5. highway - 4
6. ground + buildings - 3
7. ground - 2
8. clouds - 1
9. clouds - 0.5 (moves 1px every 2 frames)

Final Thoughts

You’ve reached the finish line. I hope you enjoyed that as much as I did. While this installment doesn’t introduce any concepts I haven’t touched on before, the amalgamation expands on the possibilities with a showcase of earnest art.

As much as I enjoy designing pixel art in the context of practical game application, nothing is quite as satisfying as making unfettered pure art. But I still can’t help fantasying about the possibility of games. I’m not really into the manager genre, but ag racing would be the best theme to adapt, just for all the rad graphic design potential. No matter, useful assets in here for all types of applications.

While pixel art is often thought of as a medium restricted to low budget video games, it has the power to transcend to the sublime just as well as any respected medium. Nearing a decade of pixel art experience, it’s been exciting to see the evolution of the medium and rise in popularity. Now, more than ever, I’m inspired by what I’m seeing in the pixel art community. I can only hope to contribute to the momentum.

RESOURCES

Please consider supporting my work by becoming a Patron. Among many other rewards, Patrons can access resources to compliment my tutorials. But most importantly, you allow me to continue making new content! 

Alternatively, you can support me by making a one-time donation

Assets featured in this Pixelblog are available in Anti-Gravity Racers Assets Pack

Source files used in the making of this Pixelblog are available in Anti-Gravity Racers Source Files

Get caught up on all my downloads

You made it to the end of the article. Thank you for reading! 

-By Raymond Schlitter

Pixelblog - 45 - Bricks, Walls, Doors, and More by Raymond Schlitter

Intro

A title like that might be the opposite of click bait, but for a pixel head like me, it sounds like a party. While some brick and stone assets have appeared in past lessons, they lack in comparison to my explorations with natural textures. After my umpteenth iteration of grass tiles, the prospect of focusing an entire lesson around brickwork actually sounded refreshing. Spoiler: I had fun! What started as simple patterns quickly became so much more in another display of the magical efficiency of pixel art. Follow me down the pixeled brick road, on a journey that promises to yield great fruits with minimal toil.

Brick Patterns

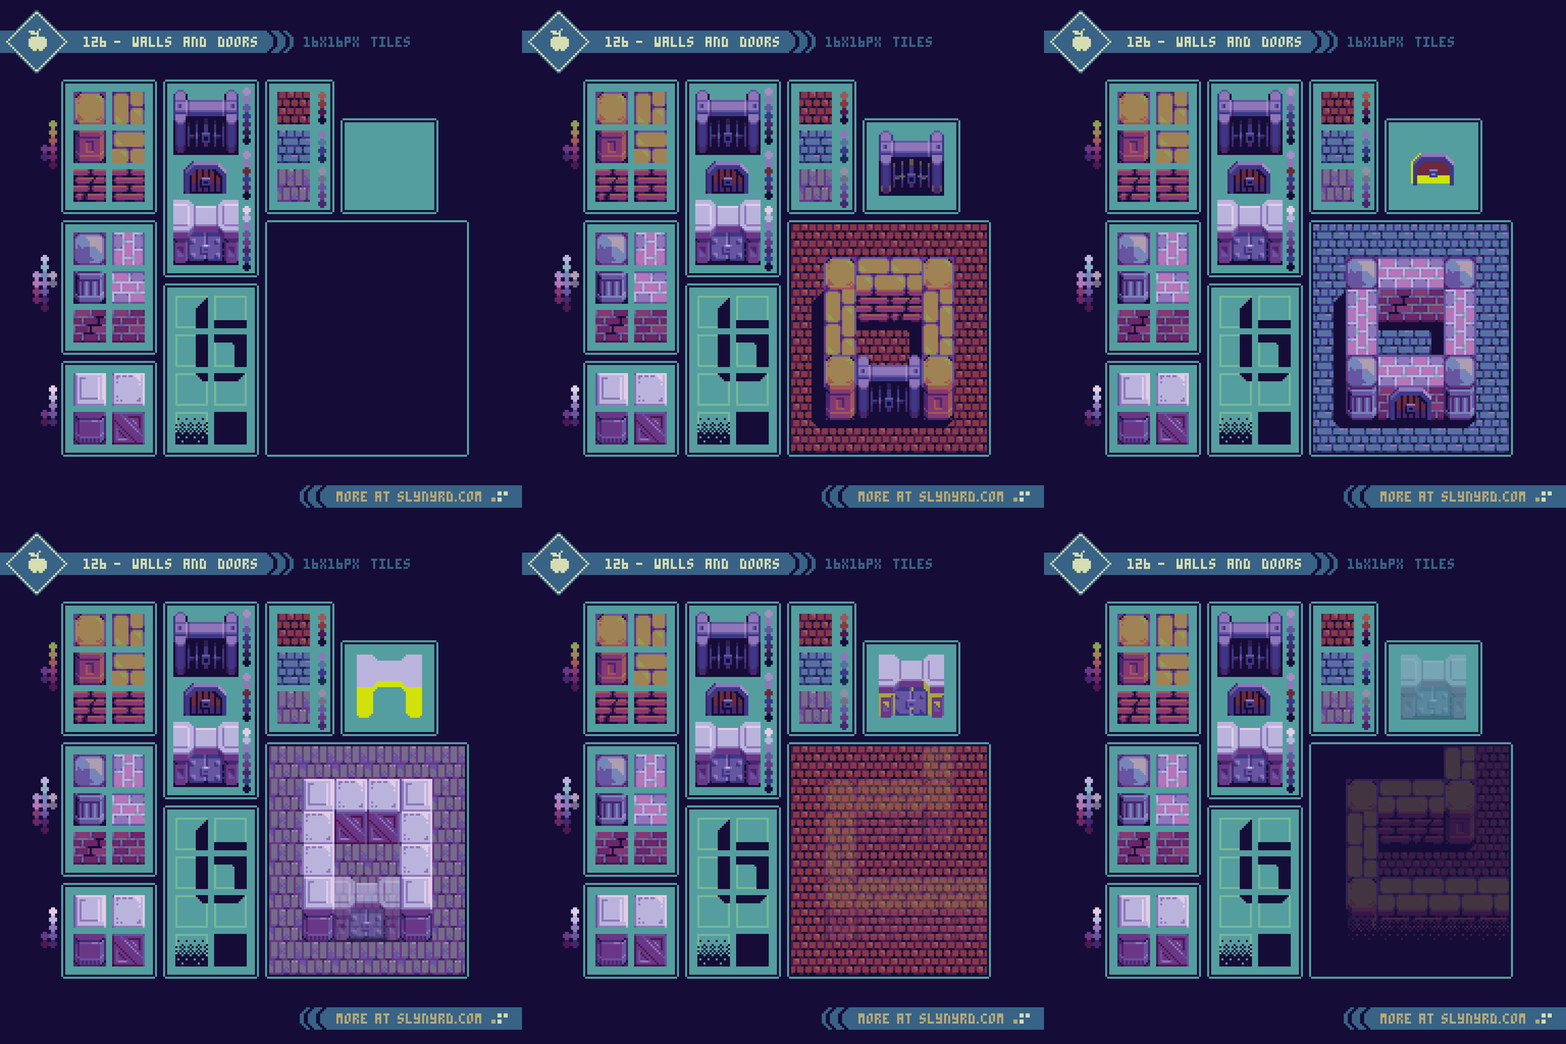
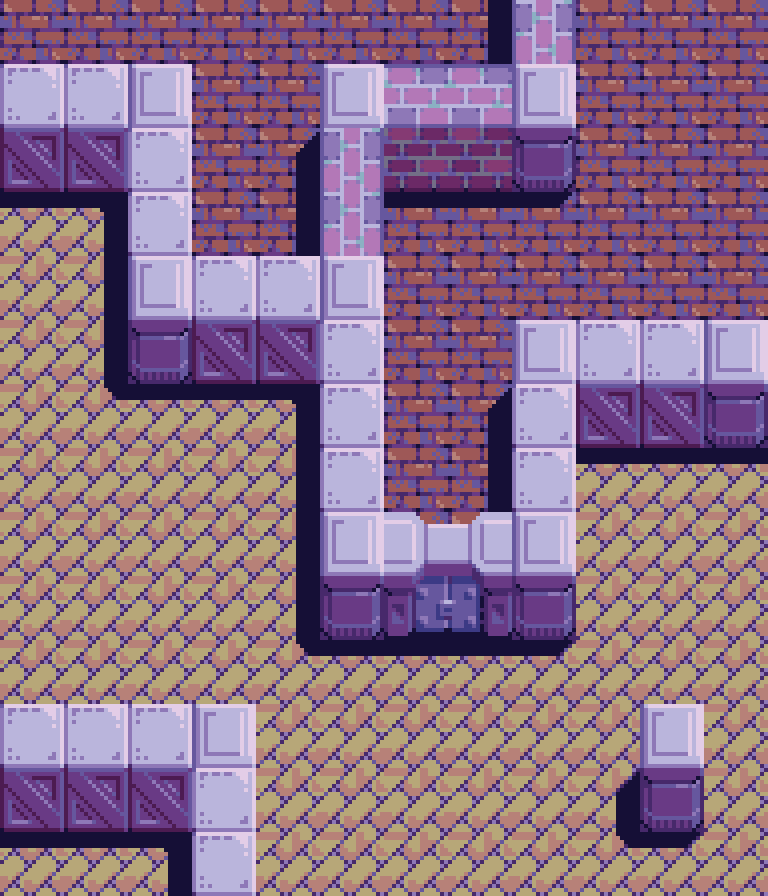
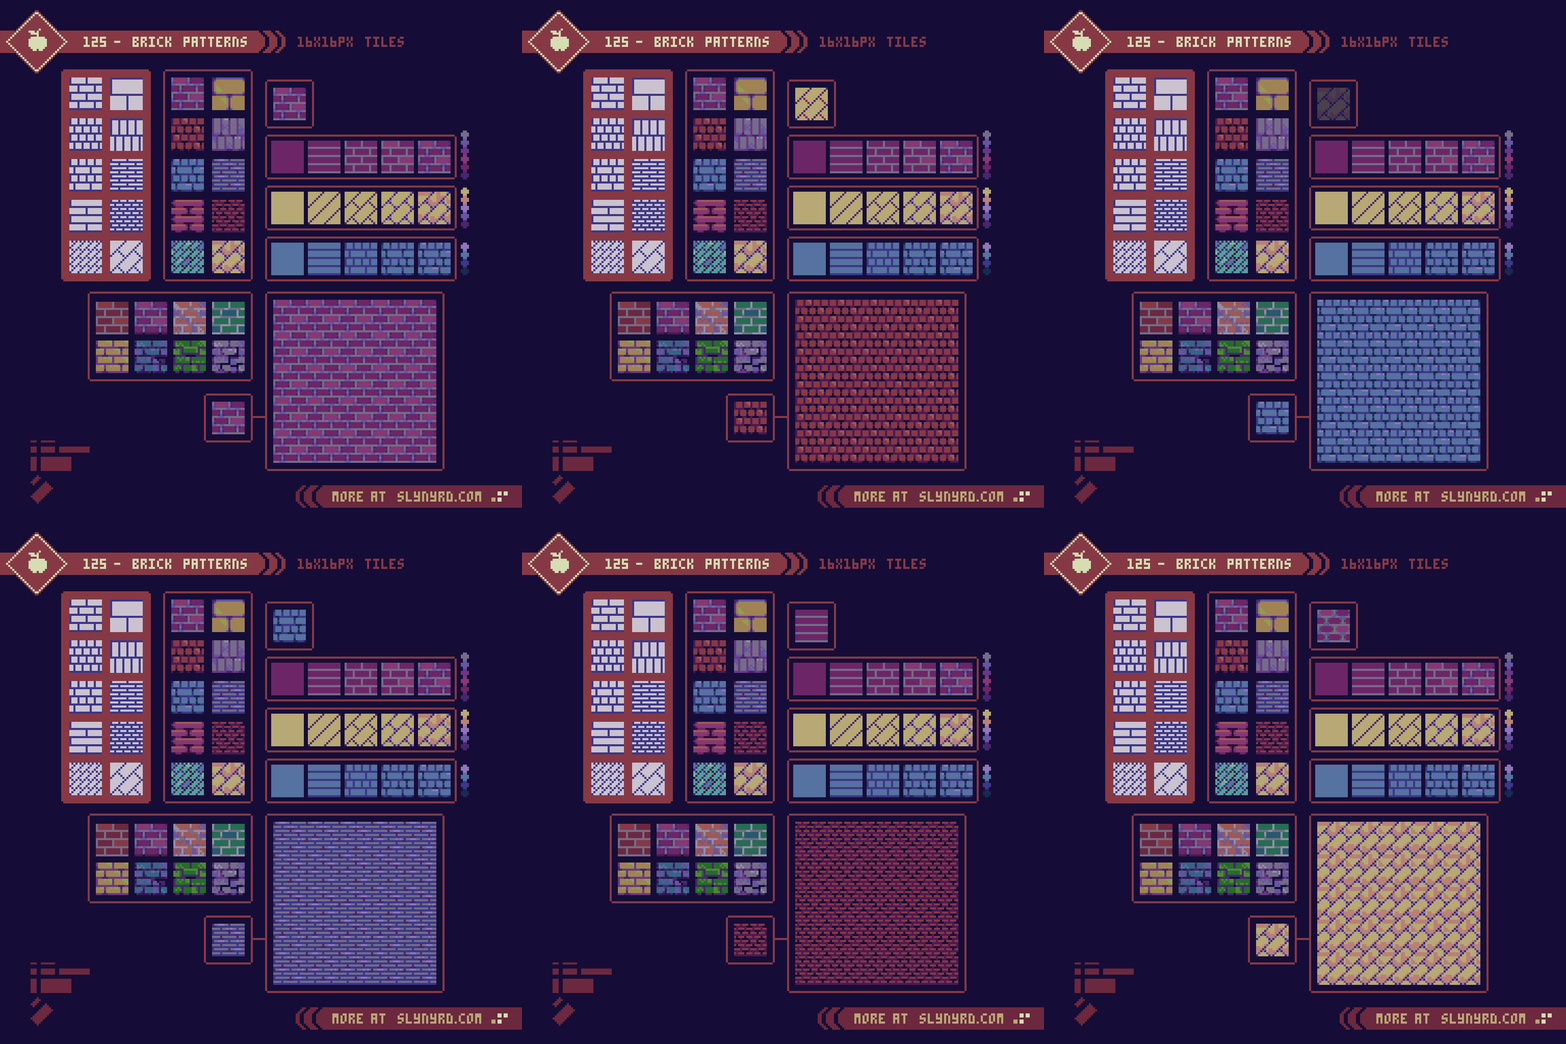
Creating with gamedev in mind, I stuck to a consistent 8-bit style with assets designed for a 16x16px tilemap. Also, the designs were created to be utilized in my familiar top down projection, however, many patterns can just as well be used in a side view projection. Working within 16x16px tiles the number of even patterns is fairly limited. Accounting for a 1 pixel stroke, which represents the grout in this case, brick dimensions that can divide into 16px are 15, 7, 3, and 1. Furthermore, the height and width of all bricks must adhere to one of these four dimensions in order to pattern evenly without any irregular sized bricks. This same rule also applies to the patterns tilted 45 degrees. Note, the graphic in the bottom left corner represents all brick sizes utilized. Typically, patterns use a uniform brick size, but they can also combine bricks of different sizes.

The process is as straight forward as real life brick laying. First, put down some grout: establish the pattern with outlines. Next, lay the bricks: color in the bricks. Then you just have to let it set, and age over time: add discoloration and damage to bricks and grout. Color choice and texture details can greatly change the feel of tiles with the same pattern. Simply changing the grout from light to dark makes a dramatic difference.

Walls and Doors

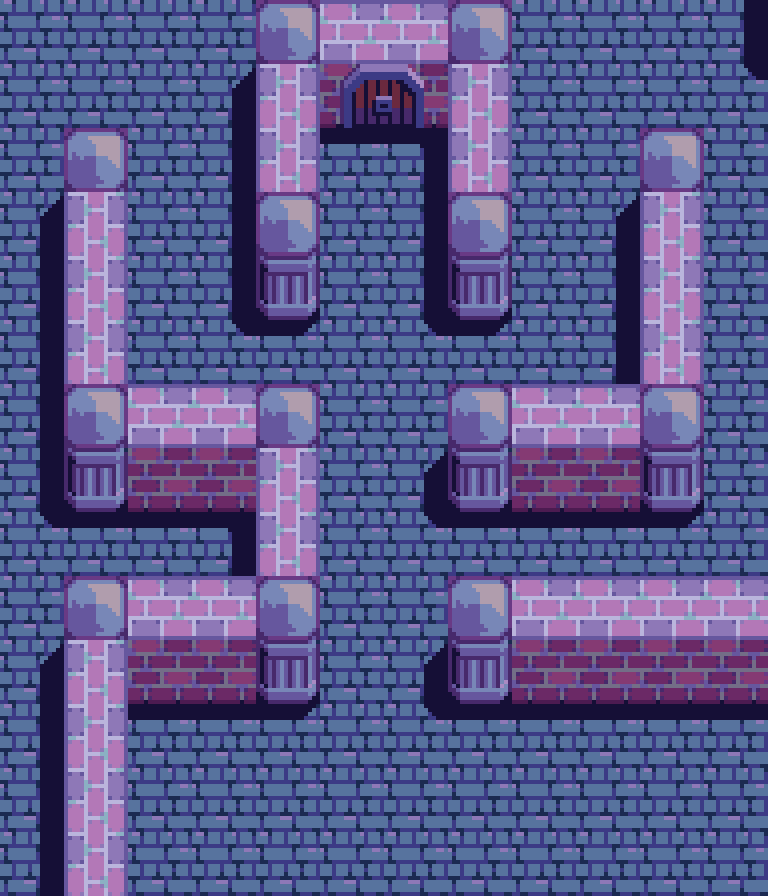
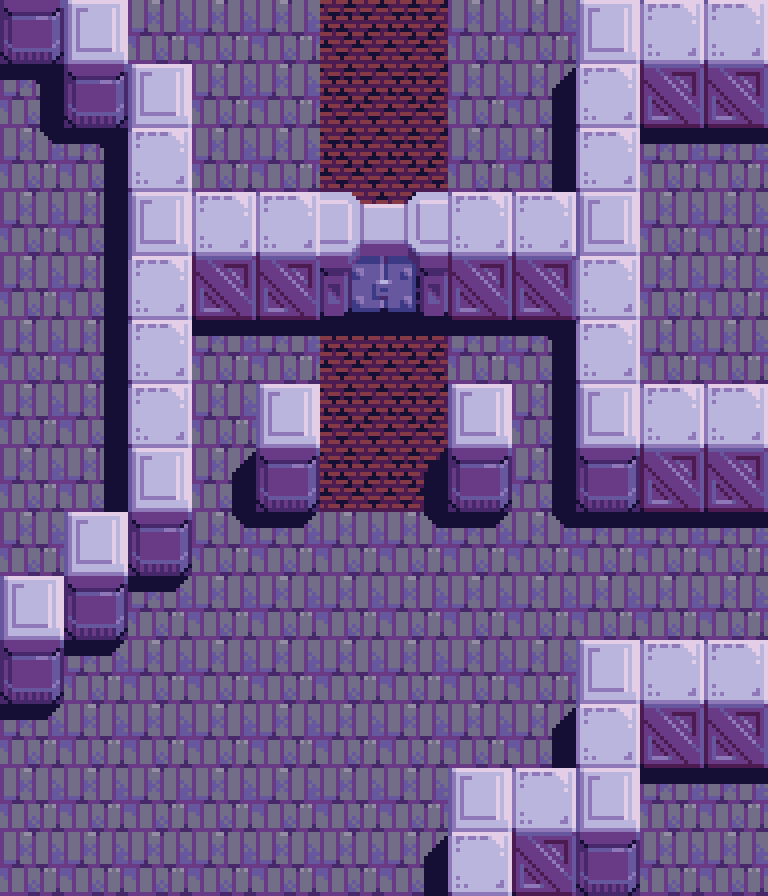
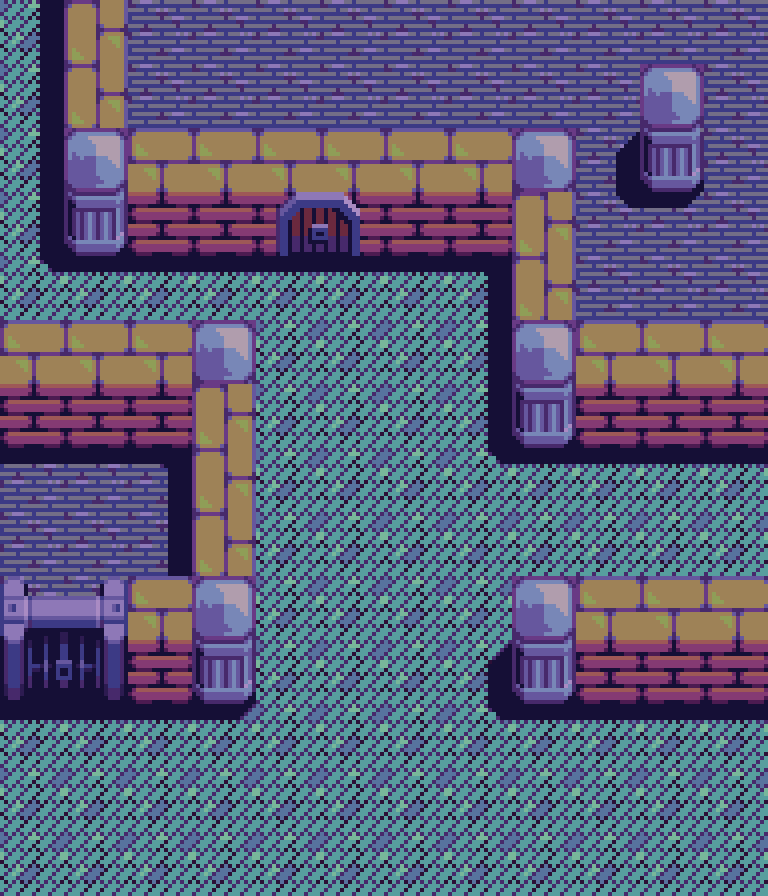
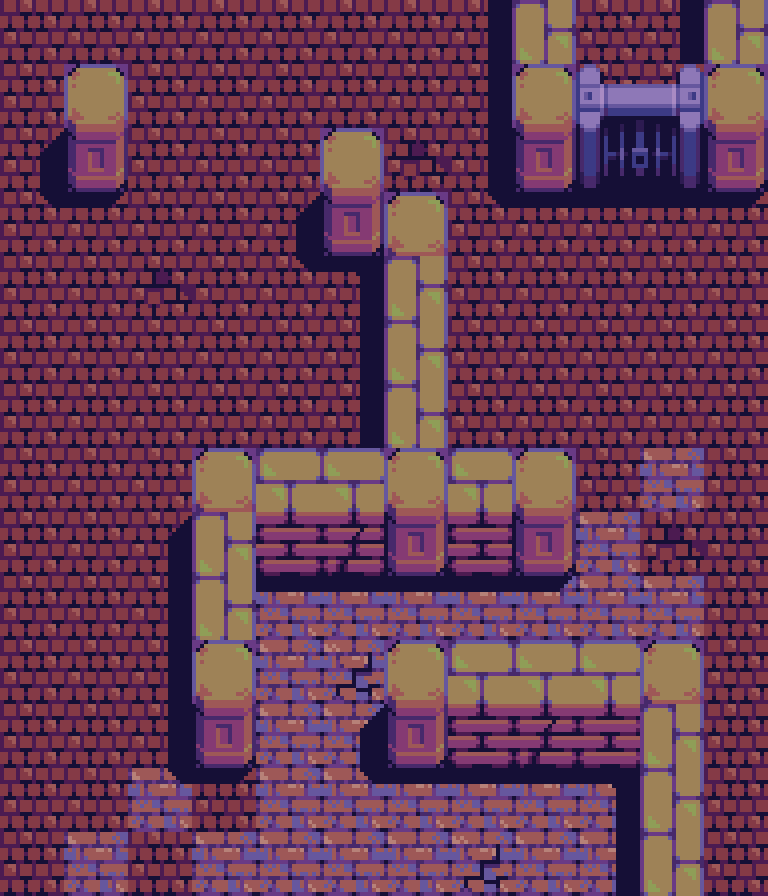
There is no difference between a ground and wall tile in the design itself, but it’s important to consider how they contrast in context to create the illusion of depth. Both brick size and color impact the implied perspective. Furthermore, the tiles that make up the top of the wall are much brighter than the sides. Bricks are typically laid with the broad side down, so when it come to walls, it’s the long narrow side that shows on the exterior. Therefore, the height of the bricks on a side wall tile should typically be shorter than on the top wall tile.

Columns, or some kind of universal corner pieces are an easy way to create corners with minimal assets. It possible to make brick corners in a similar fashion as the walls, but all four corners would require custom variants to represent the proper orientation on the top wall, and to define the edges of the side wall. The payoff hardly seems worth the added complexity, so I went with columns. Another advantage of columns is they can be used apart from walls to give environments more interest.

Speaking of adding interest. It’s always worth the time to make at least one variant of any texture that is used heavily. For example, a cracked, or discolored tile here and there will valiantly fight off visual fatigue. Additionally, drop shadows are a must for the added depth and clarity they provide. By using layers, a simple set of universal shadow tiles can easily be applied across all environments. I usually make my shadows predominantly cast to the left or right of objects, and slightly from the bottom. No matter how tall the object is perceived to be it’s best to keep the shadows fairly short, and no longer than can be contained in a single tile. This helps avoid layering conflicts where long shadows awkwardly overlap other parts of the environment, or make an object look out of place because the lighting doesn’t match when it’s placed over a shadow.

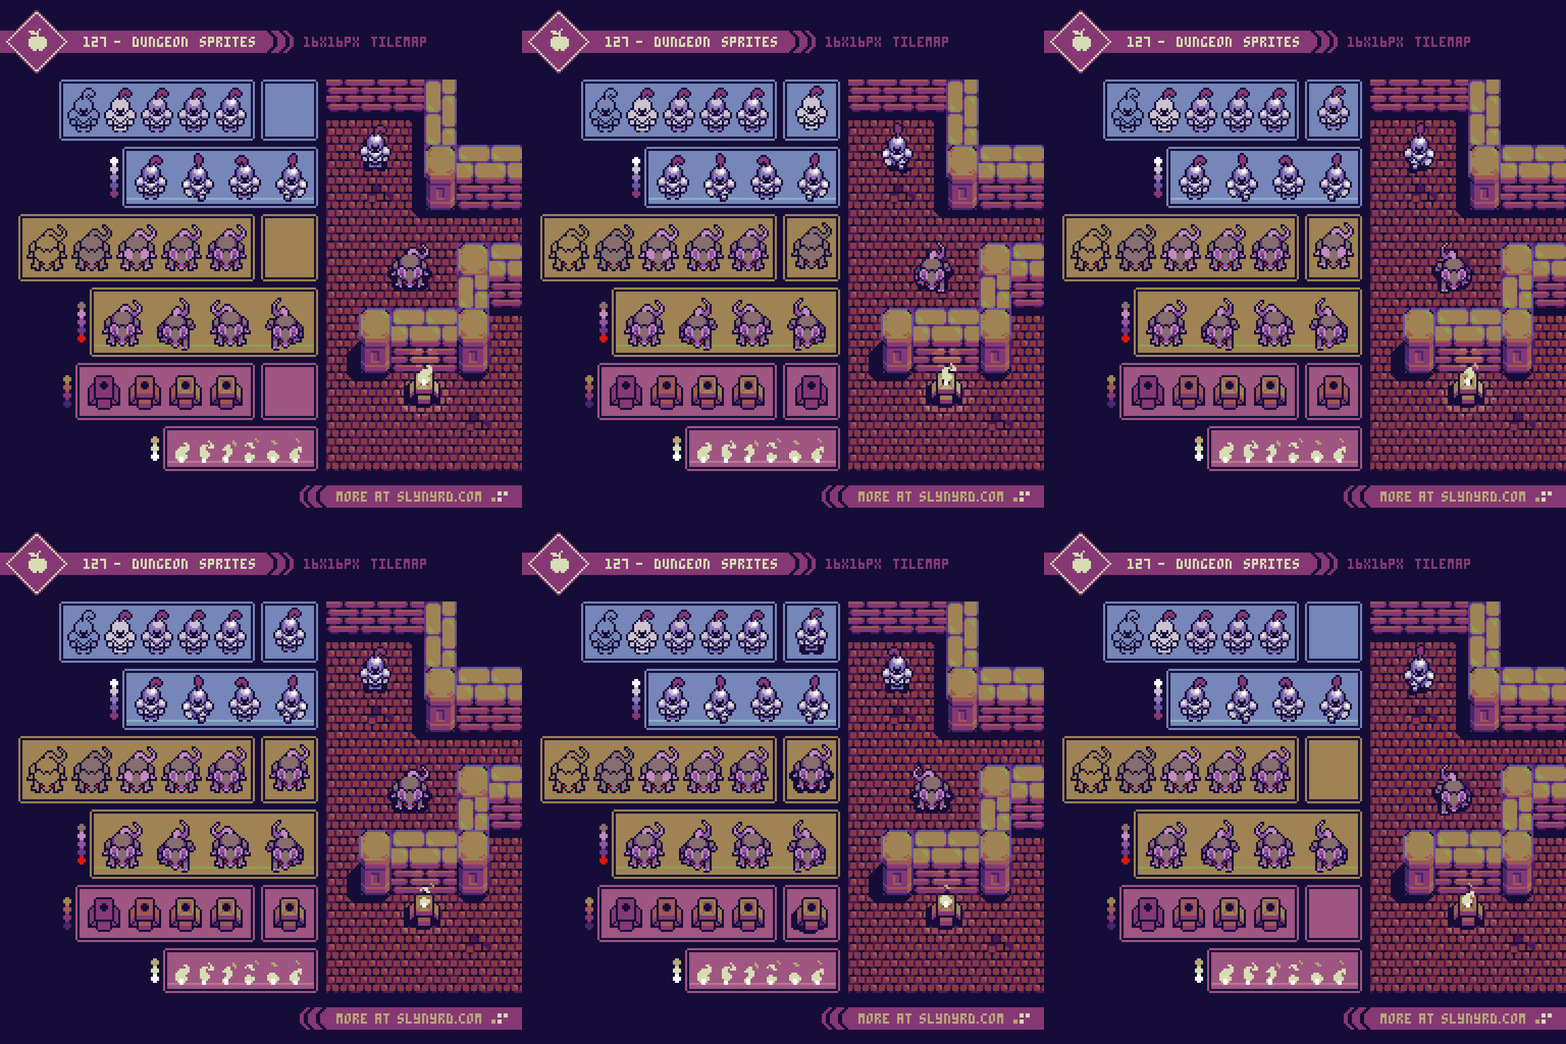
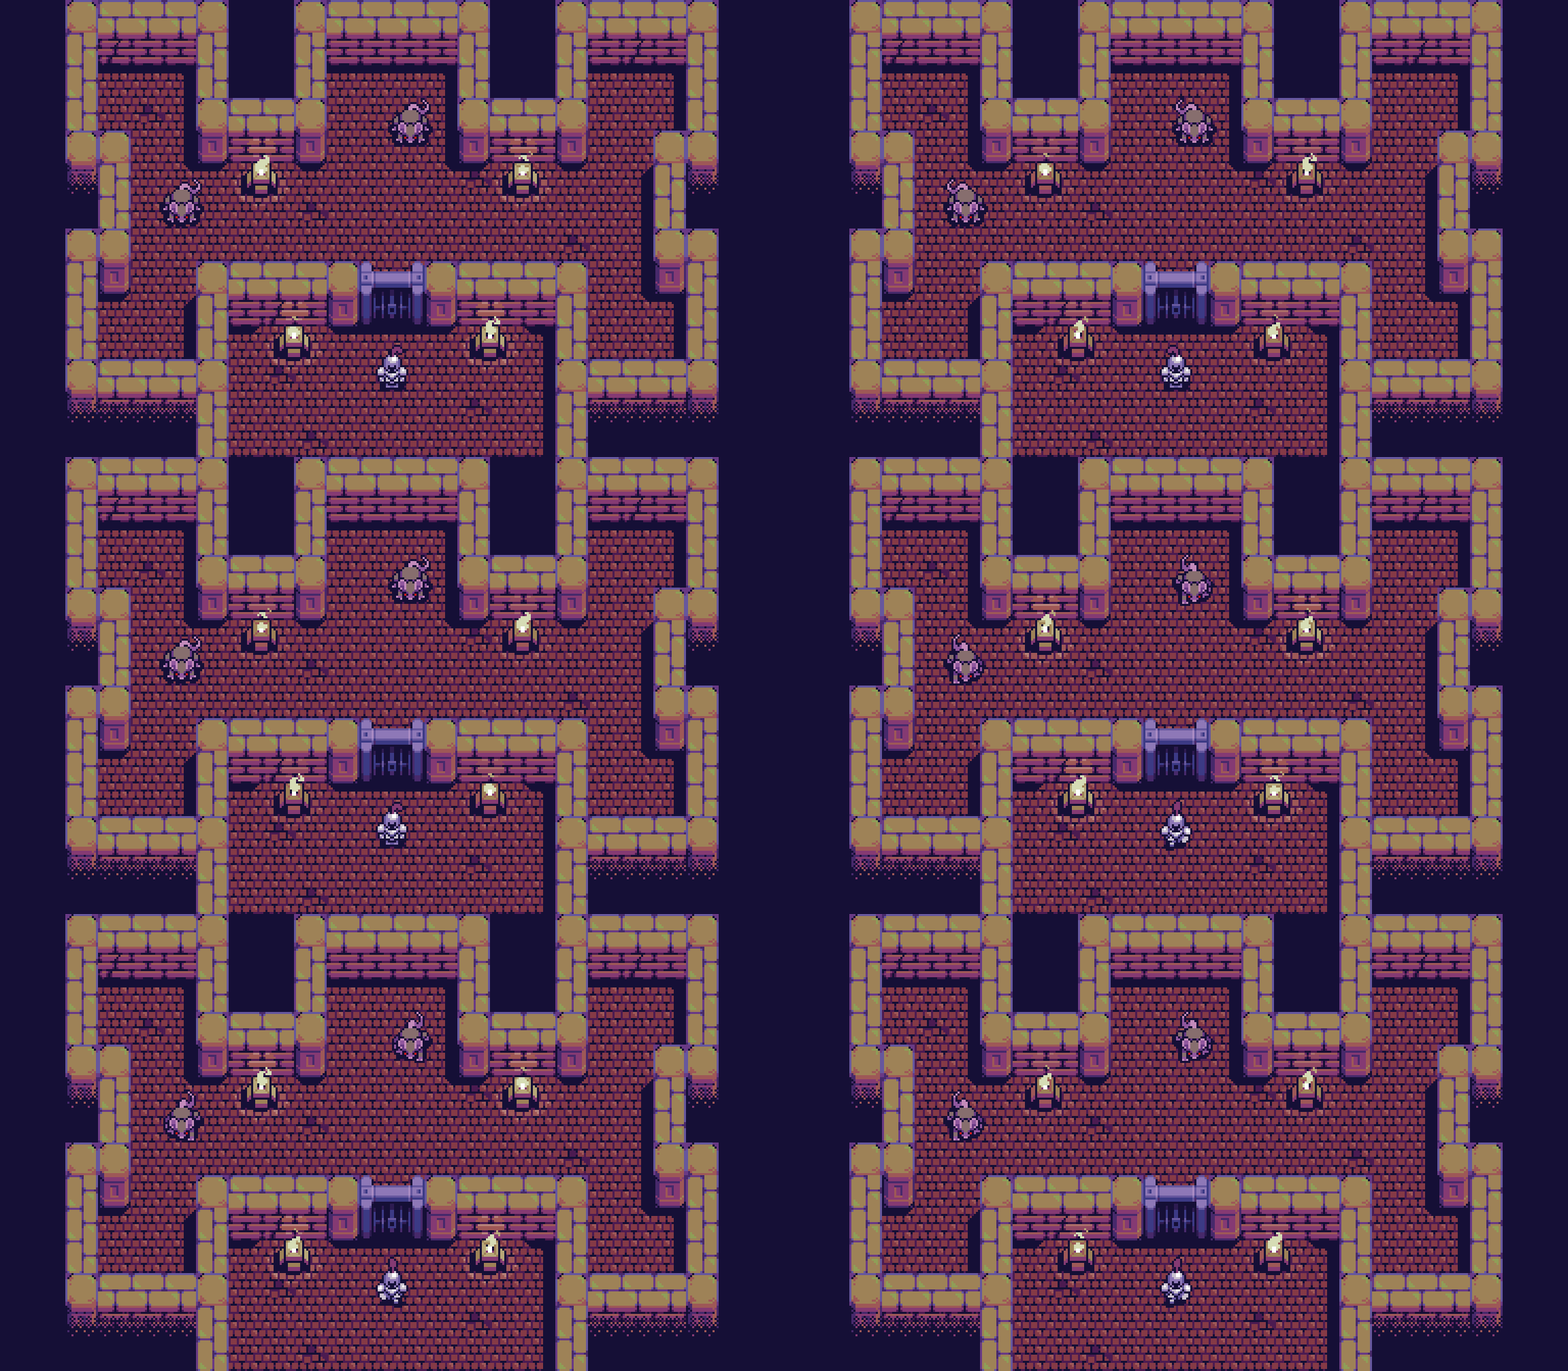
Dungeon Sprites

Now that we have a complete dungeon environment, let’s give it some life with some proper sprites. First, we have a brave pawn. Is he friend or foe? You make the call. Next up, a pesky overgrown rat I’m sure few would be upset to see slain. Four frames gets the job done for a serviceable walk/idle animation. Simply adjust playback speed to vary from idle, walk, and run. The above examples are playing at 0.2s per frame.

Lastly, is a raised fire pit to give our dungeon a little light, and a surprising amount of ambience. Fire is a such a dynamic phenomenon it allows for a broad range of abstract visual interpretations. I generally stick to an S shaped overall flame that whips into smaller S particles. The main flame shape is approached similar to a flag animation, but flowing upwards, tapering. and breaking into particles. Anyway, I feel any written explanation pales in comparison to analyzing and actually doing. Give it a try! The fire in the above example is animated with 6 frames each played at 0.1s, while the flickering highlights play at 0.05s.

FINAL THOUGHTS

Well, I think everything has been laid out and set in stone. I suspected this would be a fun subject, but I didn’t expect a study of simple brick patterns to quickly become a full fledged dungeon environment with several variations. Now I understand why so many classic pixel art games use a lot of brick. You only need a handful of tiles to make a whole level. What I’ve presented here lays the foundation for many plausible game concepts. A procedural bump combat RPG? An action based loot driven dungeon crawler? Hopefully, I’ve inspired and given some seeds to grow your next great idea from. Like with all art, doing is so much more powerful than being told. Try as I might, some insights just can’t come through words. Best I can do is show you pretty pictures and motivate you to go for it. Go through the tutorials, and try to create your own designs to discover the joy of brickwork.

RESOURCES

Please consider supporting my work by becoming a Patron. Among many other rewards, Patrons can access resources to compliment my tutorials. But most importantly, you allow me to continue making new content! 

Alternatively, you can support me by making a one-time donation

Assets featured in this Pixelblog are available in Brick Dungeon Asset Pack

Source files used in the making of this Pixelblog are available in Brick Dungeon Source Files

Get caught up on all my downloads

You made it to the end of the article. Thank you for reading! 

-By Raymond Schlitter

Pixelblog - 44 - Top Down Trees by Raymond Schlitter

Intro

Stoic sentinels of the field plant their roots where they stand to hold vigil between sun and earth for generations. These mighty servants of nature generously provide both shelter and sustenance to all manner of crawling, flying, and slithering forms of life. Beautiful in its breadth of greenery, for both form and goodness of provision. Wether standing among like kind in a sea of green, or a singular keeper of a field, reverence should be held for these wooden guardians. From tiny seed of life to towering giant, all miracles of nature are symbolized in this great gift from god we call tree.

As I write this in late May I’m inspired by the rebirth of green life surrounding me. Celebrating the season of photosynthesis, I present a completely tree themed Pixelblog. Particularly, this lesson focuses on top down designs using a highly efficient modular method I first explored way back in Pixelblog 2. In this update I refine and expand on the technique with a variety of leaf styles, and the introduction of the conifer tree.

Deciduous Tree

It all starts with a bundle o’ leaves.

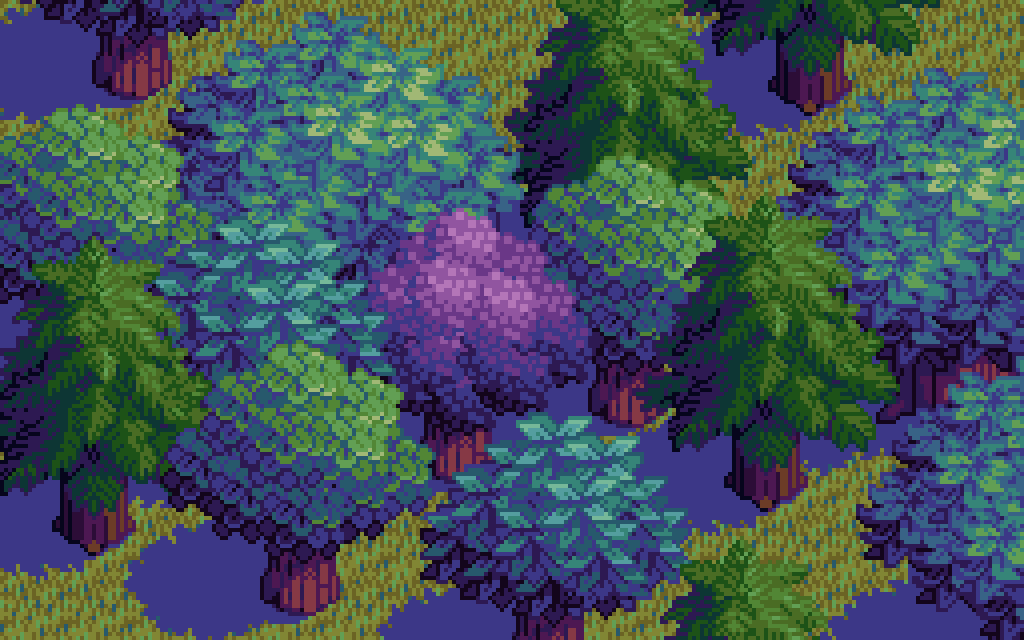
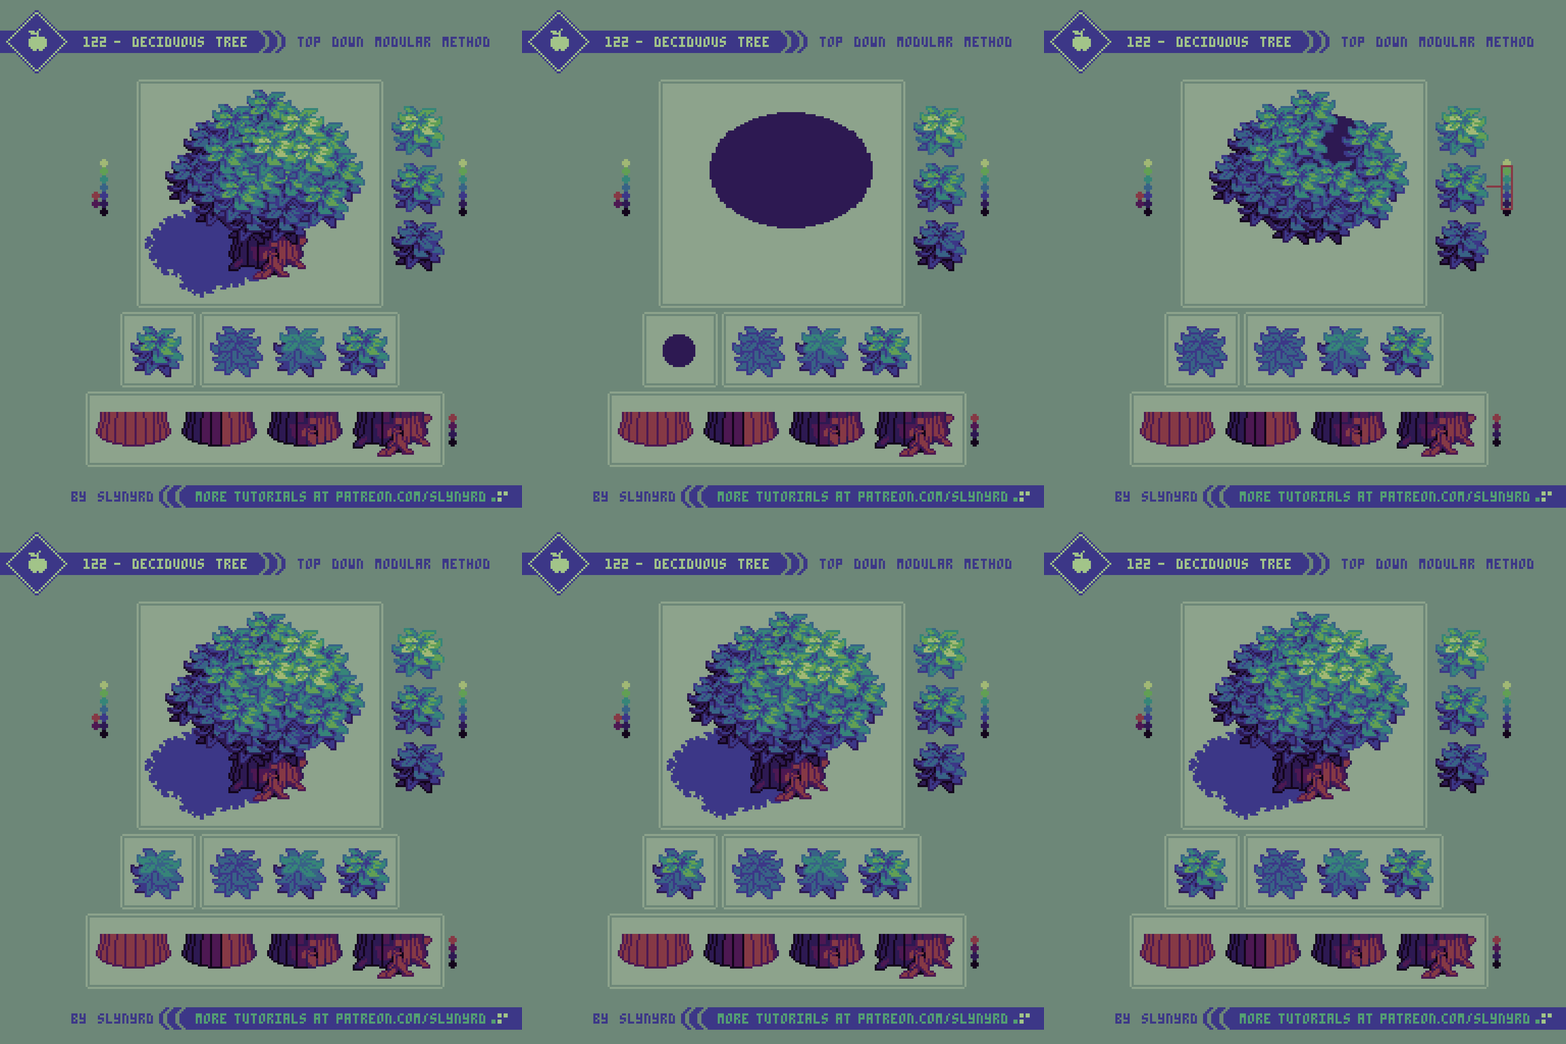
The goal here is to create a single textural unit that comprises all the foliage. Seems easy enough, but great care should be taken with the design of this bundle of leaves. Leaf shapes should be varied but consistent in form. The best way for me to stay consistent is to base the leaves around a basic geometric shape. In the above example, the base form is a trapezoid, specifically a rhombus. Subtle modifications give a touch of waviness for a more natural feel.

The repetition of similar forms is key to maximize the clarity of the texture, while even balance among the distribution of shapes helps hide the pattern that may result from repeating the bundle. That is to say, any uniquely shaped, or sized clusters will draw the eye, making the repetition of the bundles more apparent. Clusters consistent in shape, size and spacial distribution are key to achieving a pleasing overall foliage texture when the bundles are combined. Also, avoid making the bundle itself an awkward shape. Even ball shapes work great for me.

I start by making one bundle of leaves with medium color values. Construction of the bundle can be done with a variety of leaf shapes on separate layers. This allows flexibility to move things around and reorder layers until satisfied. Once I’m happy with the design, I make one darker variant and one lighter variant by shifting all hues up or down a notch on a shared color ramp. With these 3 color variants, I can layer the bundles in a natural fashion according to an implied light source, resulting in a mass of foliage with convincing 3D shape and depth. Take care of unsightly clusters and stray pixels as a result from overlapping the bundles. Placement and layer order of the bundles requires a fair amount of experimentation to find the perfect arrangement with minimal noise. Ultimately, the core bundle is fundamental to the appearance of the final tree. If you are unable to find a pleasing arrangement, it’s likely an issue with the design of the bundle. If the bundles are well designed it should be possible to create a perfect mass of foliage with no extra touch ups needed.

After that, the final step is adding the trunk and a drop shadow. The trunk is pretty straight forward, but if you have trouble visualizing it, start with a basic cylinder and add striping for the bark. The striping should be widest in the center and narrow towards the sides of the trunk. Break up the lines here and there, add a knot or an errant root for organic details. Size and orientation of the drop shadow is determined by the light source. It’s most practical for game design to center the shadow directly under the tree, so that it doesn’t run into other assets, but I like to cast it off to one side for a more dynamic look. Any issues this causes can easily be addressed with layer ordering.

Leaf Styles

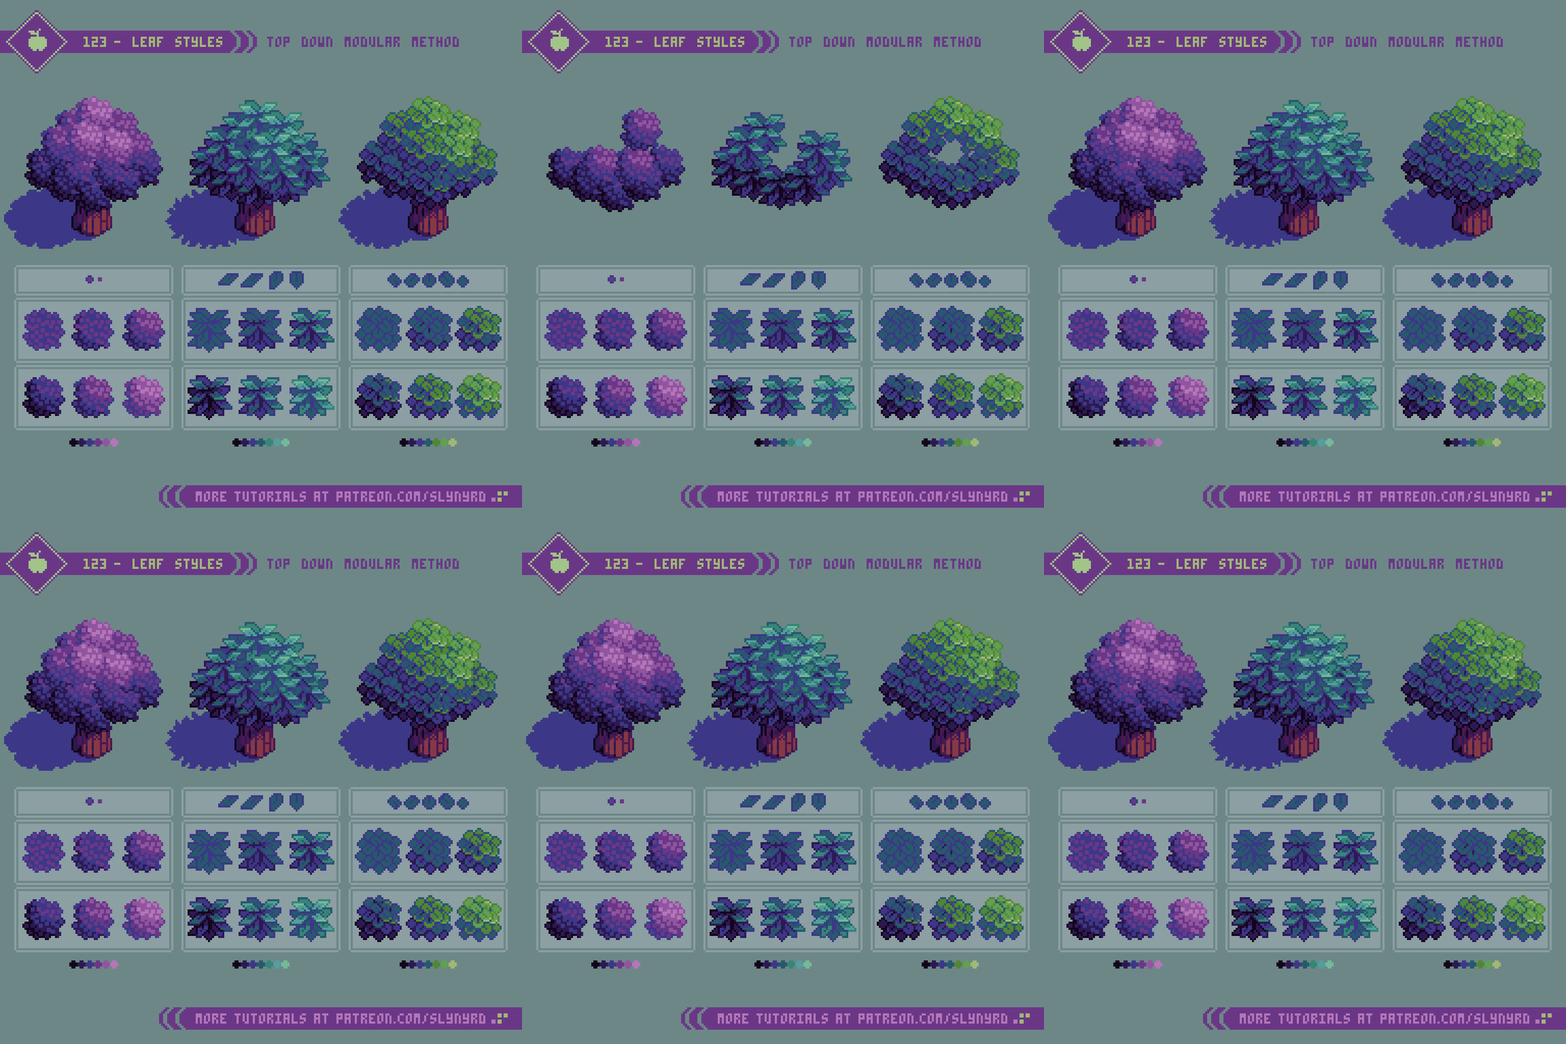
Now, let’s take the principles of the modular method and see how it holds up with different leaf styles.

The first example above utilizes a small 2x2px square as its base geometric unit. I allow the squares to touch in places but avoid overlapping, so that the square unit prevails even when new clusters are formed. Although there is little variation from this base square, the small size and simplicity of the shape prevents the texture from feeling tiresome. This texture works great to represent any vegetation with small leaves, or can appear as flowers determining on color.

The middle example is a more pure version using trapezoids like in Tutorial 123, however subtle wavy modifications are not applied here, resulting in a sharper, geometric texture. The sharp shapes clearly describe the leaf orientation and should be positioned in a natural manner, so they are pointing upwards at the top of the bundle and rotate downward towards the bottom of the bundle.

The last example above represents round shaped leaves by using circles as the base geometric unit. Orientation is slightly less critical here than with the trapezoid leafs. However, it’s a bit tricky to preserve nice circle shapes and still keep the bundle looking properly spherical. Coloring is critical to bring out the depth in all cases, but especially so when orientation is not strongly suggested from the clusters alone.

As for the coloring, I approach it in the same way I would shade a circle to look like a sphere. In all above examples, I start with making a crescent shaped selection along the bottom left of the bundle and use non contiguous paint fills one shade darker on each color. Then I make a smaller circle shaped selection on the upper right side of the bundle and fill with lighter colors. After these color fills some cleanup and hand placed highlights may be necessary to better define the leaves and reduce noise. 4 or 5 colors per bundle is plenty.

Conifer Tree

Now things are going to get a bit more prickly.

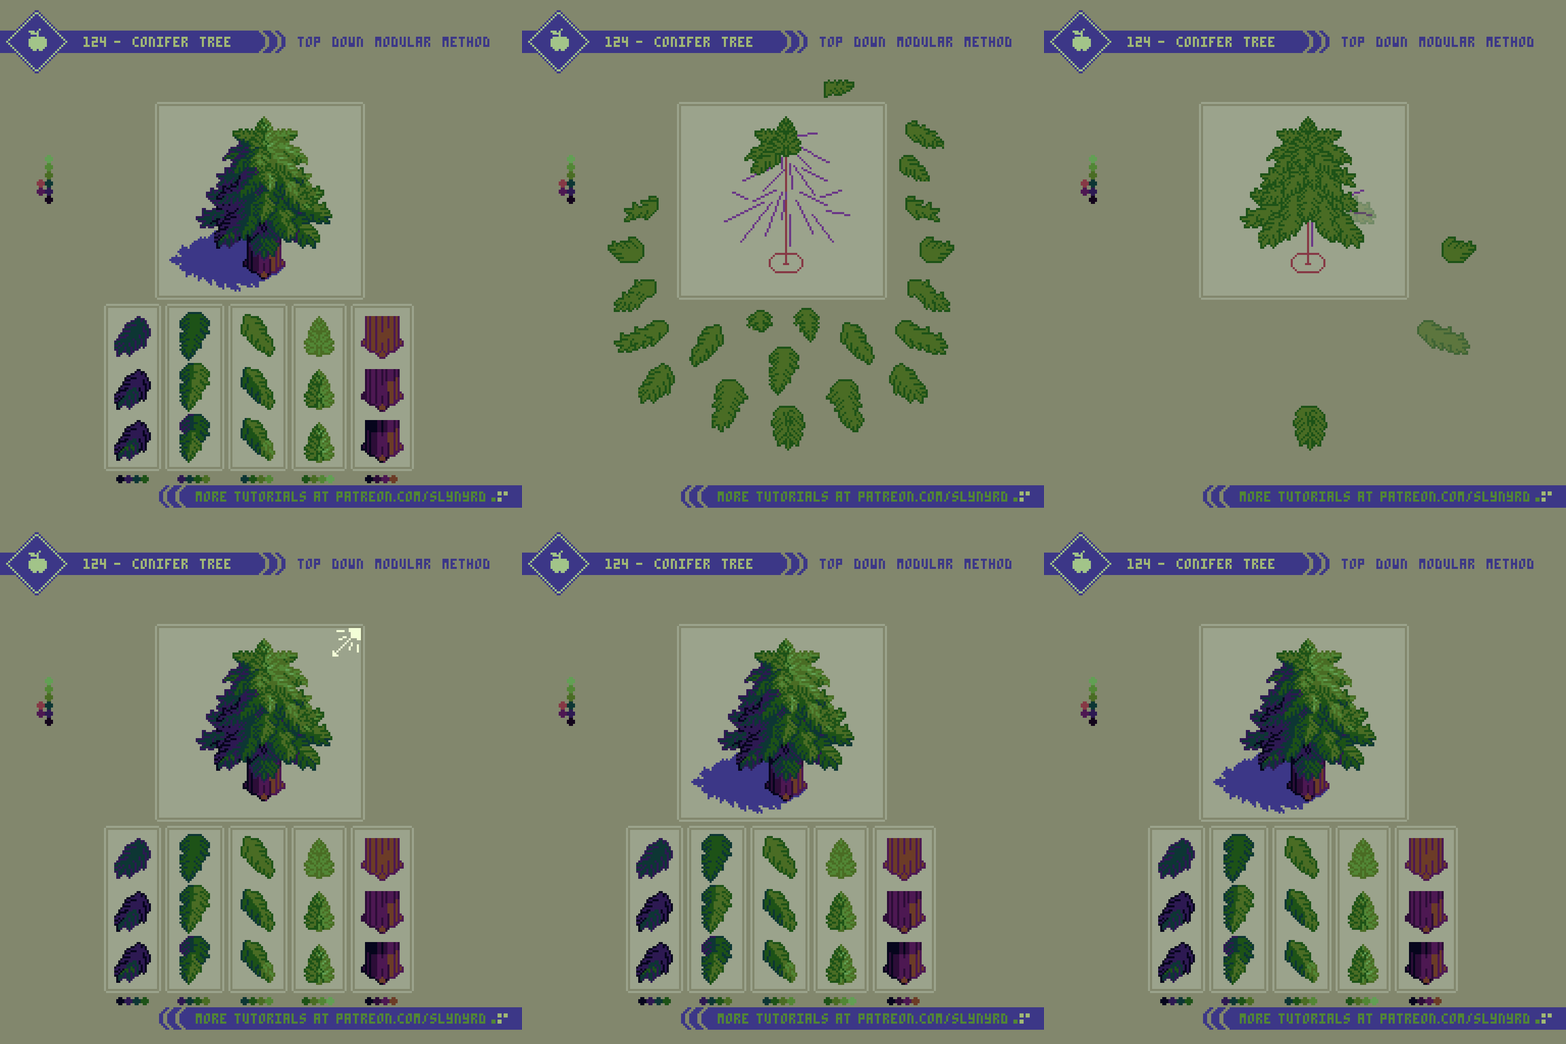
Technically, I can also call this a modular method, but it differs greatly from previous examples in that each module is unique and has specific placement. Furthermore, I cannot tout this as a shorthand for creating conifer trees, but it’s a great way to break down the subject if you have trouble visualizing the entire tree in a single layer from scratch. Personally, I’m not the best natural drawer, and it’s often easiest for me to understand a subject by breaking it down in a way that allows me to construct the image using layers. While somewhat tedious in execution, the realization of each visible branch ensures a convincing result.

Start by making a simple stick tree guide, then start making branches from top to bottom, as parts of the lower branches will be overlapped by higher branches. In my actual process of making this I started with the low branches and many of my details were covered up in the end. Work smarter not harder.

Orientation of the branches is critical to achieving a naturally shaped tree. First, make all the branches with the one fill color, and one outline color. The branches around the center are unique, but all the side branches can be reflected to fill out the opposite side at this point before shading. Once all the simple flat branches are placed, the shading can be rendered according to desired light source. Start the shading process by defining light, medium, and dark branches. The final shading details are a bit more complex than with a leaf bundle, as some branches should cast drop shadows on lower adjacent branches. Ultimately, observation and practice are the best ways to learn, so I’ll just shut up and let you look at the pictures.

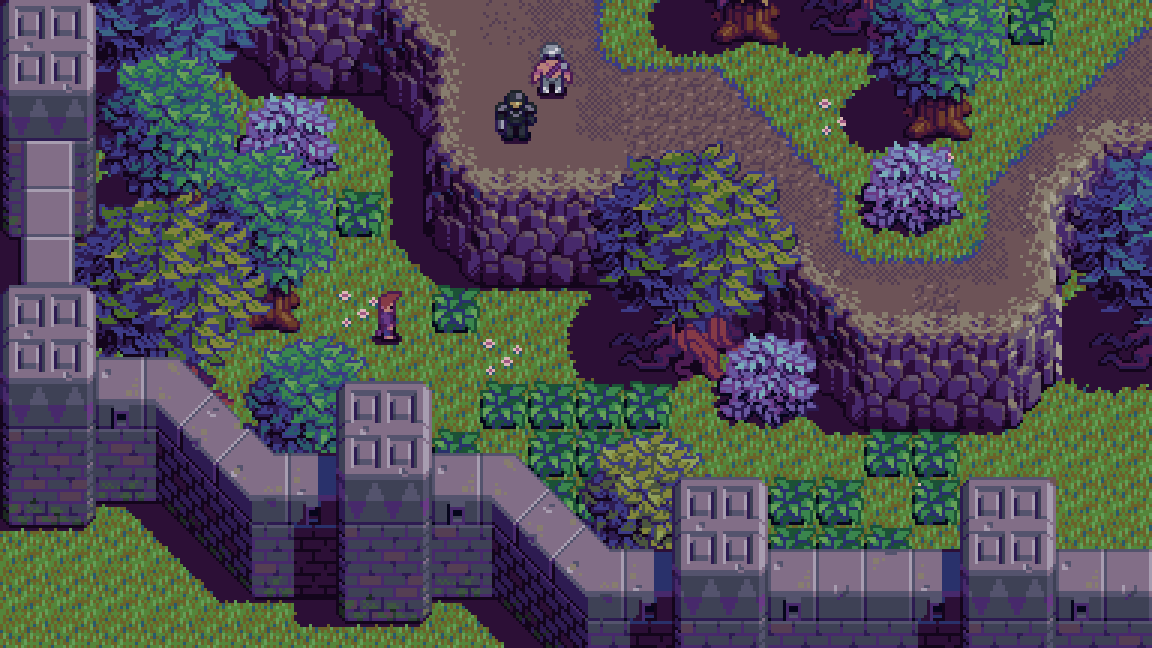
More examples of the modular method being utilized in my game project, Beast Planet.

Final Thoughts

Based on that intro, it’s clear I have a passion for trees. Part of it’s DNA, as humans have shared a beneficial relationship with trees from ancient times. However, much of my appreciation comes from growing up in a place where trees are sparse. Needless to say, it was a joy to put this blog together, but it’s not about self indulgence. We all love trees, and they are commonly featured in games and art. Furthermore, I’ve recently been designing top down trees for my game Beast Planet, and I wanted to share the evolution of the modular method, and other insights I’ve gained from practical application. While the fundamental method is much the same, compared to my first exploration in Pixelblog 2, the results looks much better this time around. This proves the importance of core pixel art skills, which I think is mostly about color choice and clustering. I hate to say it, but no matter how accessible I make my tutorials, heightened sensibility in these core skills can only be acquired through consistent practice. Maybe it’s time for a trip back to basics for a future Pixelblog.

RESOURCES

Please consider supporting my work by becoming a Patron. Among many other rewards, Patrons can download the assets featured in my tutorials. But most importantly, you allow me to continue making new content! 

Alternatively, you can support me by making a one-time donation

Assets featured in this Pixelblog are available in Top Down Nature Assets Pack

Source files used in the making of this Pixelblog are available in Top Down Trees Source Files

Get caught up on all my downloads

You made it to the end of the article. Thank you for reading! 

-By Raymond Schlitter
Pixelblog - 43 - Top Down Tiles Part 2 by Raymond Schlitter

Intro

We’ve been down this road before, on our way to the green pastures of quaint pixel art worlds. Of course, I’m talking about the joys of tile design. Originally, tiles were used to save vital memory on the wimpy computers of the 20th century. Without such limitations in the modern era, some may question the use of tiles at all. Sure, it’s technically possibly to create massive custom assets, but how feasible is that from a production standpoint? The larger the asset, the more time it takes to make. Also, consider the difficulty of modifying the layout of large images that are already baked together. What’s more, designing with tiles lends itself to that retro aesthetic we love so much about pixel art games. Love it, or hate, there is no denying the economy of using tiles to create environments. While it’s a breeze to layout environments with tiles, the challenge is actually designing a beautiful user friendly tileset. In this lesson, we’ll take on this challenge by incorporating a variety of environmental textures into one cohesive set of top-down tiles.

Grass and Dirt

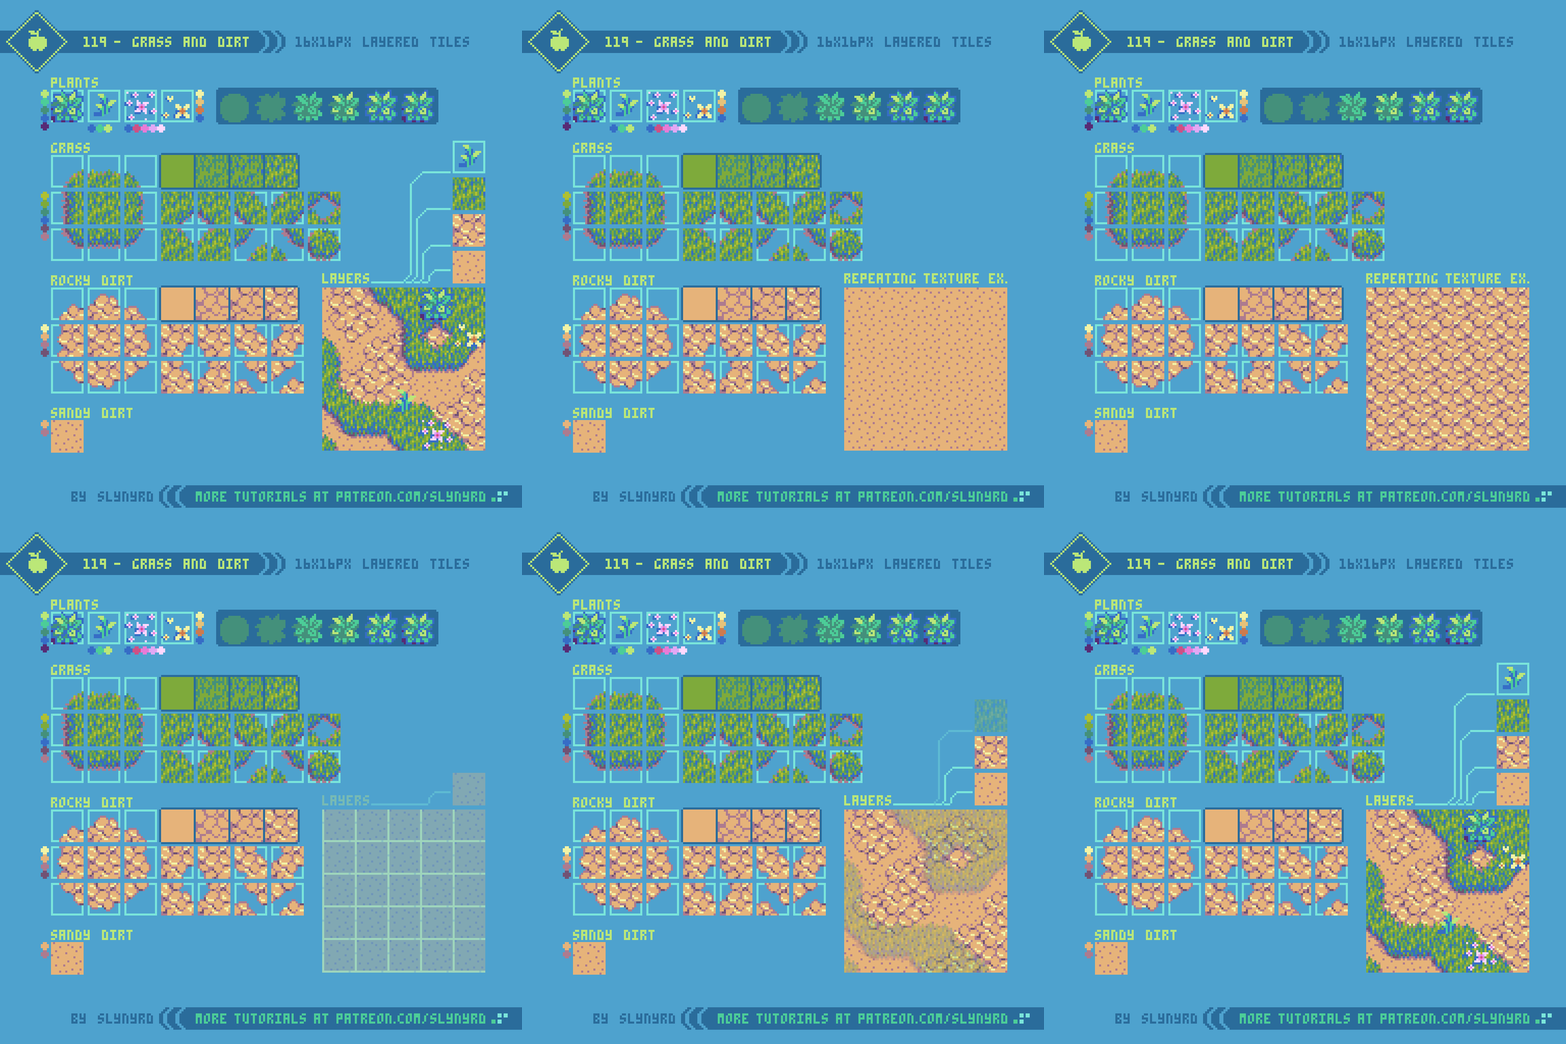
Coming back down to earth, this is not my first grass and dirt tile lesson. However, in this iteration I present a layered approach with more tile variants than my previous effort in Pixelblog 20. By removing the background from some textures that don’t fill the entire tile space, as seen in the grass and rocky dirt examples, it’s possible to layer certain tiles for different texture combos. This removes the need to have to bake together textures into their own tile variants. I think the compromise of having a few extra layers to manage is worth the trade off.

Step one with any tileset is the base repeating texture, which must loop well on all four sides. After that, all side and corner variants can be made by shaving off portions of the base texture. When creating the base repeating texture tiles, much care should be given to the visual balance. The goal is to create a convincing texture while hiding the tile pattern as much as possible. Even visual balance, and consistency in cluster work are some of the top design keys. Additionally, software effects the degree of difficulty in design. It’s critical to use a program that allows you to see tile connections in real-time as you are working, such as Pyxel Edit, or the tile mode in Aseprite. For more fundamental tile design tips, I recommend reviewing the Key Points in Pixelblog 20.

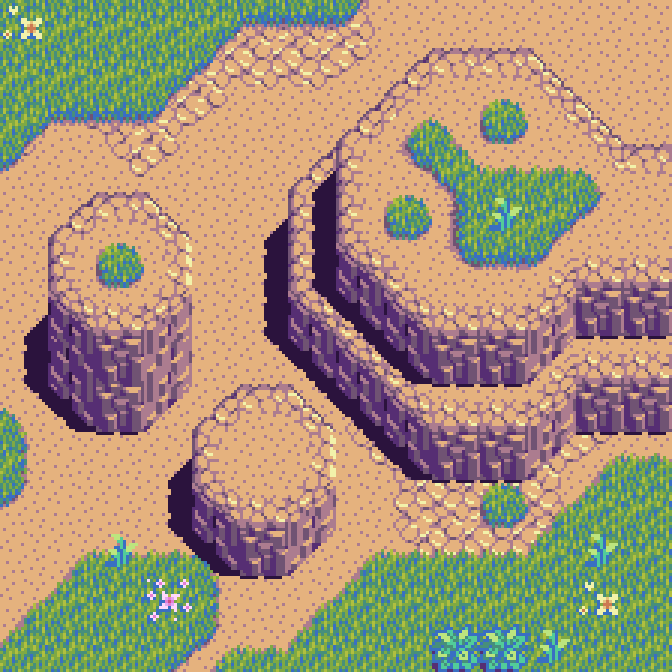
Rock Wall

I like to start a wall set with the front facing wall texture. As with a ground texture, the goal is to make it loop well on all four sides. Taking it a step further, the wall texture must also link to adjacent angled sides, wall top, and the ground.

Once the front facing texture is established, it’s not a far stretch to reimagine that texture at a 45 degree angle. Portions of the angled texture tile can then be repeated with minor modifications to create the linking bottom tile, and part of the linking wall top tile. Furthermore, the angled texture can be reflected and color swapped to create the other side of the wall. Take note of these easy recycling hacks in the highlights above.

When adding a terrace to a cliff, as in the above layer 4, the front facing angled sections lose the perfect connection with the wall texture it overlaps, Therefore, this overlapped wall texture should be changed to the proper triangle shaped tile that is designed to meet with the ground, on layer 3.

Drop shadows add essential depth, but they must be conservative in design to limit conflict with sprites and other tiles. Moreover, it’s best to limit them to one or two wall faces, minding light source, and they should not exceed a tile in length. No matter how tall the rock wall all shadows are the same length. While this is unrealistic, the effect is convincing enough to only be noticed if one really analyzes the scene. The impact of the shadows is apparent when you see an environment with, and without them. Definitely worth the effort.

Sand and Water

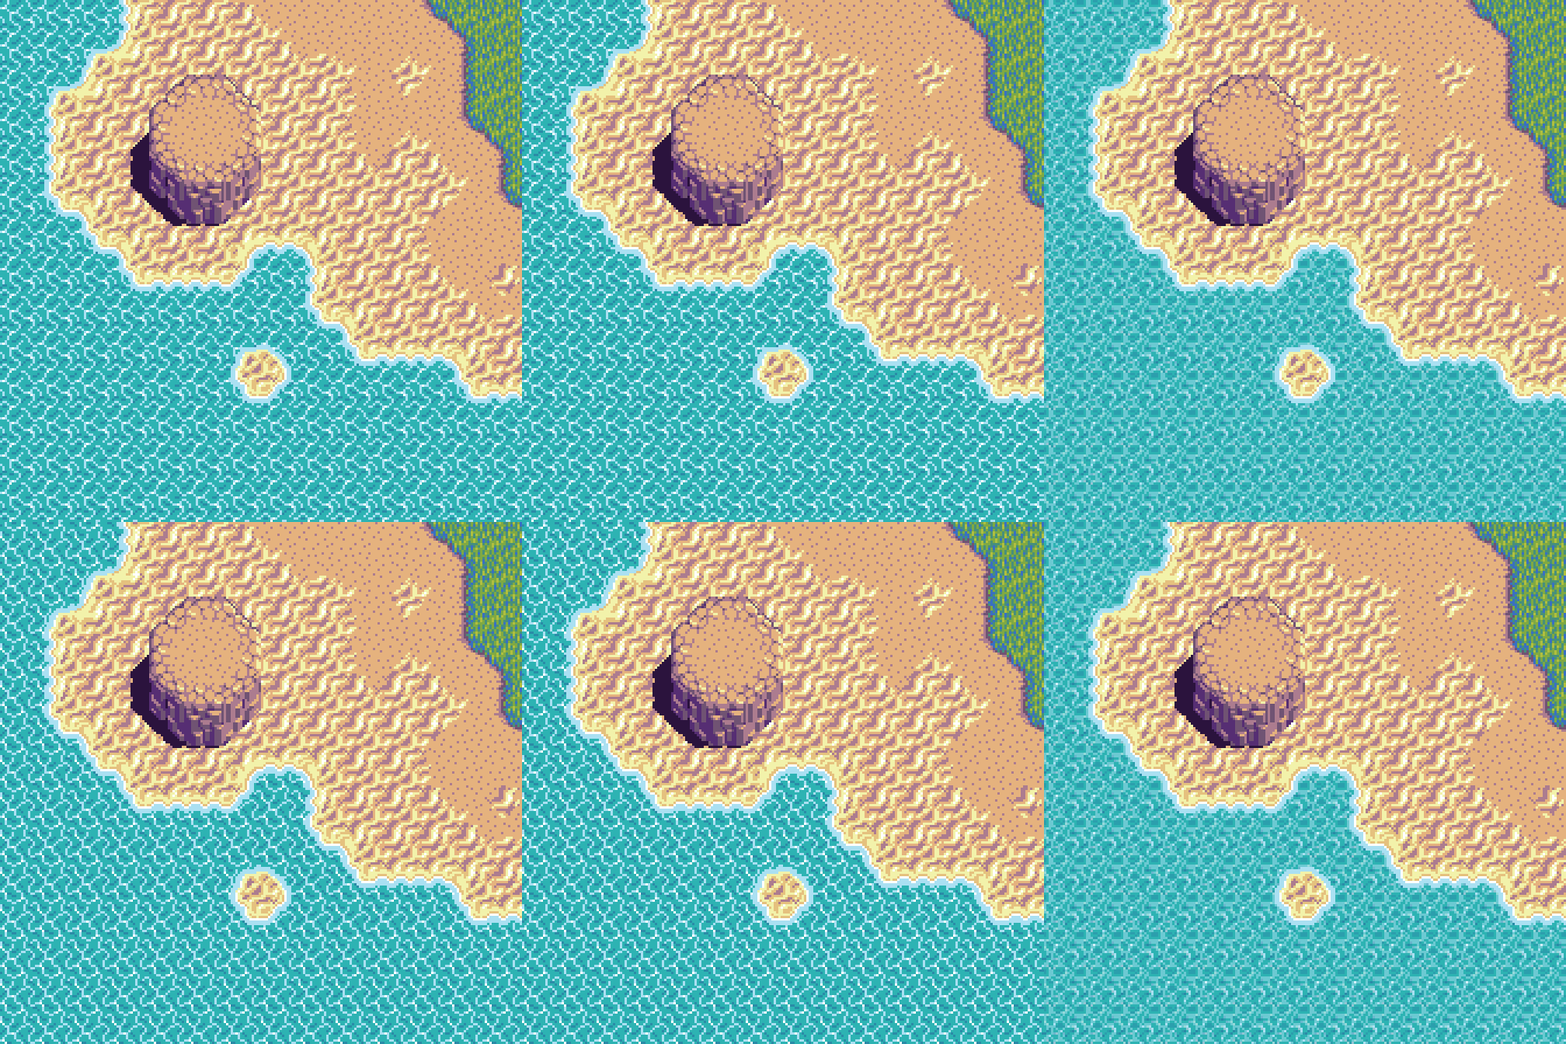
Finally, some environment features outside of the common dirt, grass, and rock varieties. I promise more unique textures in upcoming features, but I felt a refresh from the basics was in order. As for the sand texture, I like to use long angled calligraphic ‘S’ shaped clusters to create a pleasing wavy pattern. To keep things from looking too artificial, add a bit of irregularity to break up the wave shapes. If too many wiggly lines connect it starts to look like ramen noodles.

On the other hand, the water is made with wavy interconnected blob shapes that are formed by single pixel wide lines. I like to start by making one blob then draw branching lines from it that eventually connect and form a network of blobs. From here It’s good to break up the lines in places to keep a flowing motion through the pattern. Lastly, add a few highlights for some sparkle, and shadows for depth. For shadow placement, make a crude drop shadow a couple pixels down from the bright lines.

To create the water animation, make another water texture tile in the same method but with a different pattern. You can then transition between these 2 frames to create a simple, yet strangely pleasing water animation. Some texture pairings work better than others. Try rotating, and reflecting the textures to see what combos best flow together.

One animation style is a hard cut back and forth from water A to water B. This may seem abrupt, but it works if the game has an overall retro aesthetic, as seen in Pixelblog 36. However, in this iteration, I add in a frame where the tile layers blend together by reducing opacity of the top water layer to 50%. I got this idea from techniques I’ve seen in old school anime. Almost laughably simple, but when used with a translucent texture it seems suitable. Note, frame timing also strongly influences the expression. Too fast, it feels like noise. Too slow, it becomes choppy. But with just the right speed, only 2 frames can be convincing.

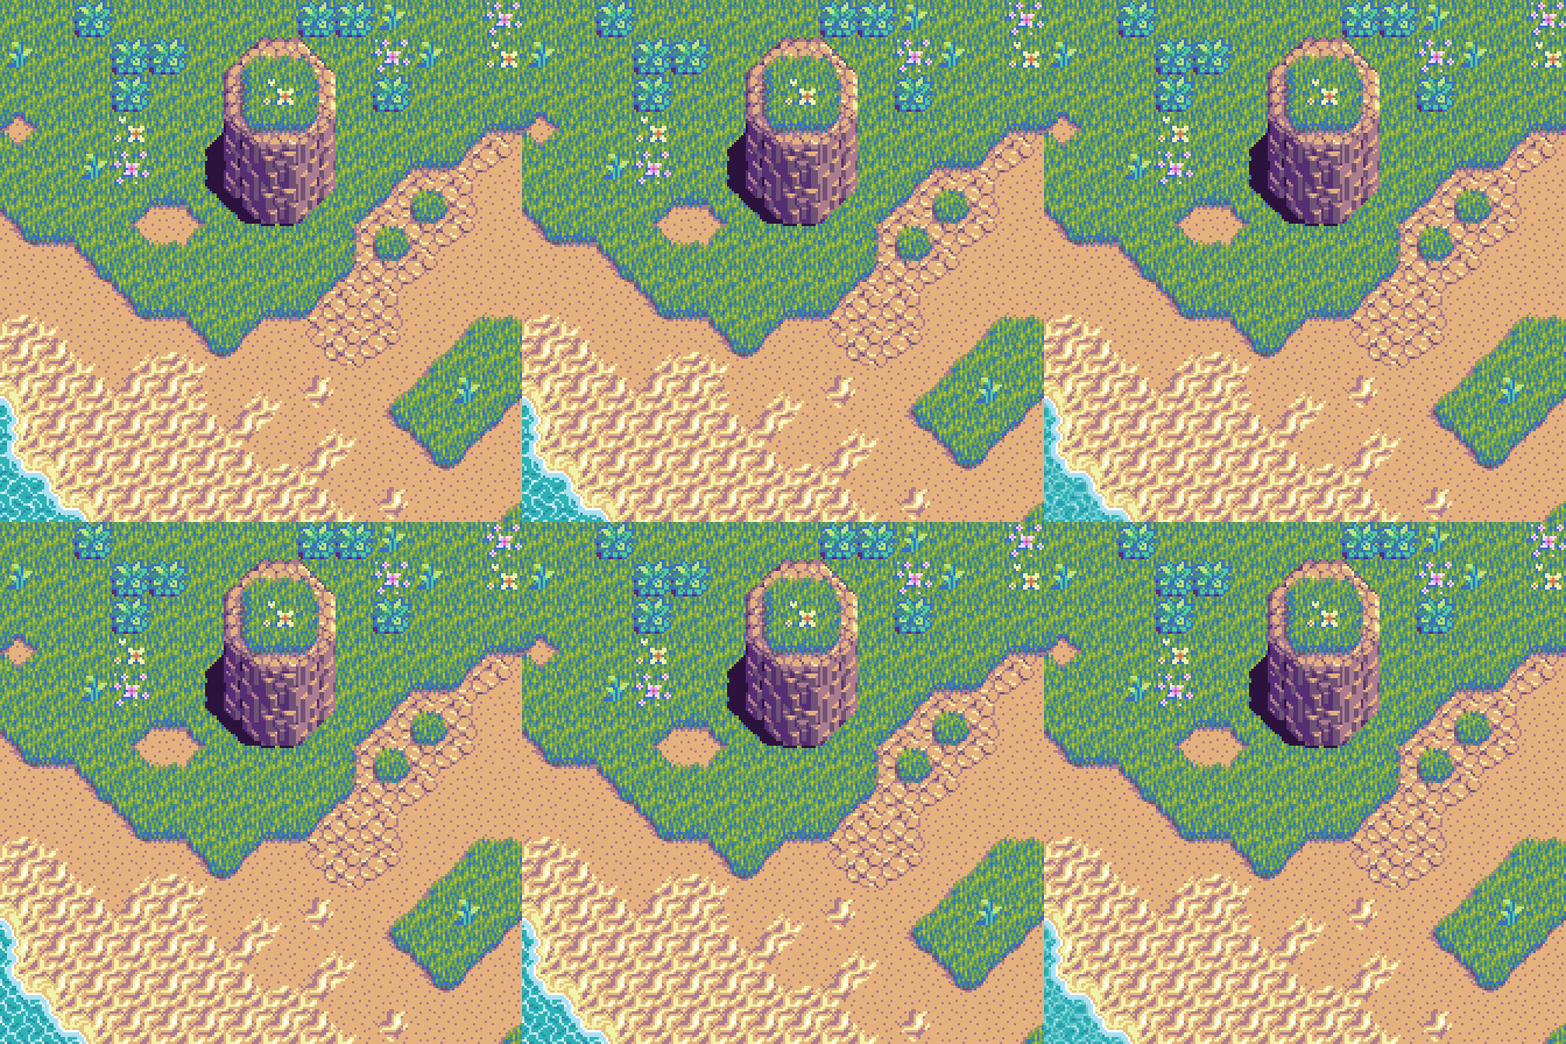
The above scene incorporates all the terrain concepts, and various texture combos into one seamless landscape. Notice how the drop shadows help integrate the rock wall into the ground, allowing a smooth connection on dirt, grass, and sand.

FINAL THOUGHTS

Tile design always starts simple but can quickly become a tedious affair. My first draft of this set was done in little more than a day, but then it took over a week to balance and smooth out all the connections. There’s a lot of trial, and constant error fixing involved when tiles have multiple connections. For example, corner tiles need to connect to side tiles, but should also connect to the other corner tiles. As with any pixel art, It’s also important to consider color and contrast for the sake of readability. To try and avoid snags, it’s smart to start with a crude template of all tiles and connection possibilities visible. Then you can monitor all connections in real time as you add details, so long as it’s done in a tile friendly application as I mentioned earlier. No matter, one is sure stumble along the way, and make beautiful discoveries just as well. I’m sure there are still imperfections in this set, and I’m aware of more orientation variants, but I try to maintain a minimalist philosophy by avoiding rare usage cases, and squeezing as much function out of a single tile as possible.

My love for creating top down worlds is apparent with several Pixelblogs on the subject now, and the intention of doing more in the future. As I mentioned earlier, I strive to bring you more unique environment studies, such as snow, ice, lava, slime, and the list goes on. Tell me, what’s in demand?

RESOURCES

Please consider supporting my work by becoming a Patron. Among many other rewards, Patrons can access resources to compliment my tutorials. But most importantly, you allow me to continue making new content! 

Alternatively, you can support me by making a one-time donation

Assets featured in this Pixelblog are available in Top Down Nature Assets Pack

Source files used in the making of this Pixelblog are available in Top Down Tiles Part 2 Source Files

Get caught up on all my downloads

You made it to the end of the article. Thank you for reading! 

-By Raymond Schlitter
Pixelblog - 42 - Cyberpunk Pixel Art by Raymond Schlitter

Intro

Coming into prominence in the 1980’s, the cyberpunk aesthetic has established itself in the visual arts over decades. With the mere mention of the word ‘cyberpunk’, one is prone to envision neon laden futuristic cities inhabited by robots, humans, and everything in between. Indeed, the aesthetic heavily focuses on city life and the cultural impact of advanced technologies. While these visions may appear optimistic on the neon lit surface, a closer look often reveals the oppression of the people by the societal structure and the very tech they are dependent on, giving rise to the famous catch phrase that best describes the cyberpunk aesthetic, ‘high tech, low life’. Furthermore, cyberpunk explores a broad range of themes, including artificial intelligence, robotics, class struggle, organizational corruption, consumer culture, existentialism, and loneliness. As an aesthetic that tries to predict the future, current expressions of cyberpunk evolve along the lines of real life tech. Frighteningly, dystopian elements from cyberpunk visions of the past have crept into our lives irl. How do you envision the next generation of cyberpunk?

Characters

It’s people and their technology that brings color and richness to an otherwise dark world composed of grimy colors.

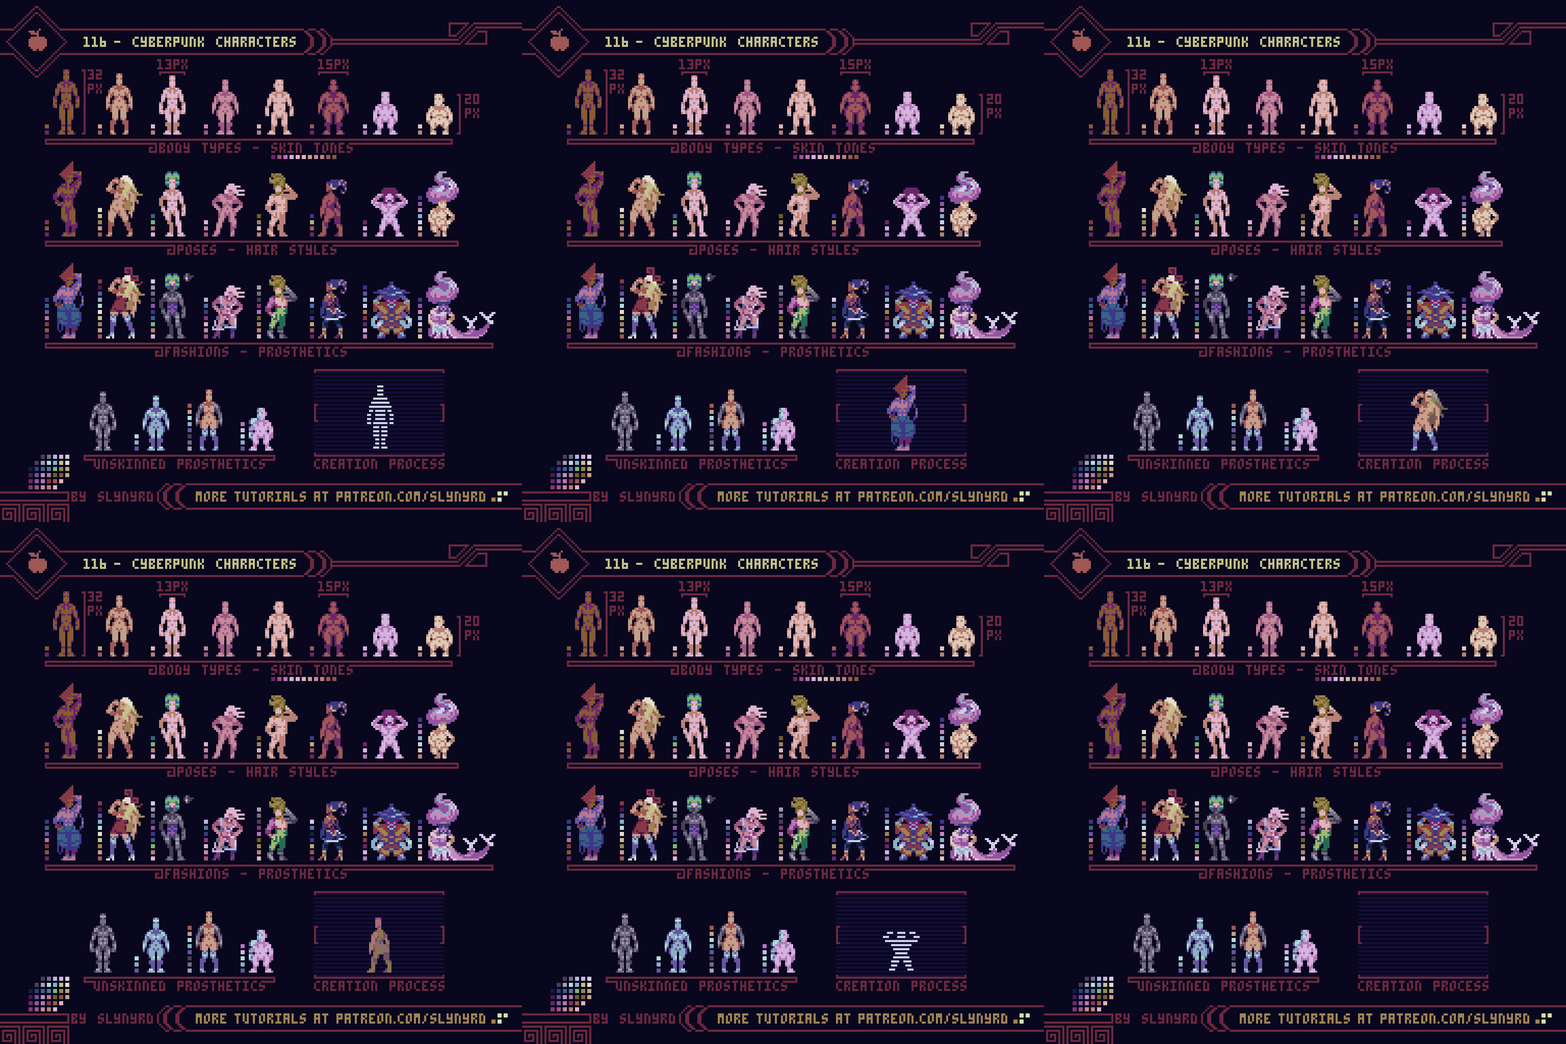
Cyberpunk characters represent a great melting pot of body types, skin tones, and cybernetic enhancements. Likewise, their fashions broadly range from baggy, identity concealing garbs, to skin tight numbers that show it all. Think of a future Tokyo, Paris, or some new imaginary city, but on steroids. In a universe that emphasizes our wanton desires and faulty egos, where does the fashion go in combination with the tech? Are people proud to show off their prosthetic body parts? Will skin ever go out of fashion?

To truly realize a character I found it best to start raw and simple, with a frontal nude. Next, you can play with different poses and perfect anatomy before finally clothing them. Working at an average sprite size of 16x32px, I was able to blob out the body proportions by eyeball. Posing takes some trial and error, but perfect placement of the pixels is never far off when working with so few.

For a more technical approach to anatomy, check out Pixelblog 17

Miscellaneous

Cyberpunk signatures that fill the streets of 20XX.

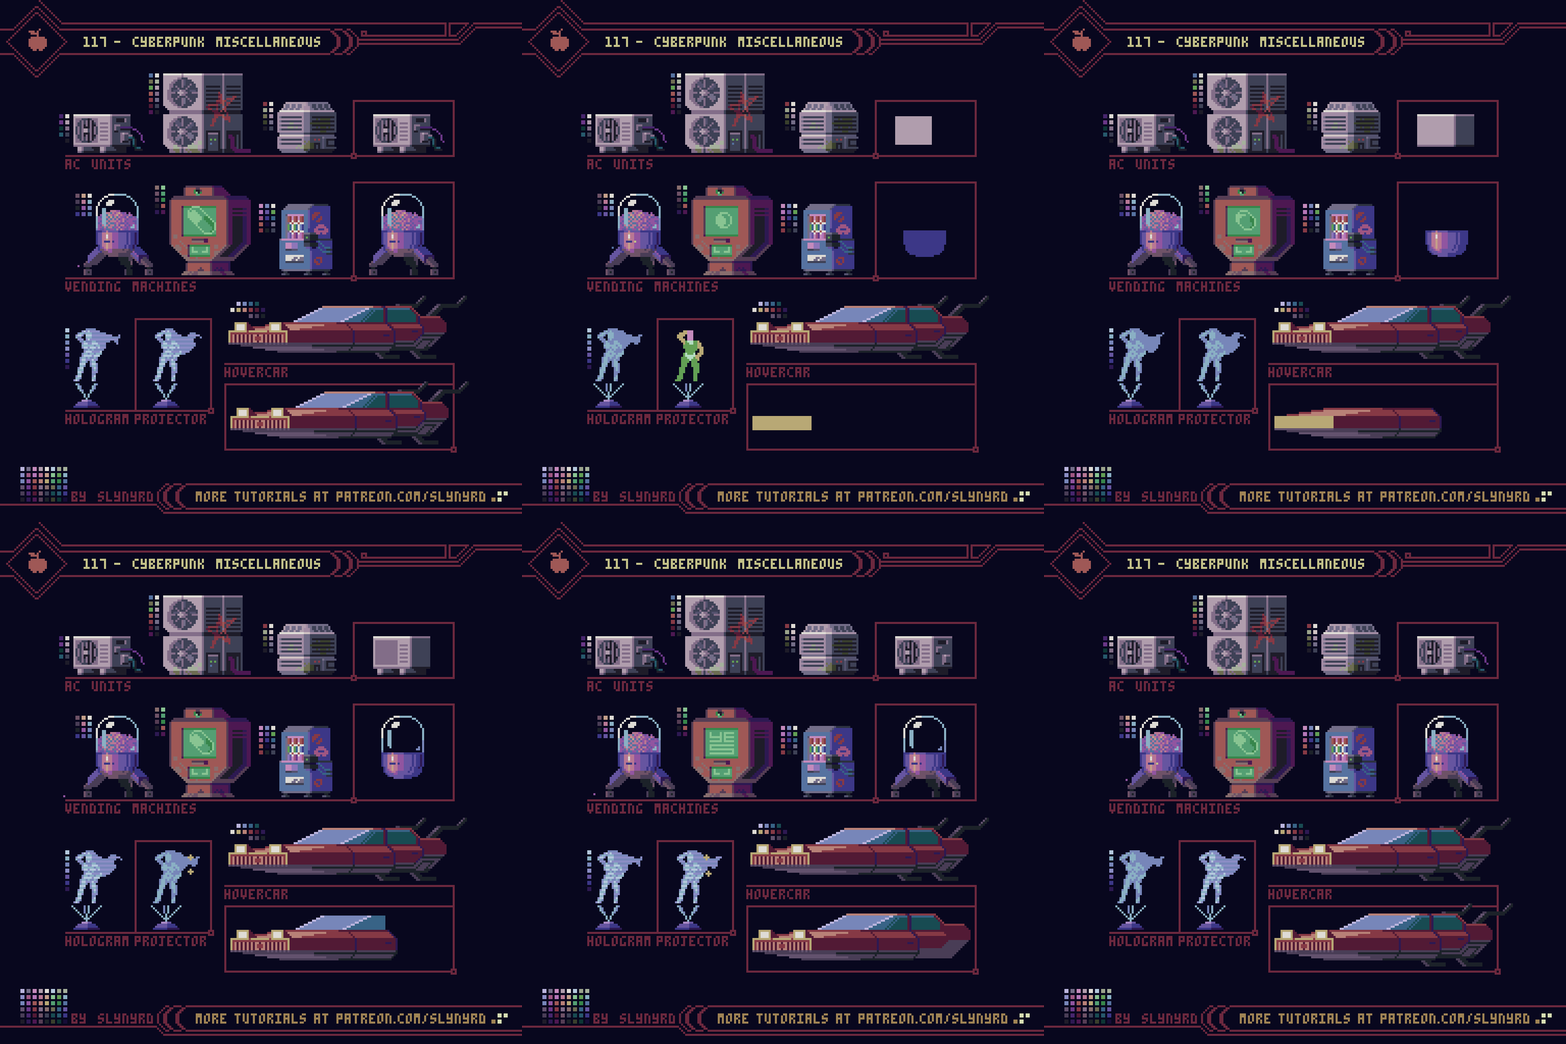
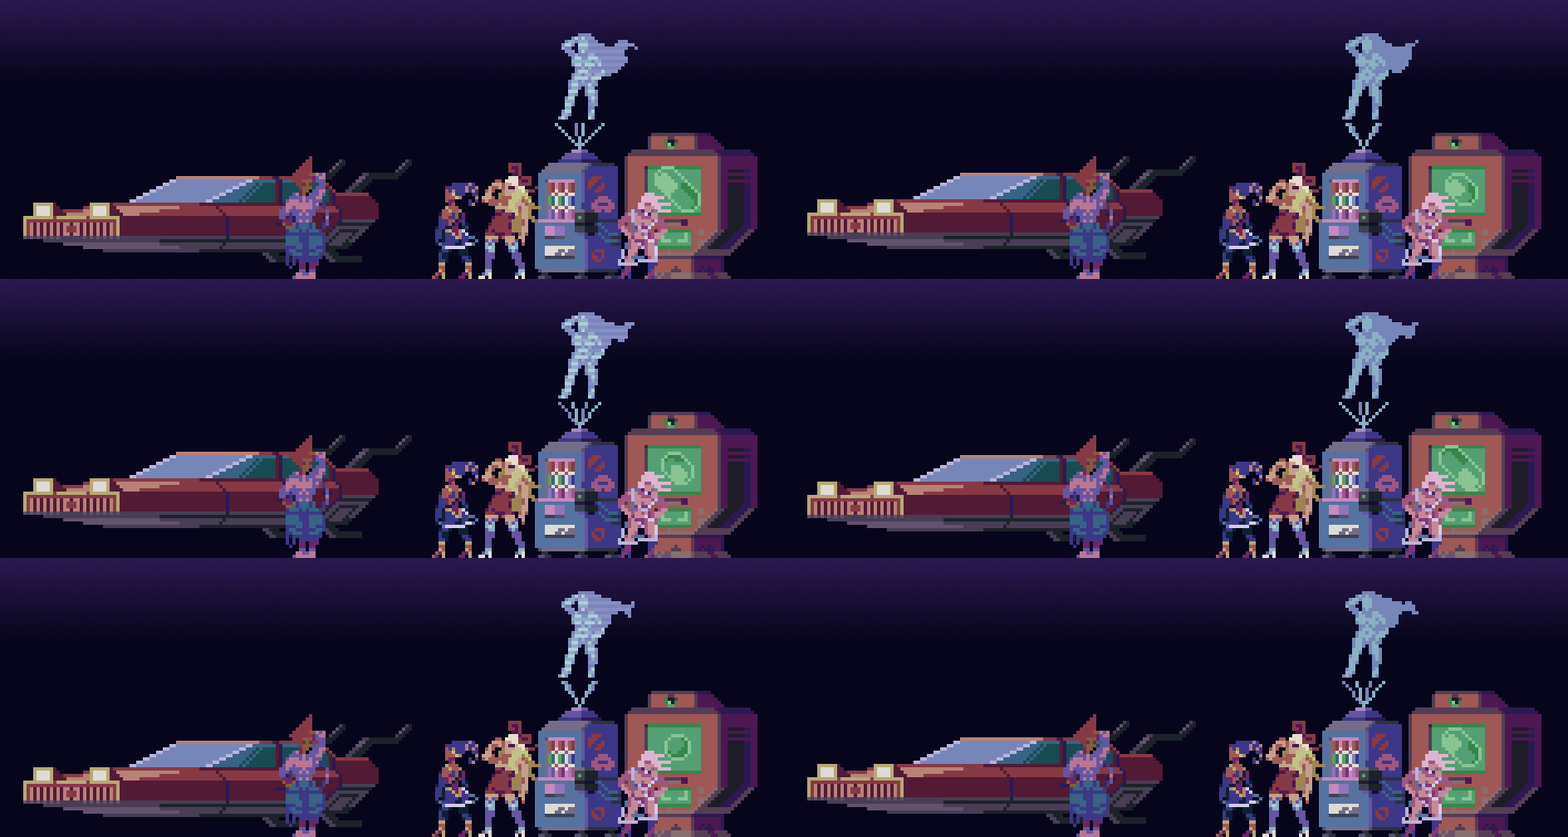
Despite the self induced environmental hazard of the city, we can only continue to live along the standards we’re accustomed to, and always consume more. The constant drone of thousands of AC units heard across the city only adds to the oppressive nature of the musky air. Flying cars add a romance to the city, but in reality they multiply existing problems with traffic, and create a whole new set of problems. The increasing need to build vertically leads to social stratification based on elevation. Down on the bottom it’s dark, filthy, and void of nature. The only color a bottom dweller sees is from a hologram plastered across the facade of stacked living cubicles, trying to sell the pill of the day, because that’s another way to see color. Up top, the aristocrats still pretend everything is fine, basked in luxurious amenities, but even they cannot escape the oppressive air of the city. The untenable nature of it all is felt among the few remaining individuals, yet the soulless collective grows everyday.

Crazy kids these days don’t even know what a tire is, let alone how to change one.

Buildings

At first, we celebrated our modern monuments. But over time, they blotted out the sun and became a prison. Eventually, the past was forgotten, and the people took comfort in their own cancer.

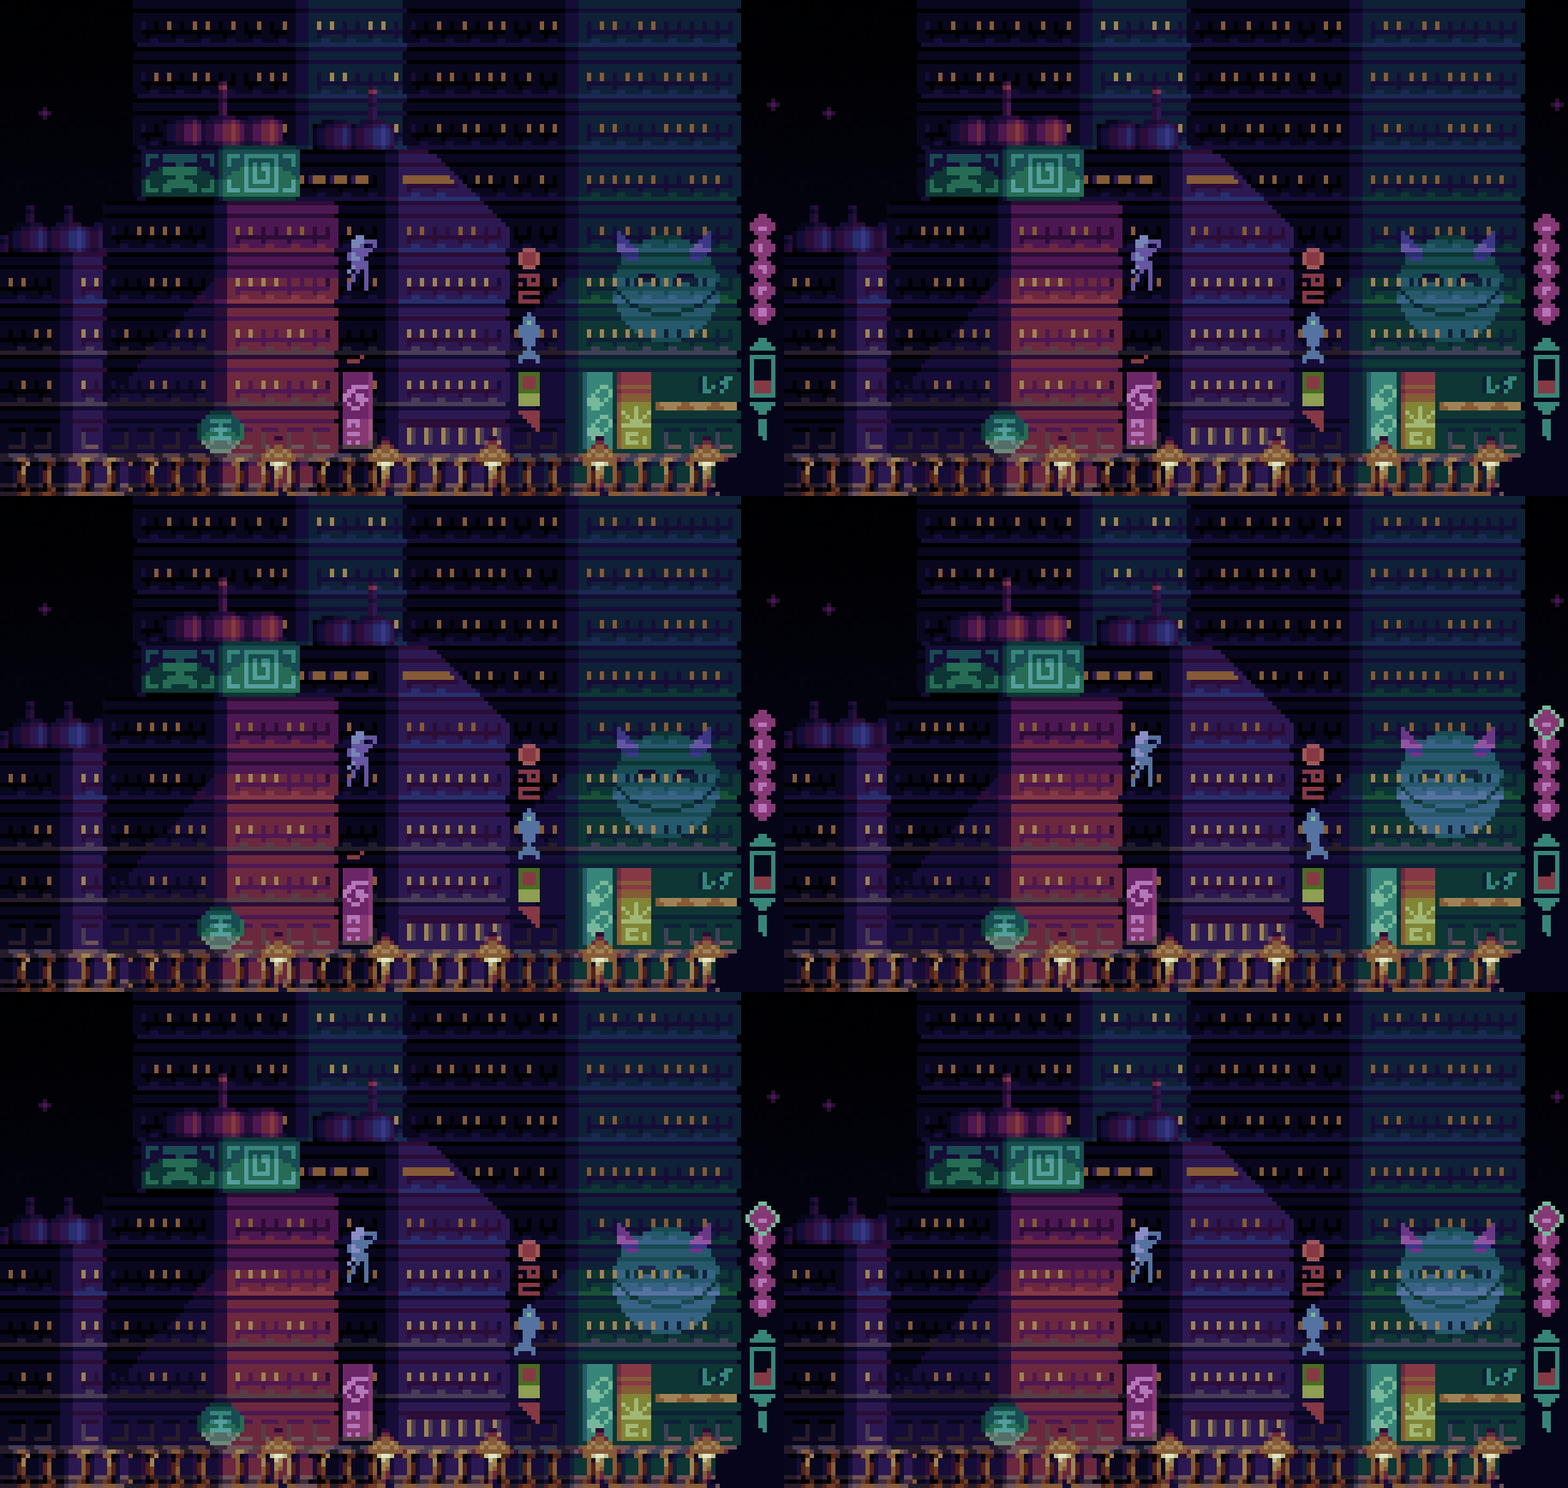
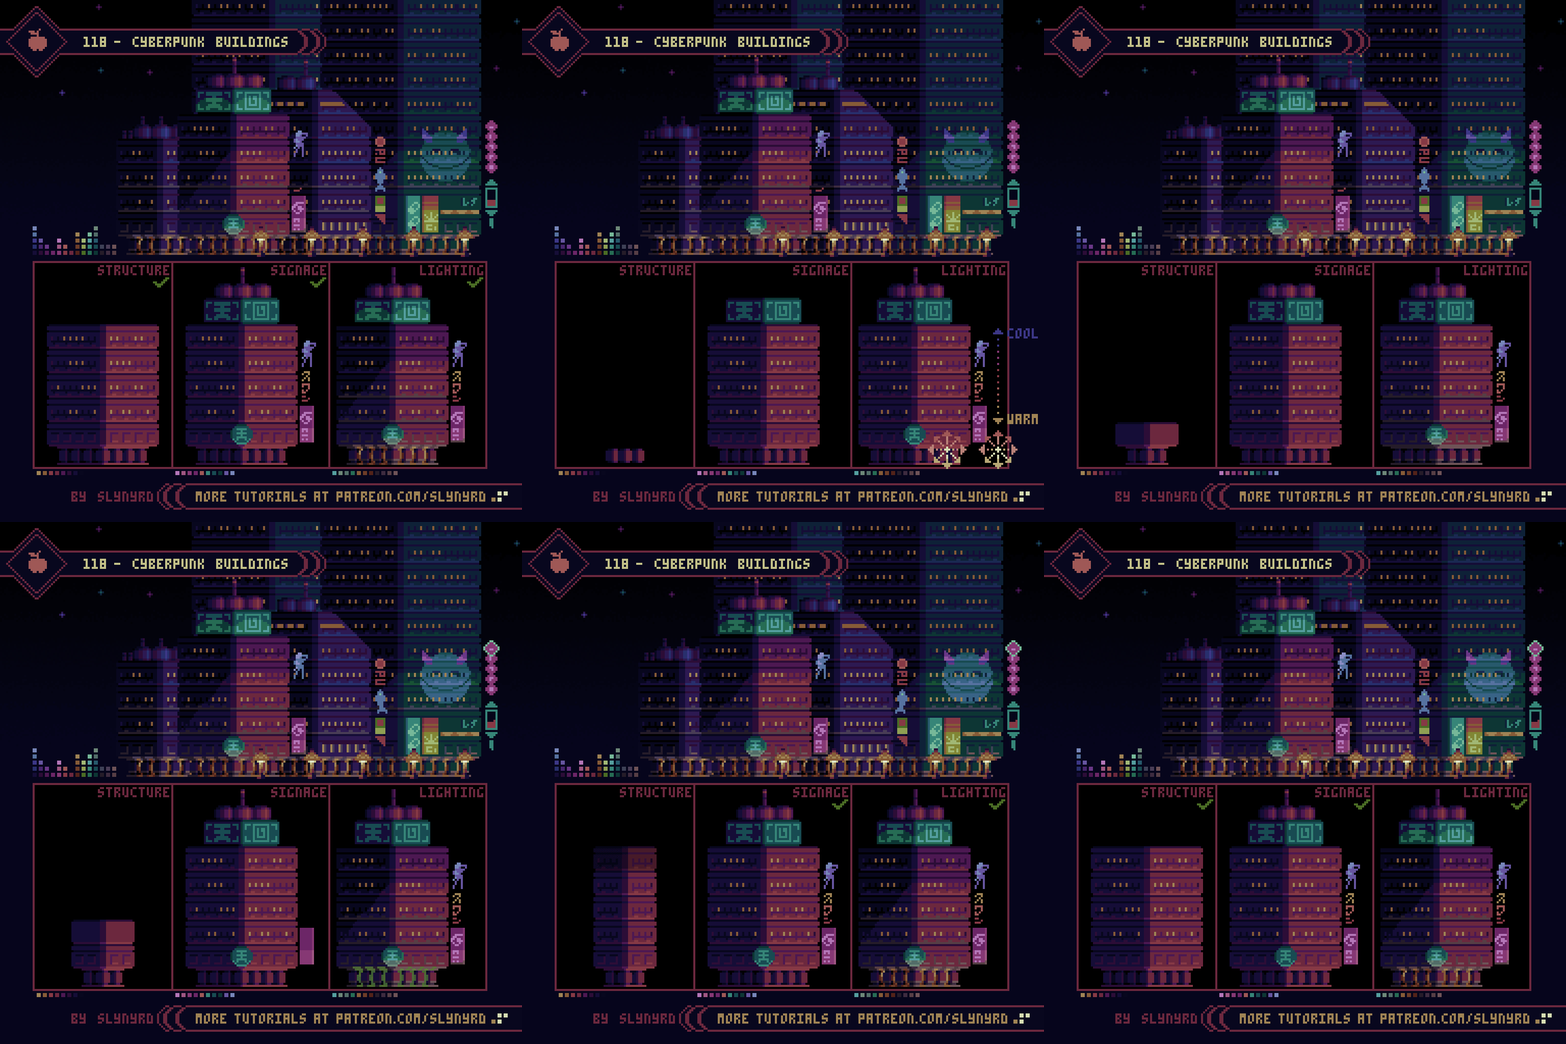
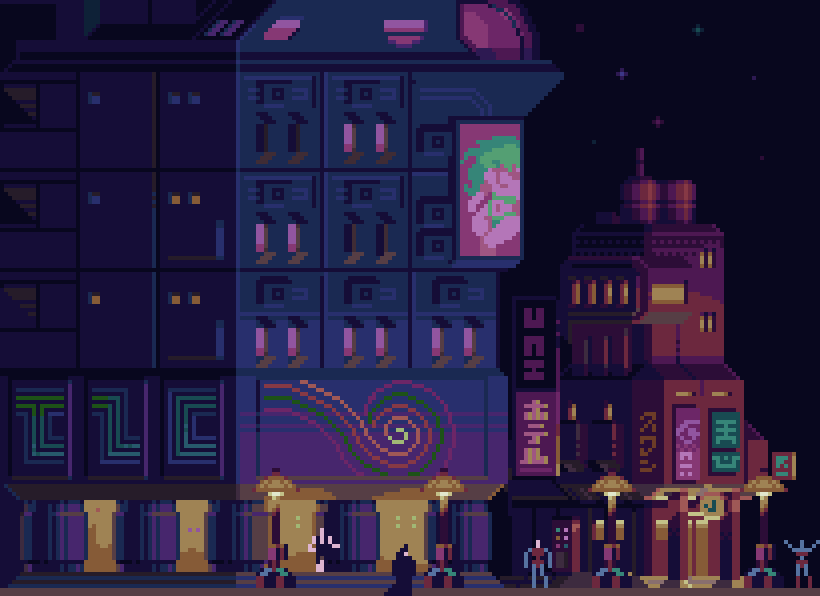
While there is much room for architectural innovation in cyberpunk, I chose to keep the basic structure of my building simple to clearly illustrate the lighting effects. Convincing night lighting, and plastering everything in neon are the main ingredients to capturing the cyberpunk feel. The base cyberpunk environment is usually made up of drab browns and grays while the color infusion comes from lighting, and neon signage. I chose more distinctive colors for my buildings while incorporating atmospheric lighting to get a little realistic grit. The main light source comes from the street level, provided by street lights and the general glow of shops and neon. Note how the surfaces facing downward on the lower portion of the building use warm desaturated hues. This is to pick up some of the ambient color coming from the dull dirty streets. Naturally, the street level light source loses its luminosity with distance, which is represented by vertical color gradation on the sides of the building. Since the street light is warm, while the cool night sky rests above, the color gradates from warm at the bottom, to cooler with elevation.

Save time by designing the building with a modular approach. Like a real building, I design with single story block units that can be duplicated to expand the building to any size. After realizing a whole building with logical layout and proportions, I can then go back and add variation to the overall structure. This results in unique, yet physically believable buildings.

The real fun comes with the neon veneer. Considering holograms, and the advancement of projection/display technology, anything is possible. Also the symbolism of a deactivated hologram exposing nothing but lifeless concrete and glass definitely says cyberpunk. However, there’s something about the weight and physical clutter of neon signage that’s essential to the urban jungle habitat.

Once you’ve mastered the basic buildings, you can use the same approach to lighting with more complex designs.

Final Thoughts

If you’ve stuck around this long you should have a pretty good idea what cyberpunk is all about. If you’re still not sure, go watch Akira, Blade Runner, Ghost in the Shell, and treat yourself to the fantastic illustrations of Syd Mead. These are some of the important founding visual works of the aesthetic, however, taking into mind the social commentary element, the vision of cyberpunk continues to evolve as culture and technology shift in the real world.

The emphasis on gloomy city life has long kept this country boy away from dabbling much in the aesthetic with my pixel art. But after a deeper study I think I’ve misunderstood cyberpunk. It’s not a celebration of nihilism, consumerism, transhumanism, and so on. It’s a commentary that heeds the warning of a grim future based on the technological and sociological implications of today. In this sense, it offers a beautiful playground to explore what it really means to be human. Yes, I must explore this more.

RESOURCES

Please consider supporting my work by becoming a Patron. Among many other rewards, Patrons can access resources to compliment my tutorials. But most importantly, you allow me to continue making new content! 

Alternatively, you can support me by making a one-time donation

Assets featured in this Pixelblog are available in Cyberpunk Assets Pack

Source files used in the making of this Pixelblog are available in Cyberpunk Source Files

Get caught up on all my downloads

You made it to the end of the article. Thank you for reading! 

-By Raymond Schlitter
Pixelblog - 41 - Isometric Pixel art by Raymond Schlitter

Intro

Isometric pixel art is based on the isometric projection, which is a method for accurately ‘projecting’ 3D objects into fancy 2D. Unlike perspective drawing, there is no vanishing point in isometric projection. Furthermore, the 3 coordinate axis have equal foreshortening, eliminating the need to alter lengths based on the perceived distance from the viewer. This allows one to create 3D objects that accurately describe the complete form and all dimensions with efficiency. Traditionally, Isometric projection is used for technical drawings in engineering, architecture, and the assembly guide to your Lego set. However, these characteristics also make it a perfect style for game graphics. Marry it with pixel art, and something truly special happens. Let’s make some magic.

The Basics

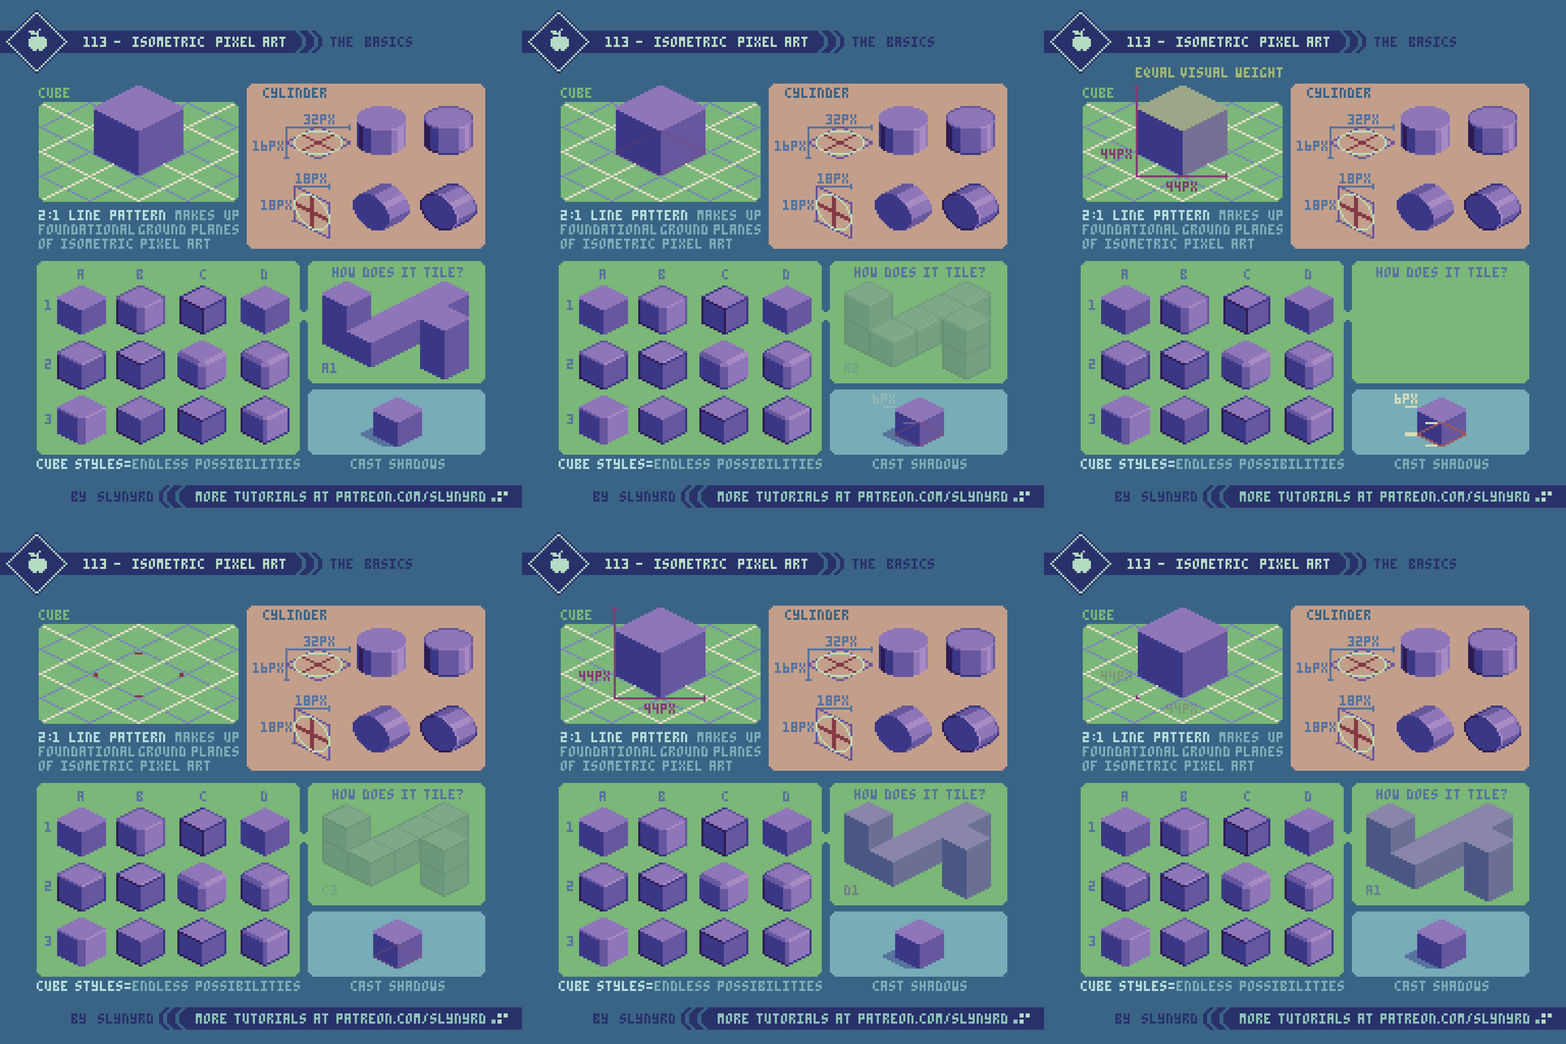
The ground planes of true isometric projection are laid out at 30º angles. Since a true 30º degree line in pixel art results in a jaggy rhythm, isometric pixel art compromises by using the 2:1 line pattern, which is closer to 26.5º. The 2:1 line pattern, or what I casually refer to as 2-step lines, make up the foundational ground planes of isometric pixel art. As long as you grasp how everything comes from a grid of 2-step lines, you can forget all the rest of the technical jargon and start banging out technically sound isometric pixel art.

The side ways circles can be especially difficult to try and eyeball. Start by making a grid from a skewed square, and cross. The circle makes contact with the square at the 4 end points of the cross. Pay attention to the shape of the cut out corners and how they reflect each other. Even with the grid it can be hard to eyeball the curves. As a Photoshop user, I draw a regular circle then skew it in free transform mode by holding option+command before pulling on a side node. Usually requires a little clean up after the transform.

Cube styles comes down to personal preference, but it should be noted some styles tile better than others. I personally prefer the look of the wide corners, as in A1. However, they require a bit of clever overlapping to tile well. D1, for example adheres more to the 2:1 grid and tiles perfectly, but those sharp corners are unnerving to me.

For more guidance on the basics, review Pixelblog 4.

Isometric Tiles

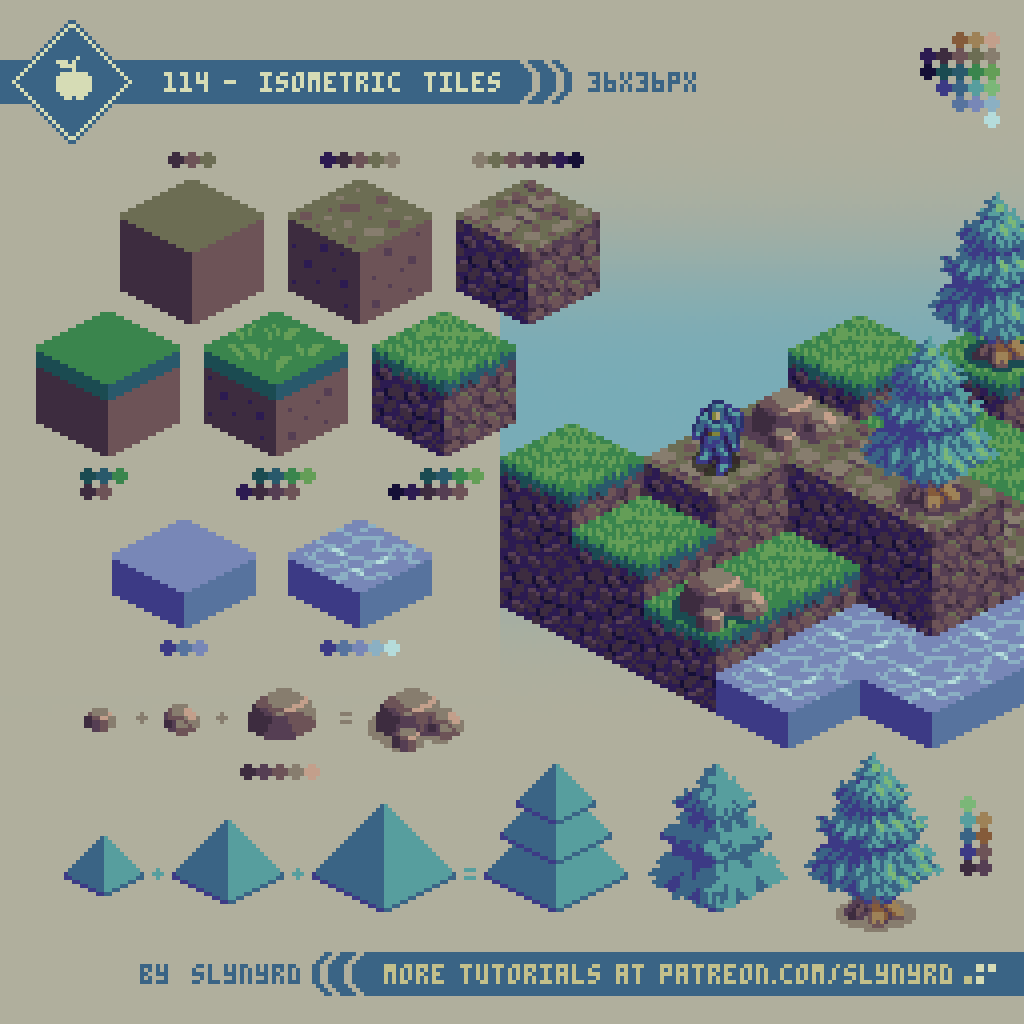
There’s a lot of variation possible with iso tiles, but it basically come down to picking out a cube style and texturing them to represent the desired environment. While it’s possible to create a complex set of iso tiles that includes slopes, I’m going to stick to cuboids, which can still make surprisingly varied and interesting environments. I use the word cuboid, as the tiles don’t need to be perfect cubes. So long as the top surface is uniform the height of the tiles can vary. You can even have tiles with no sides, but these can only go flat on the ground with no elevation. The cube is quite versatile, however, as it can be slid up and down in relation to other tiles to adjust the height as desired.

Note, the texture should be able to loop seamlessly along all 4 sides of each surface. Apply the same principles of creating a plain square tile to each of the 3 surfaces. For more tips on applying texture to tiles, check out Pixelblog 20.

The size also comes down to the look you’re going for. The bigger the more detail is possible, but the amount of work dramatically increases as well. Whatever size you go with, even dimensions are your friend. I arbitrarily ended up with 36x36 pixels based on the relationship with the sprite designs.

The tutorial depicts various styles of tiles from flat color, to more detailed texture (not a step by step progression). I think the flat color, and simple texture versions could be combined for a nice look, but stylistically don’t match well with the high detail versions. My example terrain is composed of only the max detail versions.

Even with organic objects like trees, I find it helpful to start with basic geometric shapes, then sculpt out the details. This is much easier than trying to freeform the whole object, and the foundational shapes help maintain a consistent iso look.

Isometric Mech

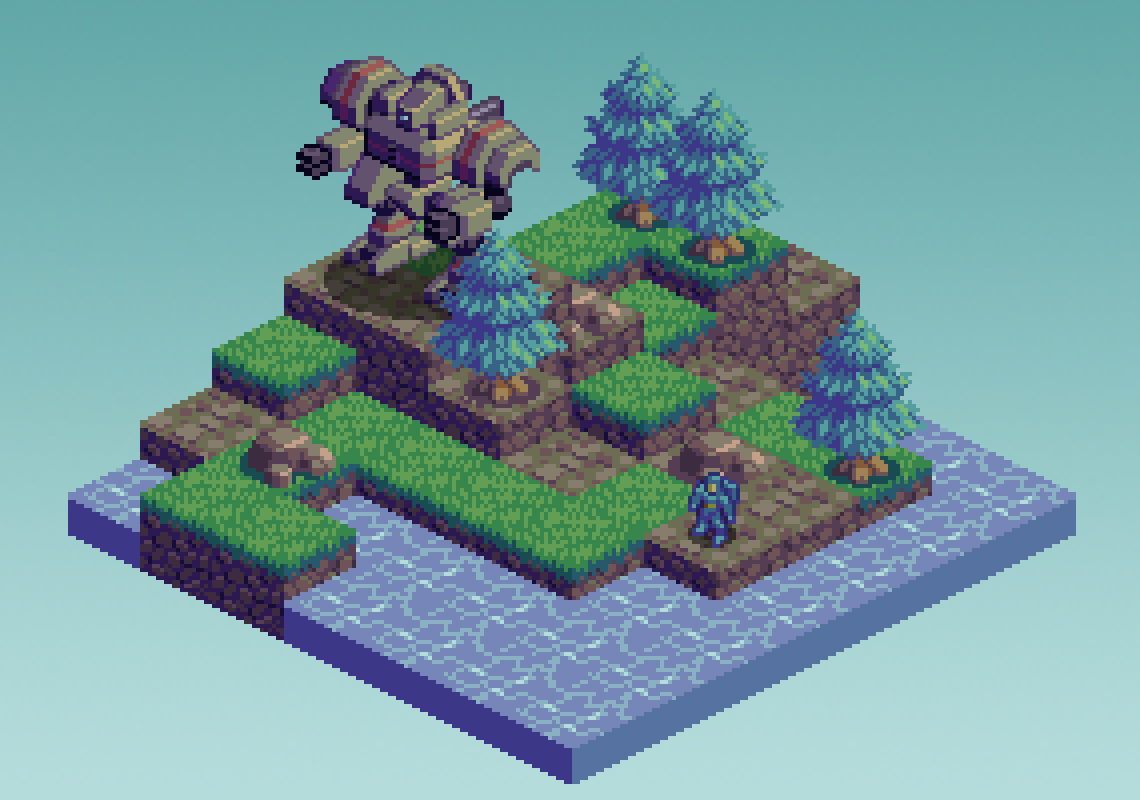
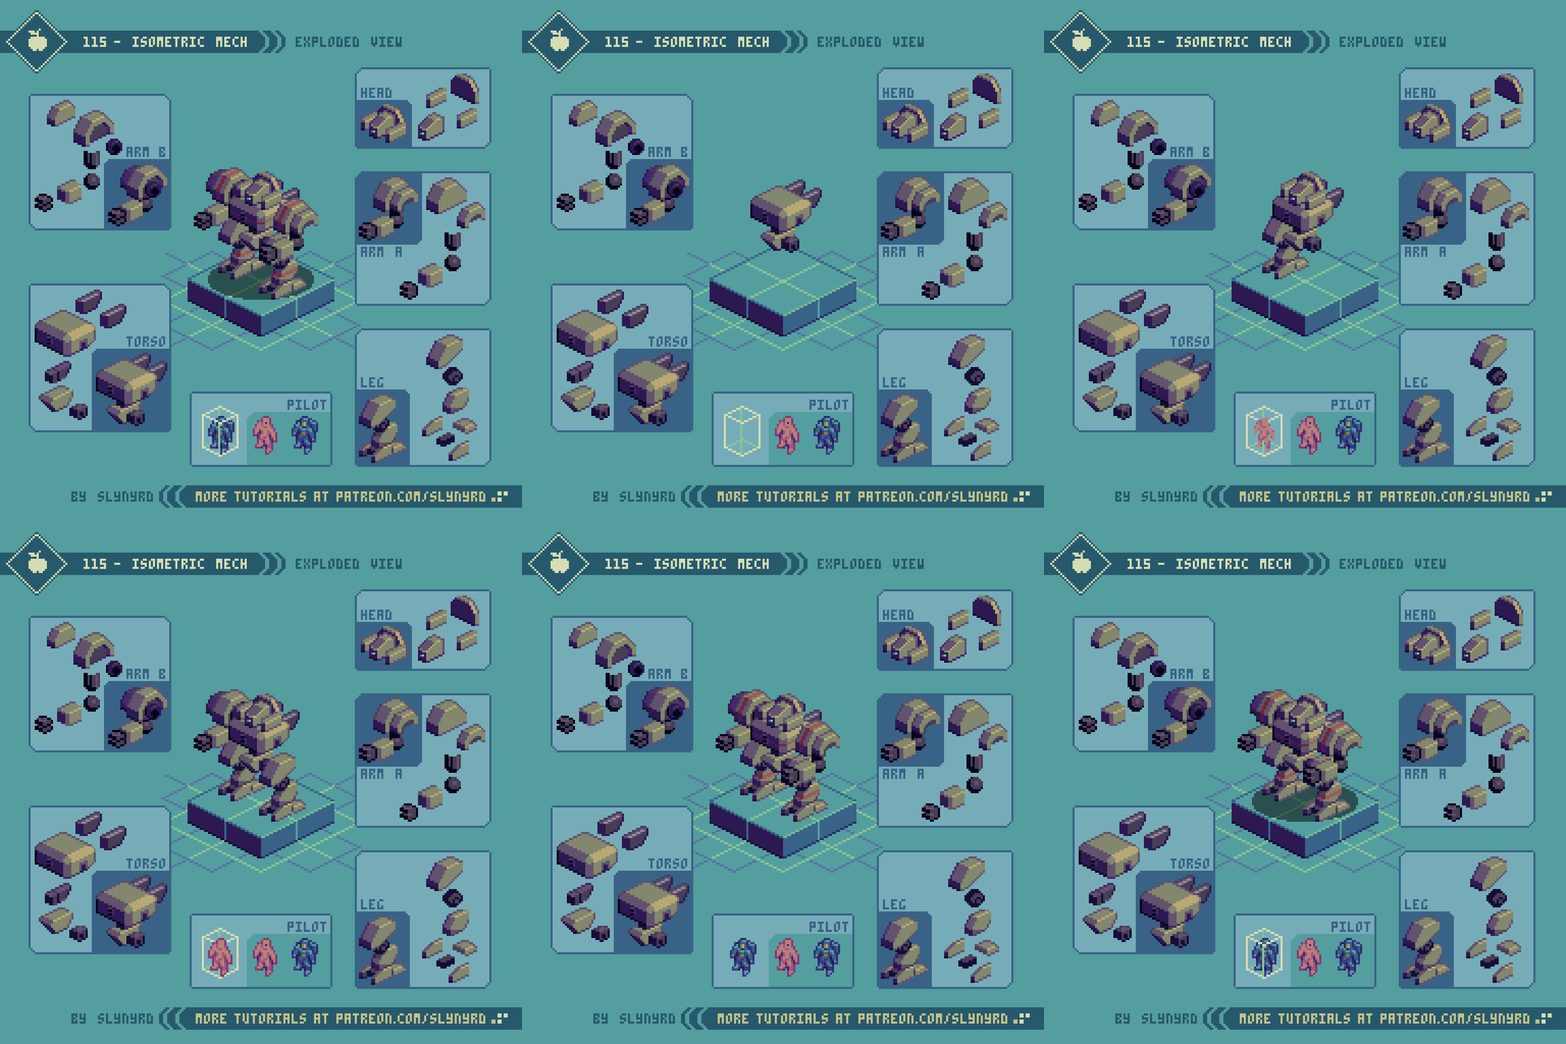
Your final test of this iso lesson, it’s a mech! At first look, the final sprite may appear like an advanced challenge, but when you break everything into separate pieces, you find fairly simple geometry that never strays too far from the foundational cube. Even though some information will be hidden in the final composition, it’s well worth visualizing all parts. The piece by piece layered approach also helps ensure a more sound final design, by offering the flexibility to easily move things around and swap out parts. I fidgeted a lot with the placement of all the parts, and it would have been very painful to render those edits on a single layer. Furthermore, it’s really satisfying to feel like you’re actually building something, and if you are so bold to attempt animating this beast, layers is the way to go.

As for drawing character sprites, I find it helpful to make a wireframe iso cuboid to help you keep things in line with the 2:1 pattern. Once you get the hang of it, you can simply imagine the shape without the need to draw a guide. As a general tip when making iso stuff, I always have a single 2:1 line in my composition as a separate layer that I use as a ruler to make sure things line up

FINAL THOUGHTS

Isometric pixel art can be a bit tedious to get into, but once you develop proficiency in drawing 2-step lines it becomes second nature. It’s well worth the effort, as iso pixel art is always a crowd pleaser, and opens up a lot of possibilities in games. However, the rotated viewpoint makes direct input gameplay a bit tricky, as the simulated perspective can make it difficult to gauge distances. Not the best choice for a platforming game, but great for turn based strategy games.

I got into iso art early on in my pixel art career. After a few studies I went for broke on very large detailed scenes. I developed a great deal of proficiency from the experience, but it was all built on the accessible fundamentals. If you can draw a cube, it’s possible to make a whole city!

All words aside, I feel iso pixel art is best understood simply by observing examples, and then mastered by actually doing. The basics can be picked up relatively quickly, and the challenge picks up once you attempt composing complete scenes. The key is accuracy, making sure things are properly spaced in relation to each other and everything lines up along 2-step lines. Don’t always trust your eyes. Count pixels and use a 2:1 ruler to make sure things are lined up that are supposed to. Start small, then go big!

RESOURCES

Please consider supporting my work by becoming a Patron. Among many other rewards, Patrons can access resources to compliment my tutorials. But most importantly, you allow me to continue making new content! 

Alternatively, you can support me by making a one-time donation

Assets featured in this Pixelblog are available in Isometric Pixel Art Assets Pack

Source files used in the making of this Pixelblog are available in Isometric Pixel Art Resource Files

Get caught up on all my downloads

You made it to the end of the article. Thank you for reading! 

-By Raymond Schlitter
Pixelblog - 40 - 3D Pixel Art Animation by Raymond Schlitter

intro

Long before the polygon, game creators have sought to bring 3D worlds to life by whatever means necessary. When the only means is pixel art, one must rely upon the good ol’ art of illusion. I have always felt the illusion of 2D art, as in traditional painting, or pixel art, is more compelling than realized 3D in the form of sculpture, or modern 3D graphics. The lack of information in the 2D form kicks on the viewer’s imagination to fill in the gaps, while true 3D spoils this interaction by giving you the full 360 degree view. Furthermore, I present a lesson of 3D concepts achieved by hand pixelled frame animation. Sure, it may not seem like a practical approach in the modern setting, but the mental exercise is greatly satisfying, and the results are guaranteed to be unique.

3D Dungeon

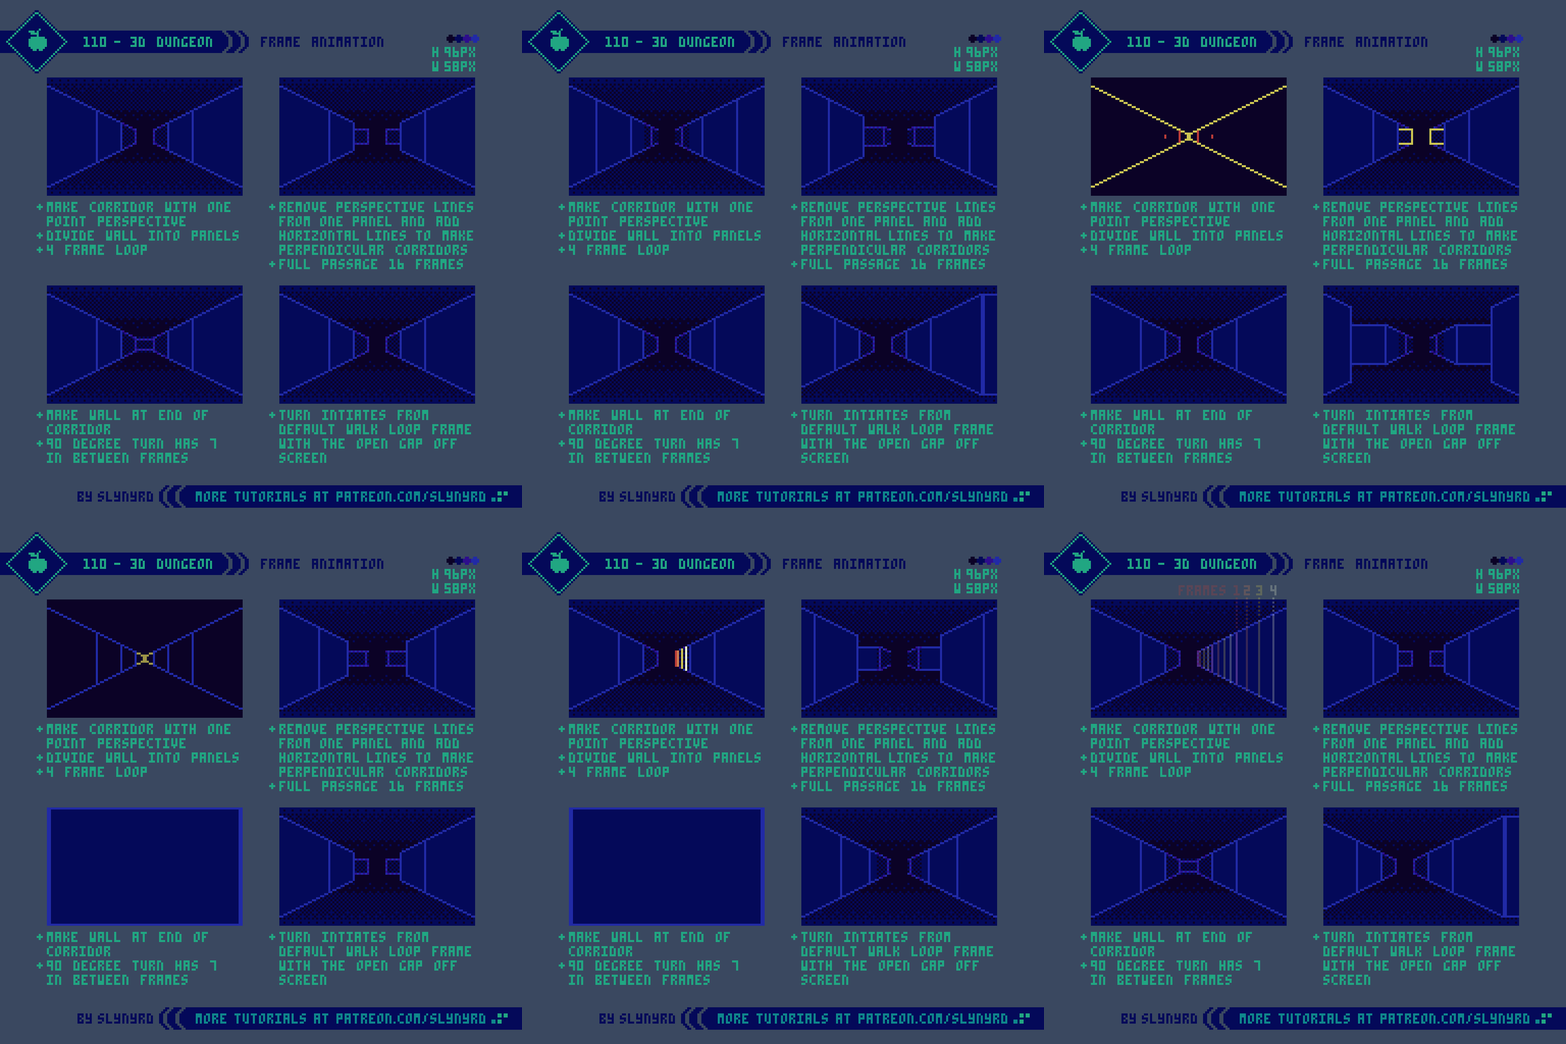
Before Doom came along with its revolutionary 3D engine, the first person perspective was uncommon in games, generally reserved for dungeon crawlers, and archaic flight sims. In the case of the former, simple corridors are navigated within a tile based system, presented in slideshow fashion with little to no animation frames between tiles. This lack of animation could be disorientating and limits the immersion factor, However, a valiant effort can be seen in the example of Phantasy Star 1 for the Master System, which actually animated first person movement between steps and turns within simple 3D corridors. Taking inspiration from this prime example, I’ve created a first person dungeon concept with basic forward, backward movement, and turning.

I recommend using a low resolution to economically practice the concept. However, keep in mind the less pixels to go around, the less nuanced movement can be, as even a single pixel movement can appear dramatic on a small scale. My example is 96x58px, landscape format to capture a natural wide gaze.

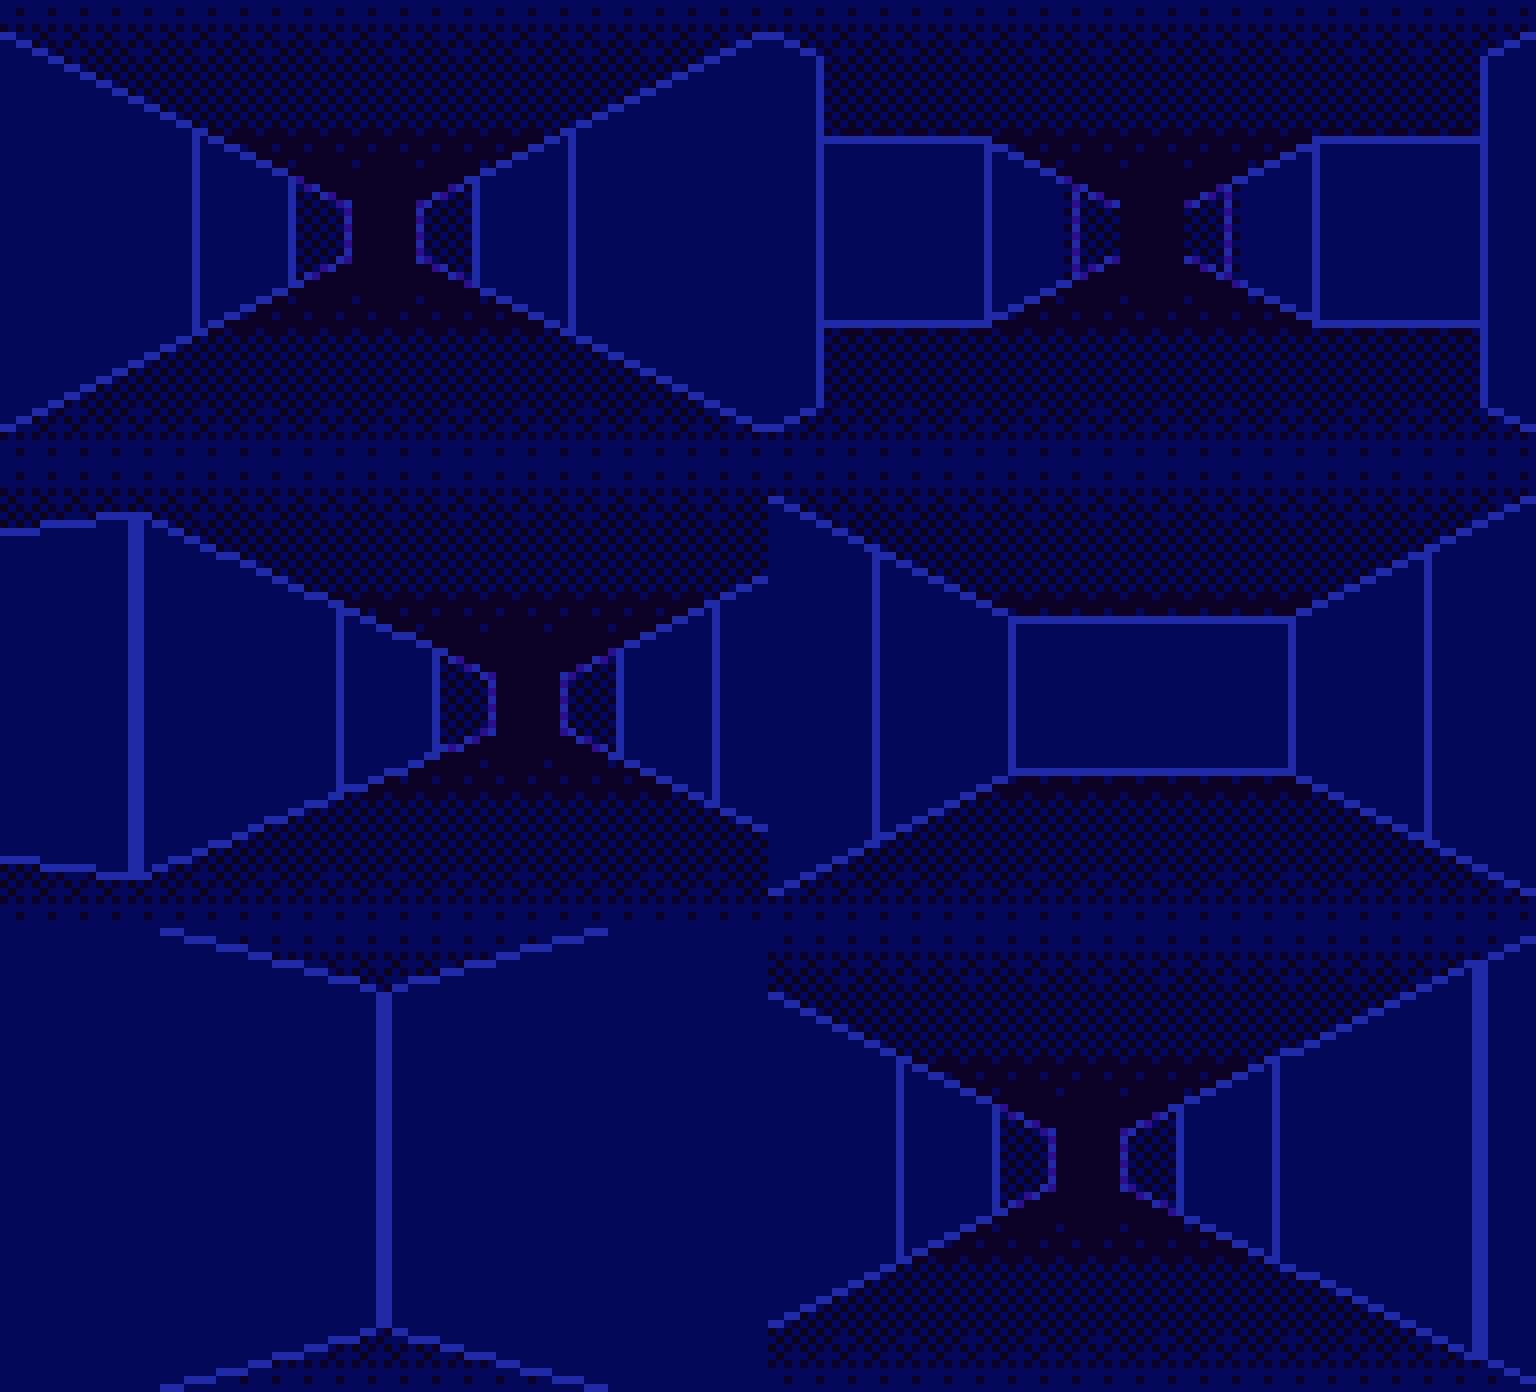
Make a simple corridor with one point perspective, and the vanishing point at the center of the canvas. Use only lines and solid color to make the walls. Divide the wall into panels with vertical lines. The gaps between lines should grow larger as they extend out from the vanishing point. Make it so the nearest panel is uncropped and flush to the canvas edges. Apply a dithered texture with darker color to the far end of the walls at the center of the canvas to create a subtle atmospheric depth effect. Also, apply dithered gradient to the background with darker color in the center to enhance the sense of depth.

To create a straight movement loop only the vertical lines on the walls need to move until reaching the next line, or edge of canvas. My example only uses 4 frames for this core loop. Make sure the dithered depth texture is applied consistently to all frames.

To make perpendicular corridors, simply remove the perspective lines from one wall panel and replace them with horizontal lines. Start from the most distant panel and do this for each frame until the side corridor has passed the field of vision, back to the first default frame from the core walk loop. My example is 16 frames for the full pass. I duplicated the 4 frame walk loop 4 times and modified each frame to have the side corridors.

To make dead ends, again duplicate the walk loop 4 times to make 16 frames. Starting from the first frame, make a wall at the far end of the corridor. Then make it one step closer each frame until the wall completely frames the canvas.

There are 7 frames of animation in between end points of a 90 degree turn. First, establish the middle frame of the turn as a key frame. This is the frame where you are turned 45 degrees exactly facing a corner. Depending on if you are turning into a corridor, or turning from a dead end, the middle turn frame will respectively be a convex, or concave corner. Once you’ve established the middle key frame, you just need to come up with 3 frames between it and the start point, which can be duplicated and reflected to complete the second half of the turn. This step requires keen vision to imagine how the environment rotates. I referenced the animation from Phantasy Star 1 to help see how the angles trend from frame to frame.

Once you’ve mastered the simple vector style dungeon, try including brick texture, and environment variations, like windows, cobwebs, and bones. Just remember every detail needs to be hand drawn into dozens of frames. Yikes!

3D Hyperspace

I’ll permit a break from the lesson if you’re stopping off for a little game of Hyper Echelon

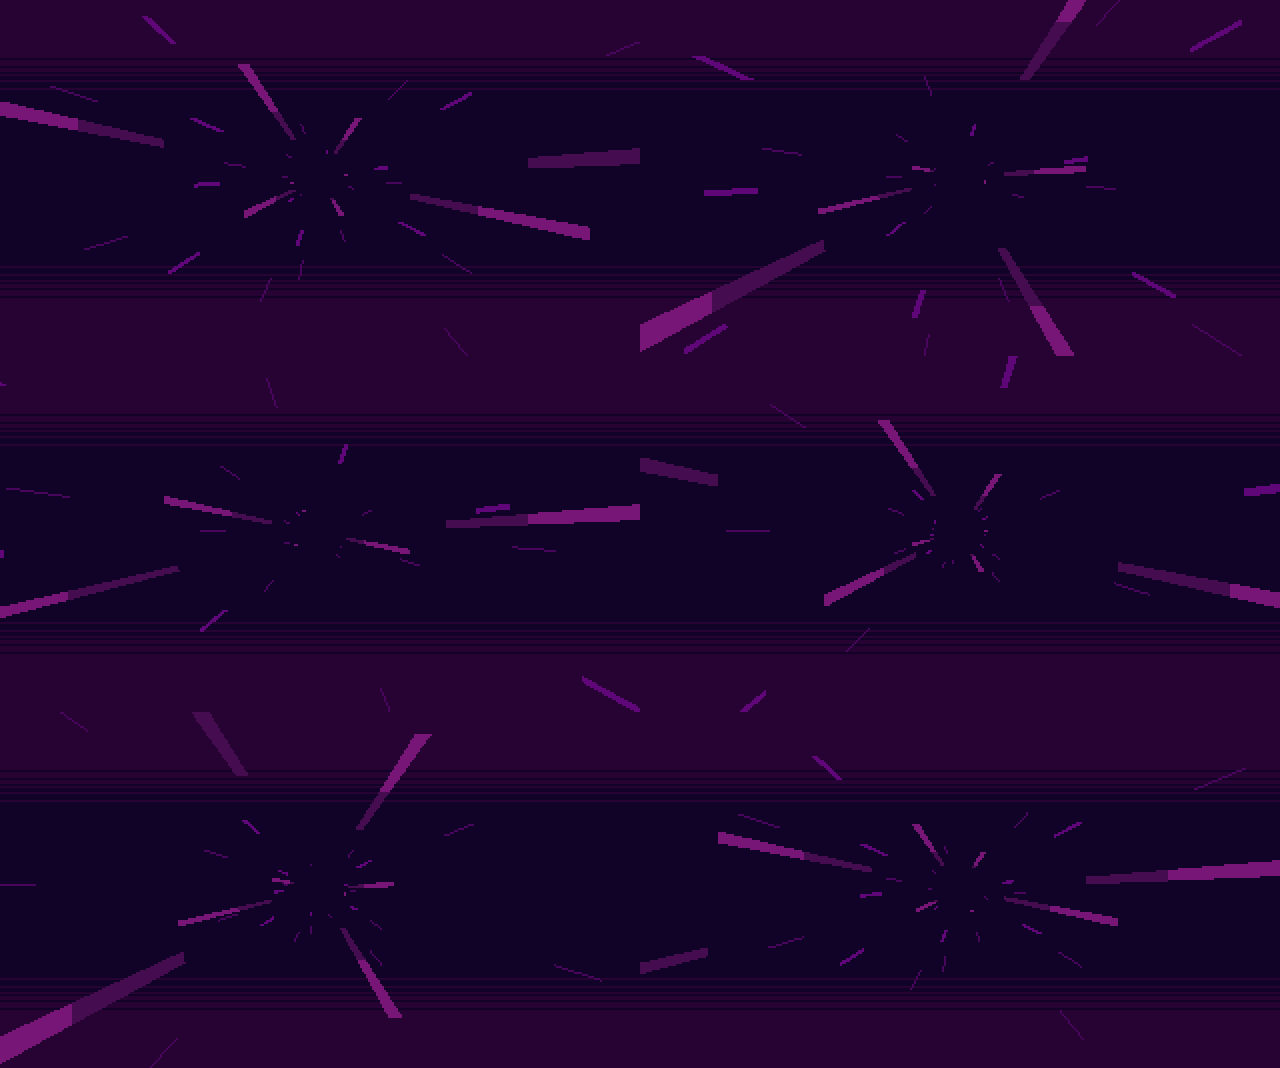
How does one travel the big wide universe? Hyperspace, of course. Essentially the interstellar highway, this sci-fi concept is commonly used as a mechanic to feasibly link many worlds in one epic story. Sure, we know it from Star Wars, but did y’all catch Hyper Echelon?

Yup, I have some experience with this kind of animation from multiple scenes created for Hyper Echelon. Here, I’ve refined the core elements into a sample animation while breaking down the process from start to finish.

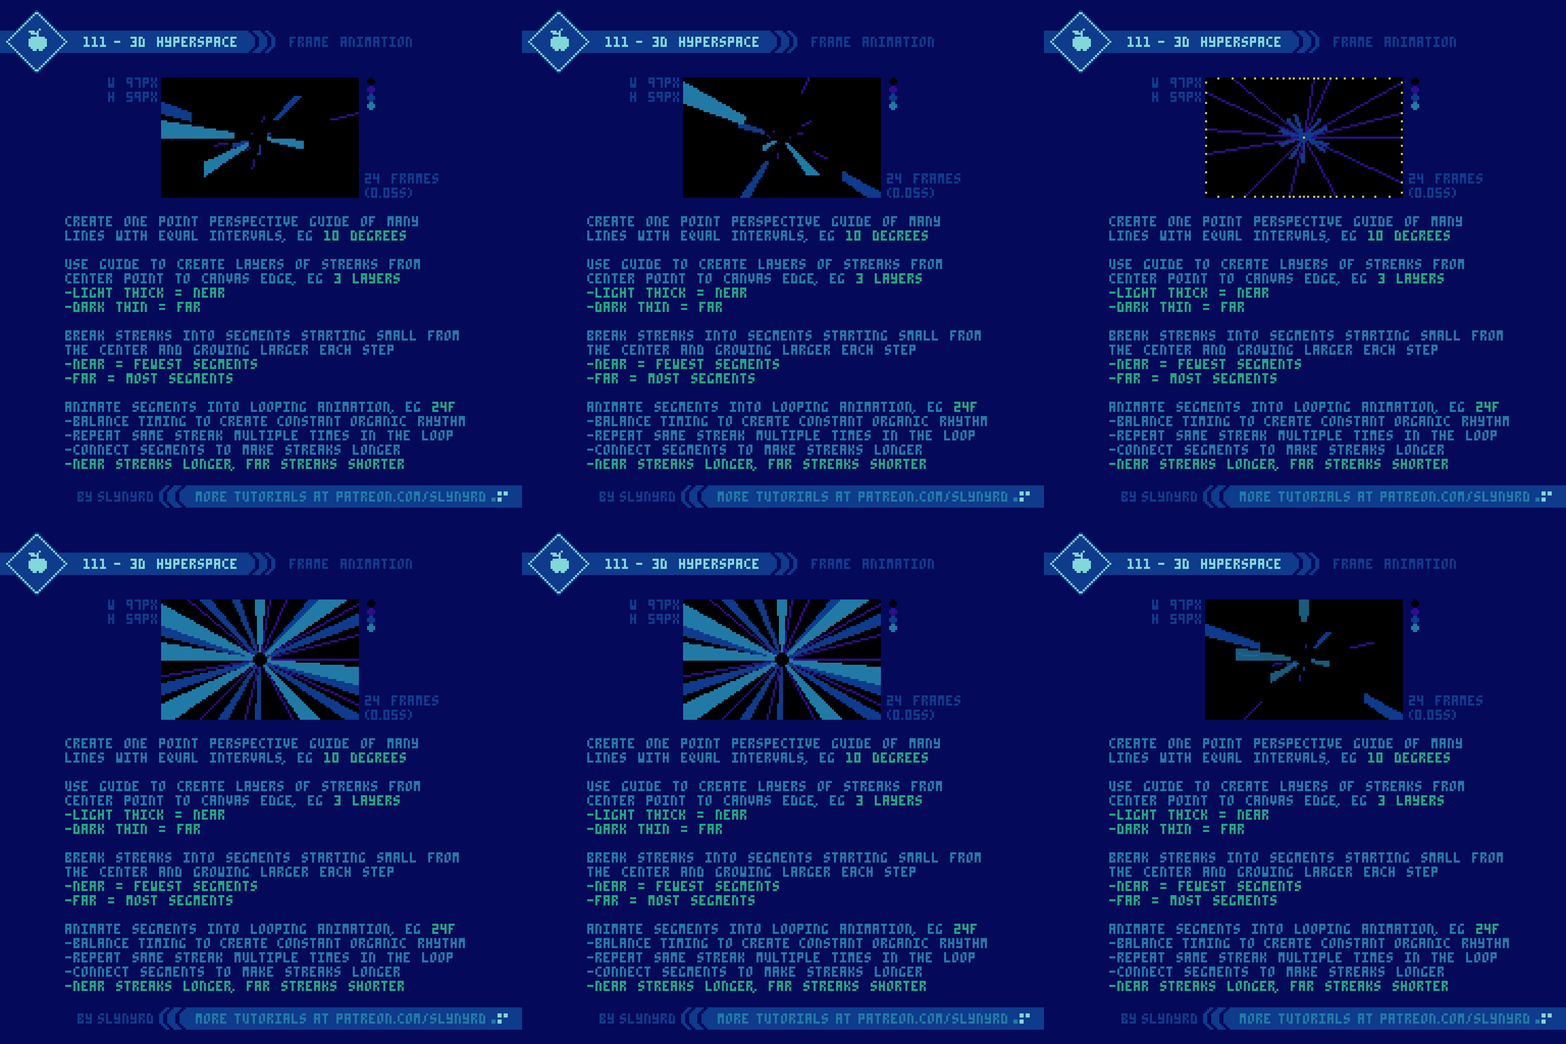
First, make a one point perspective guide of many equally space lines from a center vanishing point (10 degrees in my example). Use this guide to create multiple layers of streaks with varying thickness and color to indicate depth of field. Thin dark streaks appear farther away while thick bright streaks appear closer.

Once the composition is filled with full length streaks, break them down into segments. To capture depth, the segments should start small near the center and grow longer each step outward. Avoid cropping and always make the nearest segment the longest segment of the streak.

Animate the segments into a looping animation (24 frames in my example). Coordinate position and timing of streaks to create constant balanced rhythm that feels organic, opposed to obvious intervals of waves of stars. Streaks can be repeated multiple times through the loop to achieve this constant flow. Segments can be connected to make streaks longer. In my example, far layer streaks are only one segment long, 2 segments long in the middle layer, and 3 segments long for the nearest layer streaks.

For an enhanced hyperspace, go for higher resolution, more frames, more depth layers, width variation within layers, and perhaps even a spaceship cockpit in the foreground. Have fun!

Rotating Cube

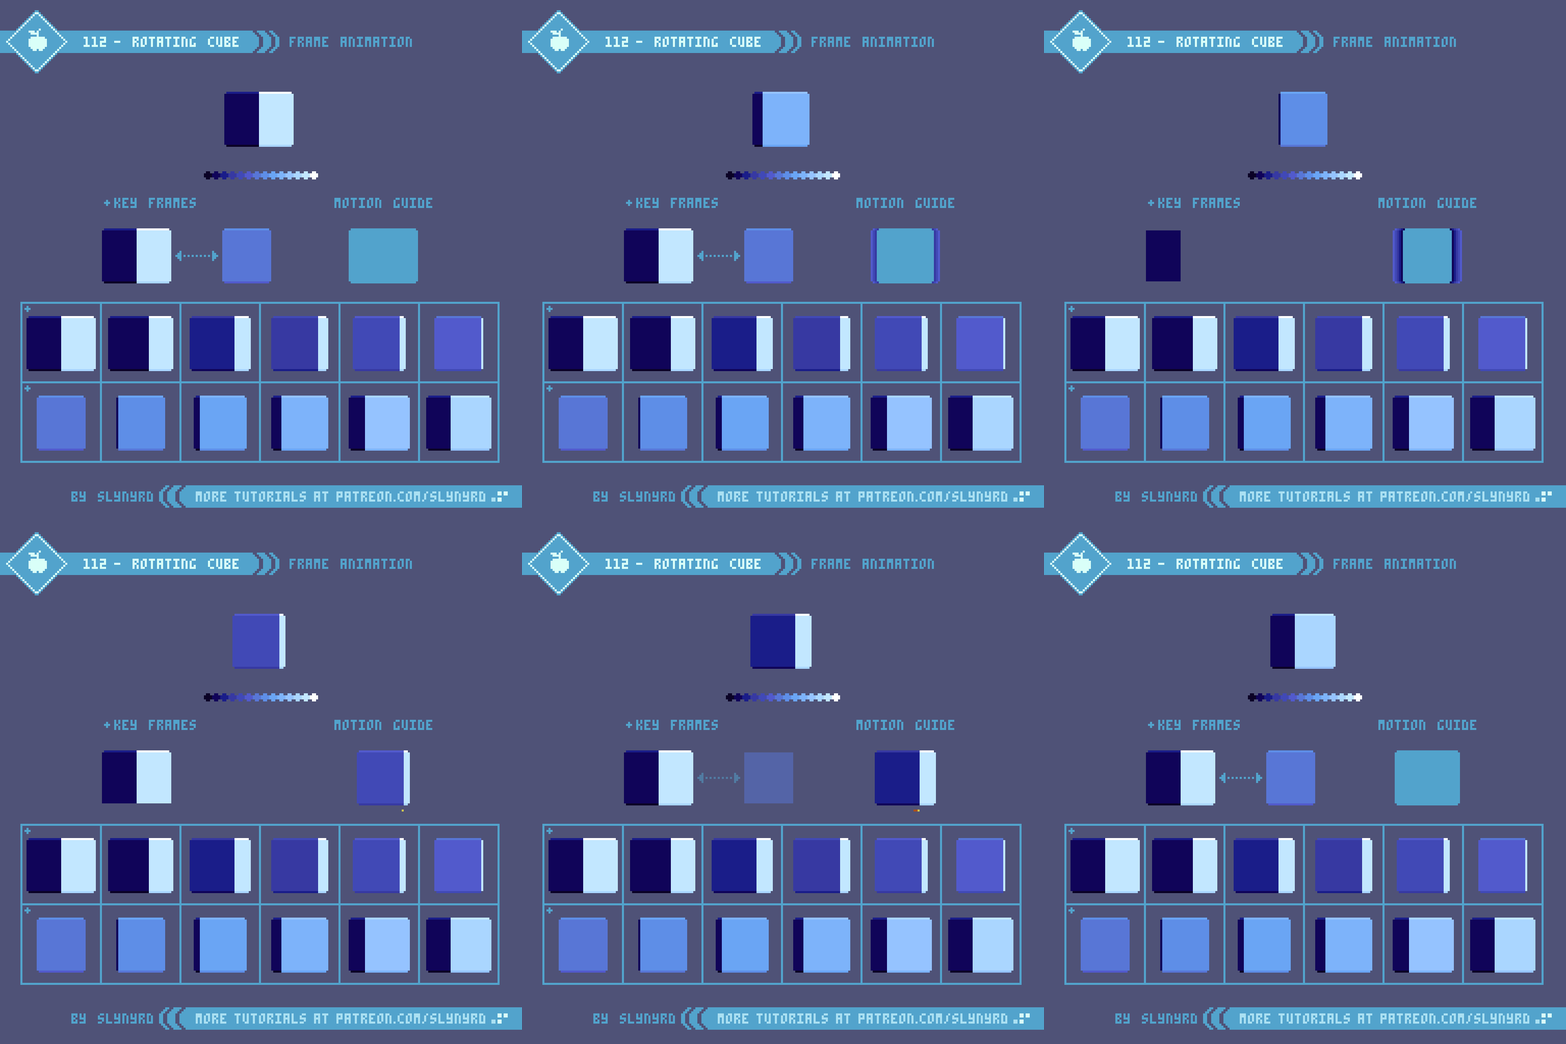
Next up, we have sort of a faux 3D effect, famously used as a level design mechanic in the game Fez, where the vanishing lines always remain perfectly horizontal. This abstracted projection is a cornerstone present in most of my work, but this strangely convincing animation is a bit of an oddity. I first conceived it way back around 2016 when working on a platformer prototype. Driven by curiosity, I tried to hand animate the rotation of my beloved ‘Fez’ cube. Surprisingly satisfied with the results, I applied the effect to some funky lamps that could be found in the home’s of NPCs.

But, let’s not get ahead of ourselves. First, we must learn how to create the illusion of rotation.

The overall motion plays a factor, but it’s mostly the color that sells the illusion. Therefore, the first step is to prepare a color ramp from the darkest hue to the lightest hue, with plenty swatches to fill out the gradient.

Next, make the key frames. One with the cube turned 45 degrees, and the other with the face of the cube flush to the viewer. Now, the tricky part is making the in between frames. Personally, I like to work in solid color from the get go, so I go one step at a time, considering shape, and color based on light source. However, if you’re a fan of outlines you could try nailing the shape and motion down before messing with color.

If you break down the motion of the shape itself, you can see even expansion and contraction with consistent 1 pixel movements. However, the movement of the perceived corner of the cube makes small movements at the sides of the mass, which become larger as the corner reaches the center of the mass. This should create a nice ease in, ease out motion of the corner sweeping across the cube, and create a sense of depth from the varied speed.

Try using less frames and removing the bevel from the cube for an easier version.

FINAL THOUGHTS

I needed to do something a little more unique after all the game studies lately, and this proved to be even more fun than I expected. Basing an entire game on a 3D pixel art concept may not be practical, but there are many instances in games where a little clever 3D can bring a splash of life to a 2D world. Some relevant examples are rotating sprites, a brief first person section, and or cinematic cutscenes that present a dynamic viewpoint. Pixel art may not be the first choice for 3D graphics. However, by keeping things fairly low res, the pixels have proven to be an economic way to practice 3D concepts. What’s more, I find these visual practices tickle my brain in a satisfying way, keeping the art muscles in shape, and boosting mental health. Give it a try!

RESOURCES

Please consider supporting my work by becoming a Patron. Among many other rewards, Patrons can access resources to compliment my tutorials. But most importantly, you allow me to continue making new content! 

Alternatively, you can support me by making a one-time donation

Assets featured in this Pixelblog are available in 3D Animation Assets Pack

Source files used in the making of this Pixelblog are available in 3D Animation Source Files

Get caught up on all my downloads

You made it to the end of the article. Thank you for reading! 

-By Raymond Schlitter
Pixelblog - 39 - Sci-Fi RPG by Raymond Schlitter
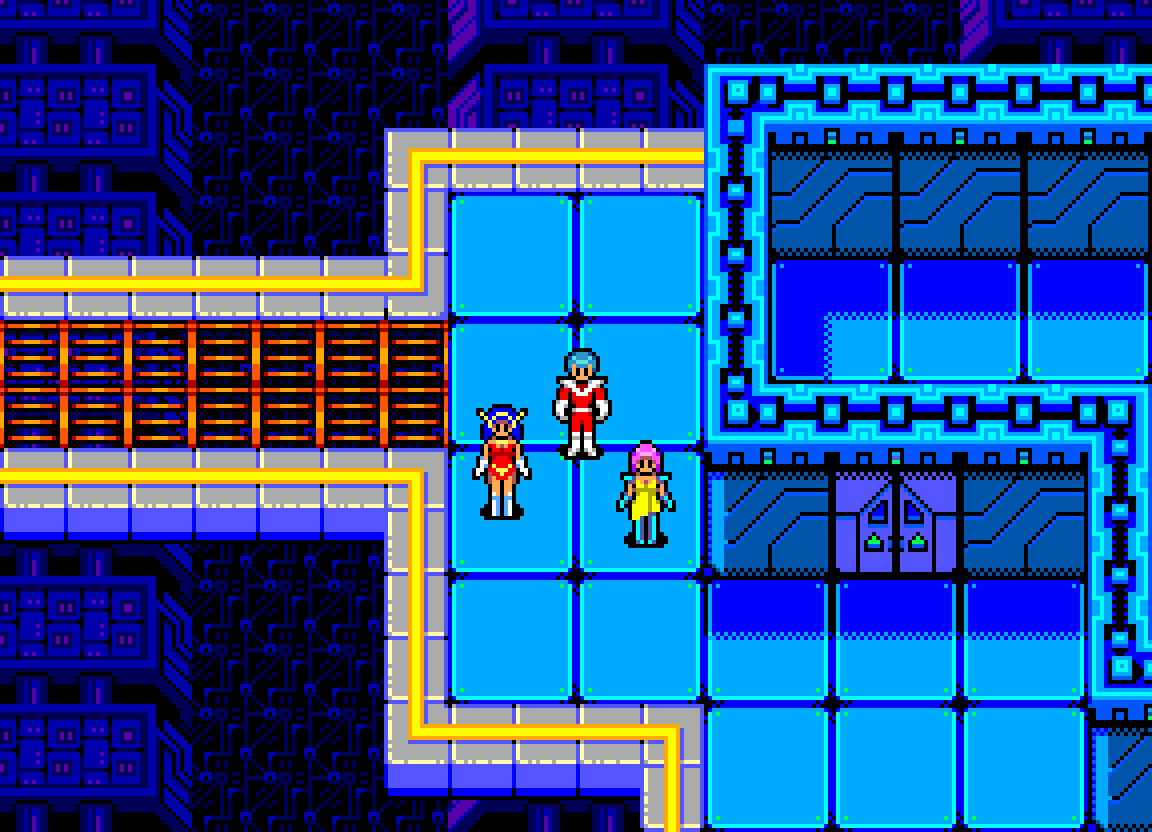
Sci-fi RPG mockup, Slynyrd (2022)

Intro

Prepare to go back to the future, into a retro space age inspired by Sega’s venerable Phantasy Star franchise. It’s the early 1990’s, and every time I venture into the local rental store, the beautiful box art for Phantasy Star 2 captures my imagination. Alas, my family’s allegiance is with Nintendo, and my little child brain has yet to develop the patience for rpgs. Thus, the box went back onto the shelf, and the dream of an epic space themed adventure receded into distant memory. Fast forward to nearly a decade later- I’m at the height of a personal golden age of gaming during the all too short lifespan of the Dreamcast and its revolutionary SegaNet. Caught up in the 3D trend, I had yet to play any pixel art iterations of Phantasy Star. But, lo and behold, that captivating universe I gleaned from box art years ago, was finally making a return in online multiplayer form.

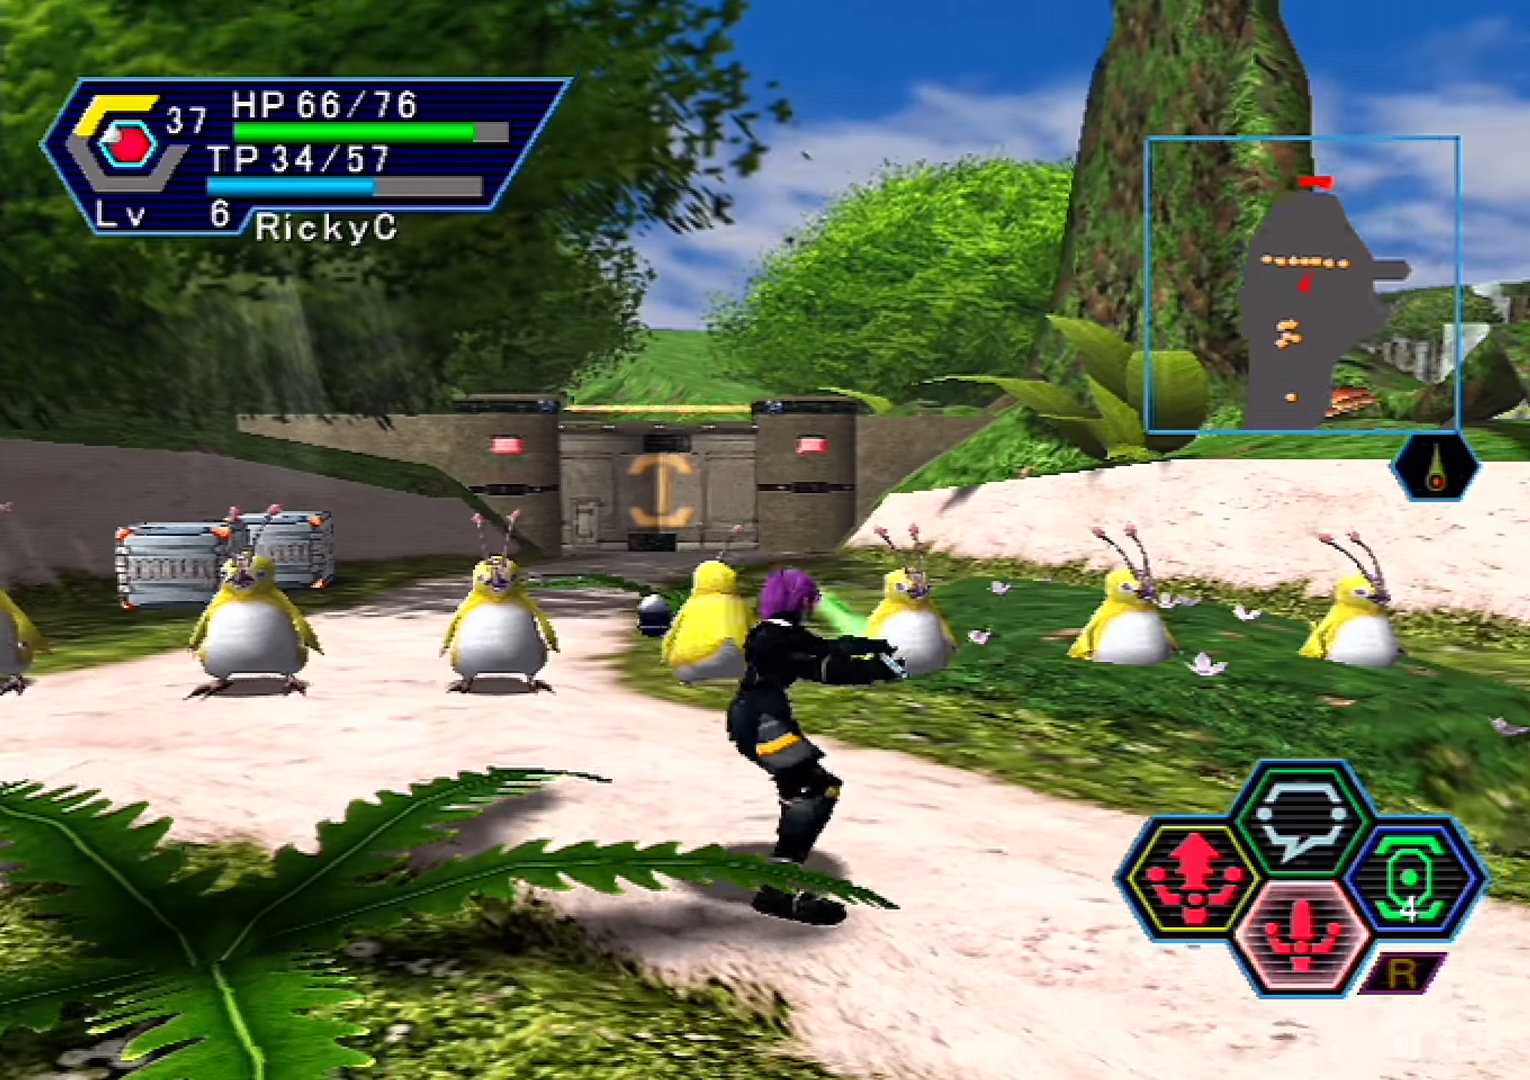
Phantasy Star Online would be my first foray into the PS universe, and man, was it a doozy. Upon popping in the disc, I played 13 hours straight until sunrise, when shamefully ordered to bed by my mom. I’ve never quite had a gaming binge like that since. Needless to say, it left an extraordinary impression. The gameplay was so simple, but the perfect synthesis of sound and visuals was, and still is hypnotic.

Phantasy Star Online, Sega Dreamcast (2000)

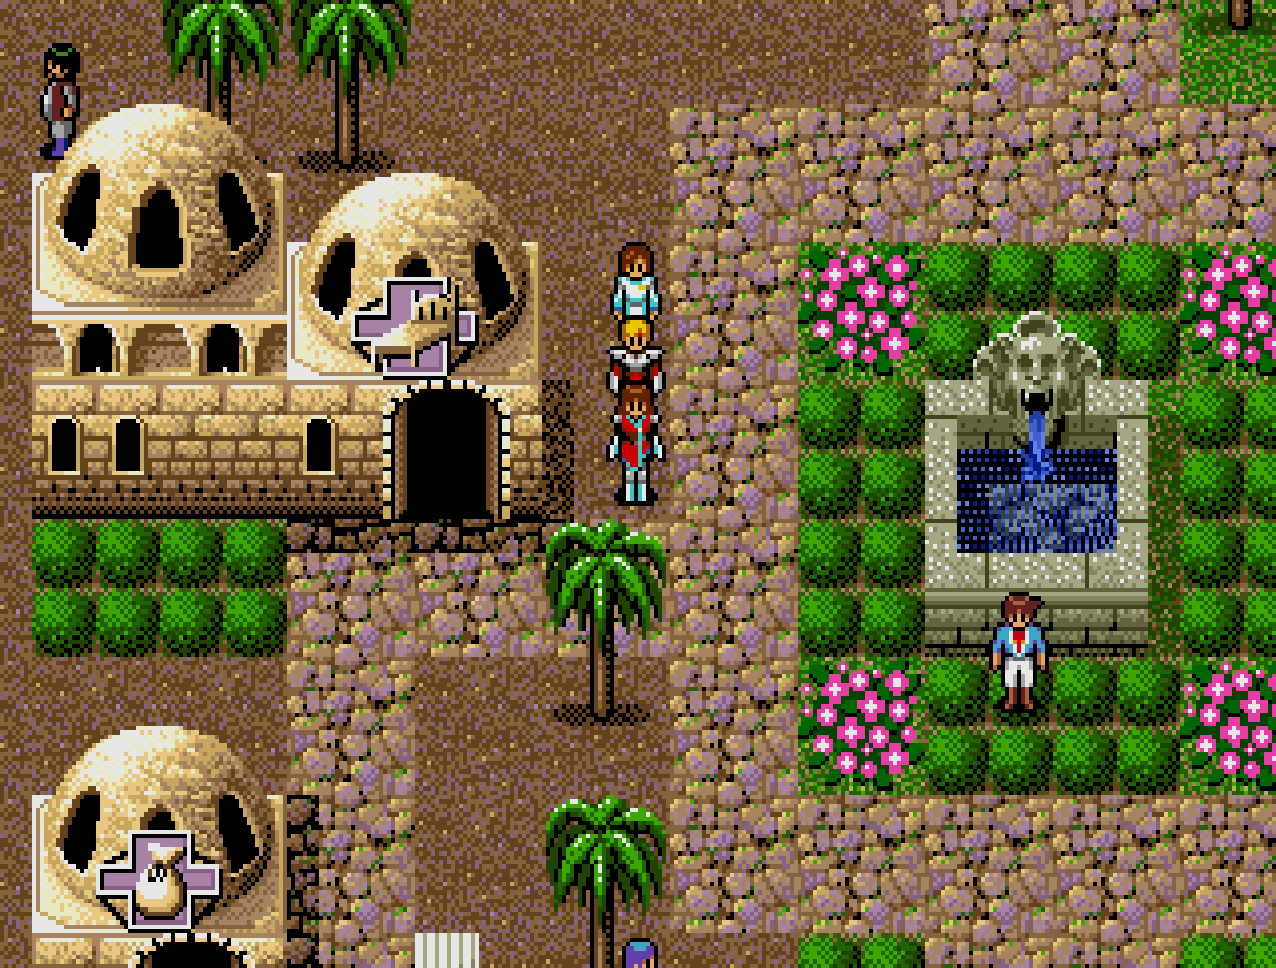
Surely my experience was not unique, as PSO and it’s various ports gave many gamers their first taste of Phantasy. Soon after its release, renewed interest in the 8 and 16-bit titles finally lead me to experience PS2 and 4, on authentic Genesis hardware, while years later I eventually sampled 1, and 3 through emulation. Even with the technical limitations, I was surprised to see consistent aesthetics throughout, each title being equally, if not more immersive than the modern 3D version I was accustomed to, albeit 3 slightly falls under par. Ultimately, PS4 is my favorite, and has the most refined graphics of the pixel art titles. Returning to the older generation gave me newfound appreciation and respect for pixel art. I was still caught up in the trends of the day, but I could sense an undeniable charm in these older games that my modern gaming diet was lacking. Roots were taking hold.
Phantasy Star 4, Sega Genesis (1993)

While my love for PSO is apparent, I’ve longed to see the franchise go back to the traditional turn-based random battle jrpg formula. After the greatness of PS4, there was so much potential for more main games within the genre. Unfortunately, the franchise was absent for 7 years until PSO, and has never returned to the traditional formula. But that can’t stop me from phantasizing about a return to retro form.

So with that long winded background story out of the way, I present a pixel art study heavily modeled after the stylings of PS4, and further informed by my experience with the series as a whole. While still exercising creative liberty, the following assets loosely adhere to Sega hardware somewhere between Master System and Genesis limitations, and are closely informed by the source material. Everything uses 6-bit RGB palette, and conforms to 16x16px tiles.

Character Sprites

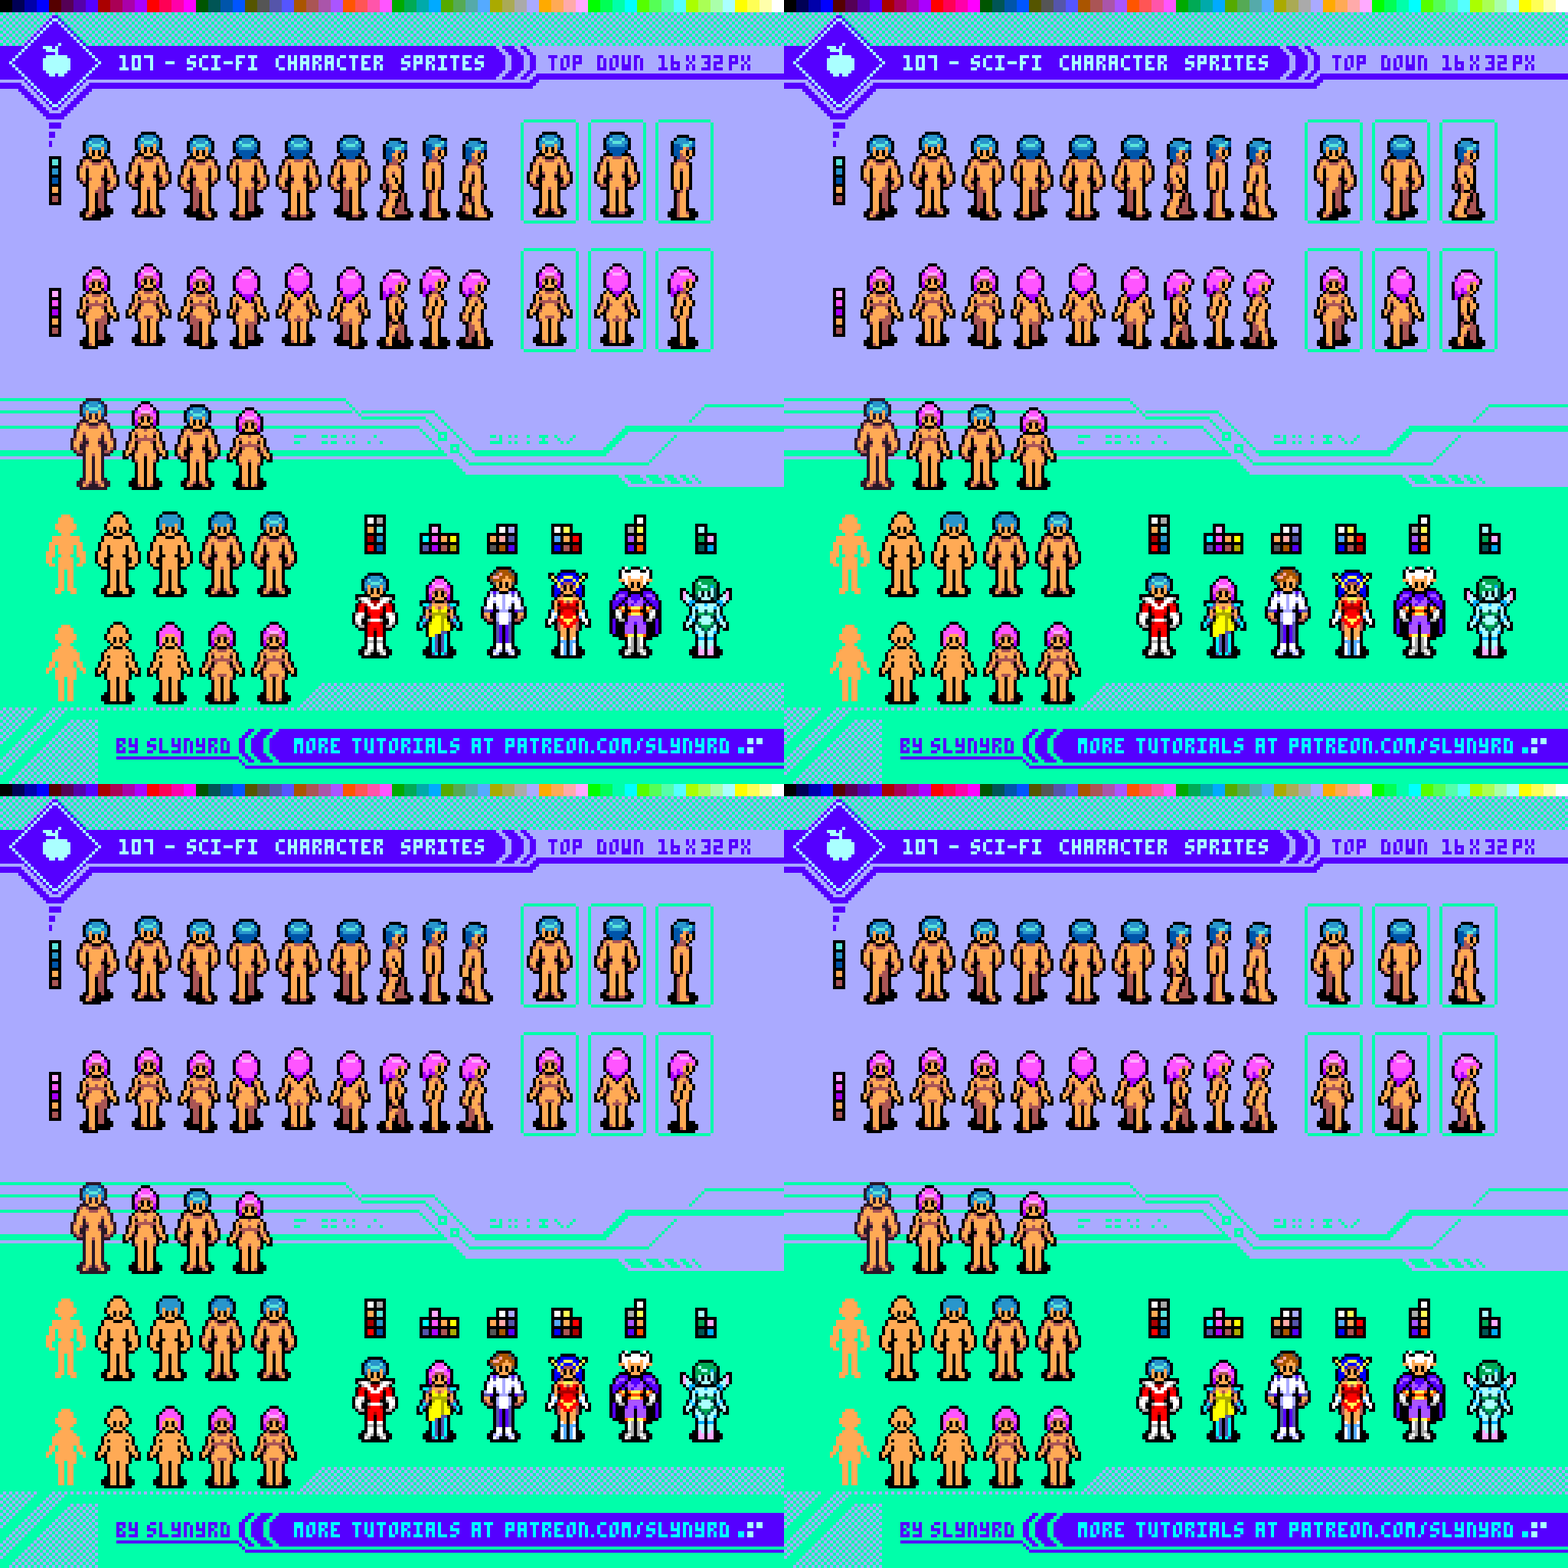
With the sci-fi setting, alien and robot characters are common place, but it all starts with the base model humans. Once a few male and female variations are established it should be much easier to iterate for more diverse characters. Analyzing an existing sprite and stripping them down to their birthday suit is a great practice, and makes it much easier to iterate and visualize your own designs.

I’m always impressed with the 3-frame walk/run cycles of these old games. In this case, shading is essential for convincing effect. Idle is static, but you really don’t need motion with characters this vibrant! All 64 colors of the main palette can be see at the top of the tutorial.

For more tips on how to approach recreating retro inspired sprites, please review Pixelblog 37 Castlevania Study.

Character Profiles

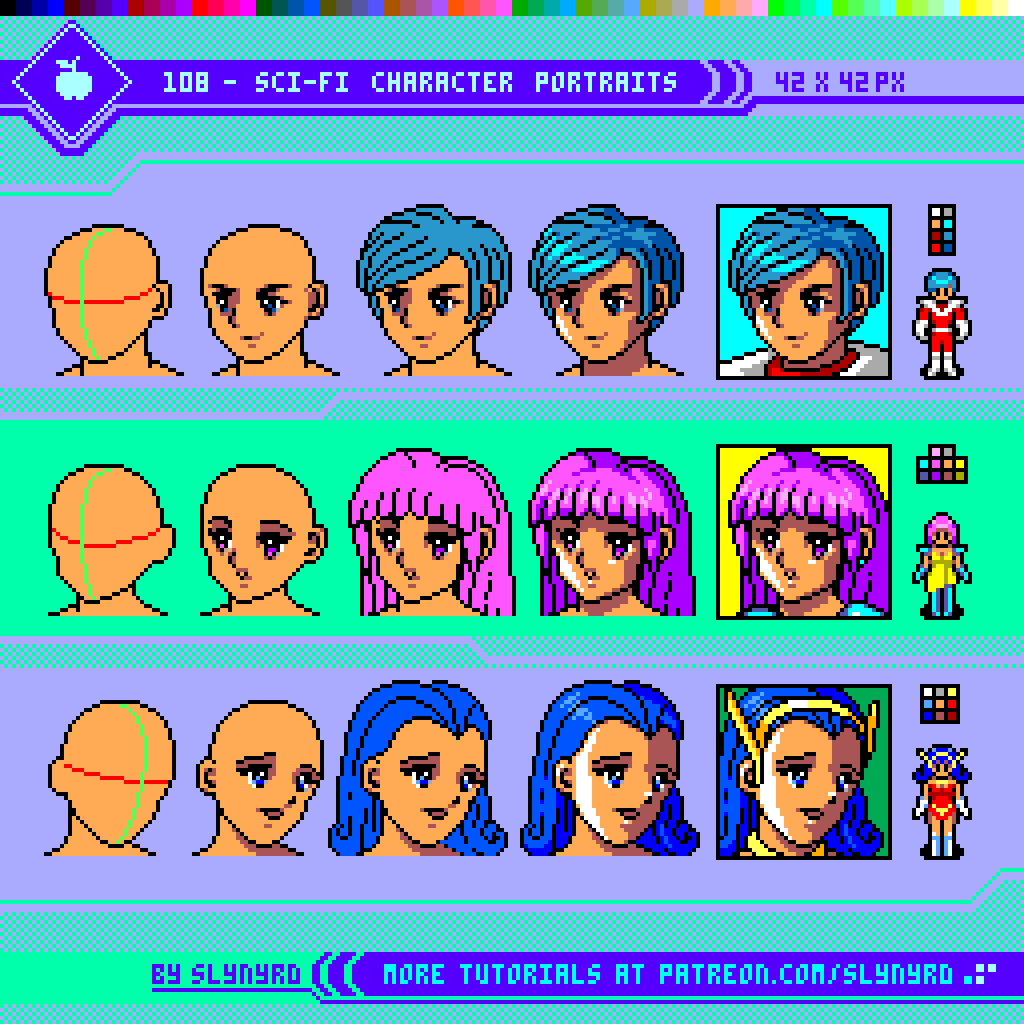
Similar to the process with the character sprites, I referenced models from PS4, boiled them down to the basic head shape, then recreated them with my own styling. Shapes and placement of features are always important with anatomy, but simple shading and highlights are the key to creating depth.

Anatomy is like foreign language to me, if I don’t keep regular practice I quickly lose proficiency. The keys are to always use references, and with anything, persistence pays off. Try to see your efforts through to completion, as things looks out of sort until all features are well placed and proportioned. But don’t rush any steps! The basic head shape provides the foundation that will largely dictate the final outcome. If things look off in step 1, they will likely be off in the final step. Yet, there’s always room for adjustments along the way. Insight is best gained by going through the motions. In other words, practice! For more tips and tutorials on anime styled portraits, check out Pixelblog 29 Anime Faces and Hair.

Dungeon Tiles

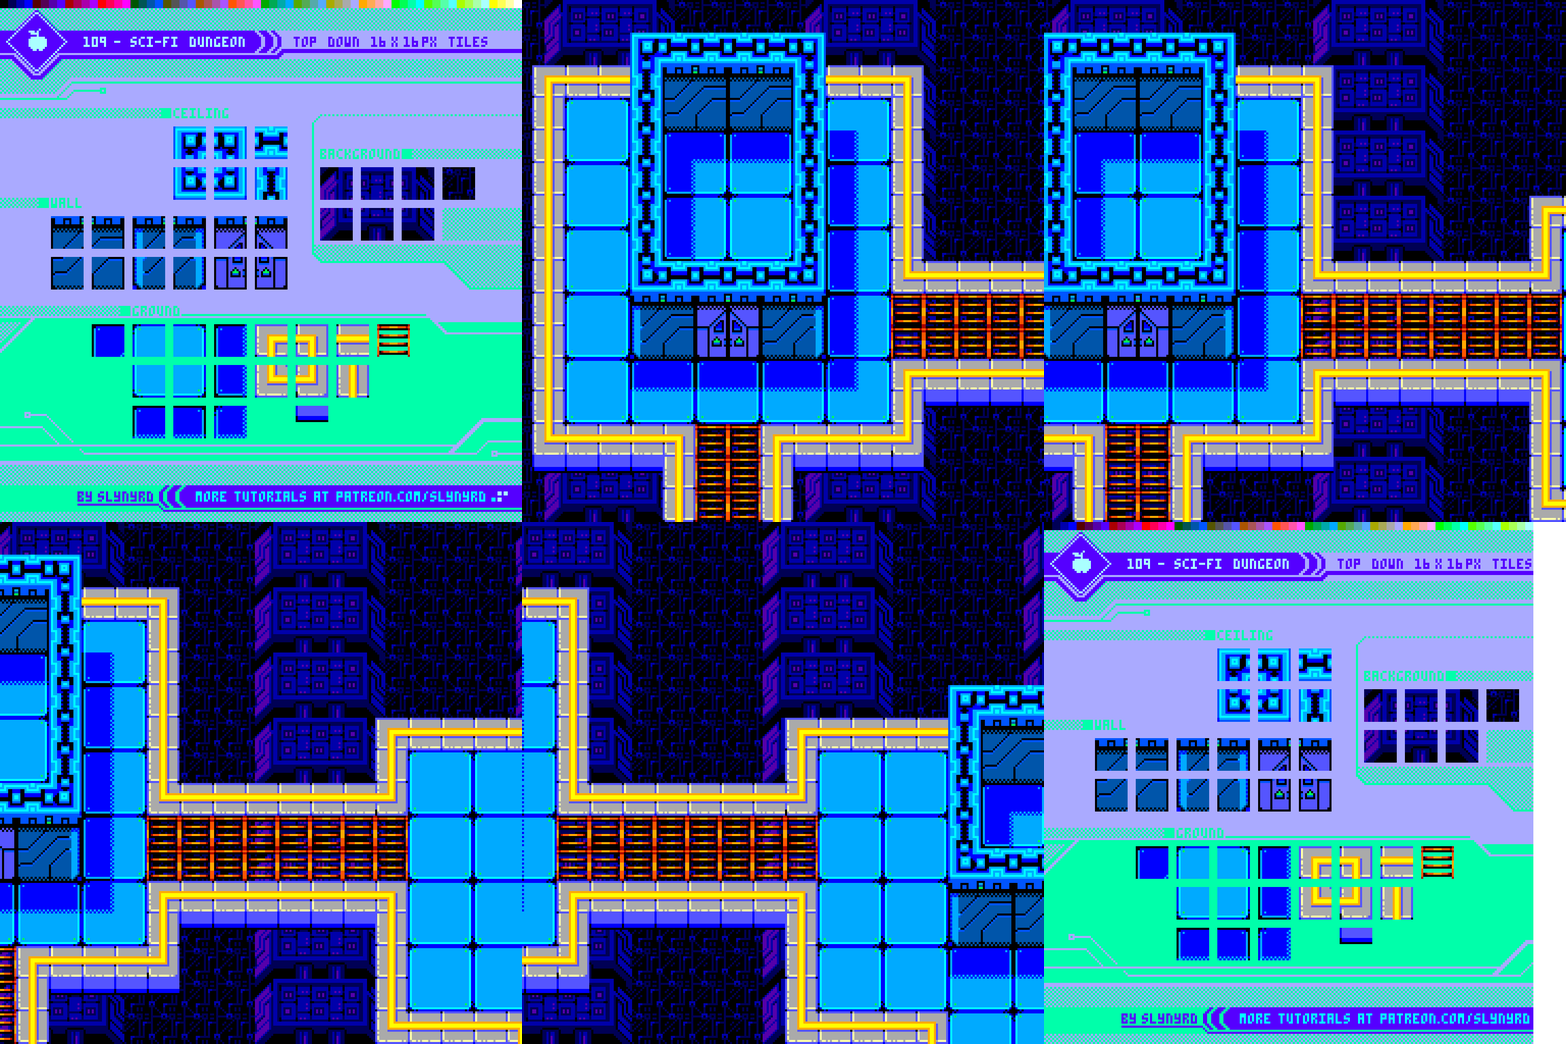
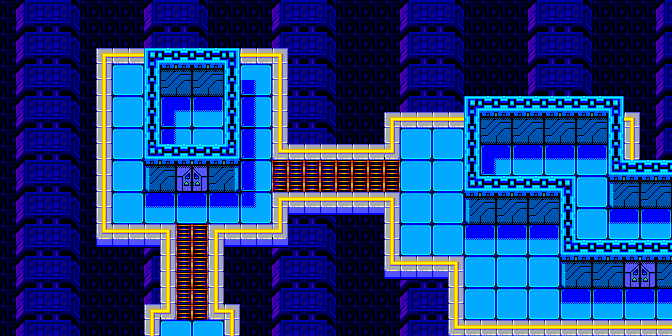
Ah, this cybernetic aesthetic suites the pixels well. Each individual tile is quite simple, but everything comes together in striking fashion. Again, I studied references from PS4 dungeons to inspire the design. The few extra tiles for the baked in shadows is well worth the added depth. The combination of large 32x32px panels along with the standard 16x16px blocks helps break the monotony of the grid. Also the color contrast and different floor textures keeps things interesting. But, the coolest aspect is the parallax background. All done with minimal assets!

Made with Pyxel Edit. If you’re new to making top-down tiles, I suggest reviewing the fundamentals in Pixelblog 20 Top Down Tiles.

Let the monster blood splash across those shiny tiles.

FINAL THOUGHTS

This study hit a personal sweet spot. Listening to the PSO soundtrack as I developed these tutorials had me gushing with nostalgia and kept the inspiration on high. The 6-bit RGB palette was surprisingly fun the work with and feels slightly more versatile than the NES palette. While I’m grateful for the games we got from the era, I can’t help feeling bittersweet that we didn’t get more pixel art space themed rpgs. Maybe these tutorials will inspire someone to make one! How about a part 2 follow up, focusing on the battle system? Always more to come!

RESOURCES

Please consider supporting my work by becoming a Patron. Among many other rewards, Patrons can access resources to compliment my tutorials. But most importantly, you allow me to continue making new content! 

Alternatively, you can support me by making a one-time donation

Assets featured in this Pixelblog are available in Sci-fi RPG Assets Pack

Source file used in the making of this PIxelblog are available in Sci-fi RPG Source Files

Get caught up on all my downloads

You made it to the end of the article. Thank you for reading! 

-By Raymond Schlitter