Intro
In Pixelblog 20 I introduced the fundamentals of making tiles with various 16x16 pixel grass and dirt textures from a 3/4 top down projection. Now I will continue developing the environment with some natural, and man made objects. Since the base ground is made of 16x16 tiles it’s important to consider how the objects will fit onto the tilemap. In this case, I break my objects down into 16x16 tiles so they can easily be used in a tile editor and laid out in a logical manner.
Tree
Of course, we’ve gotta have trees. A grassy environment without trees just feels lonely. So let’s get to it and spring up some green darlings!
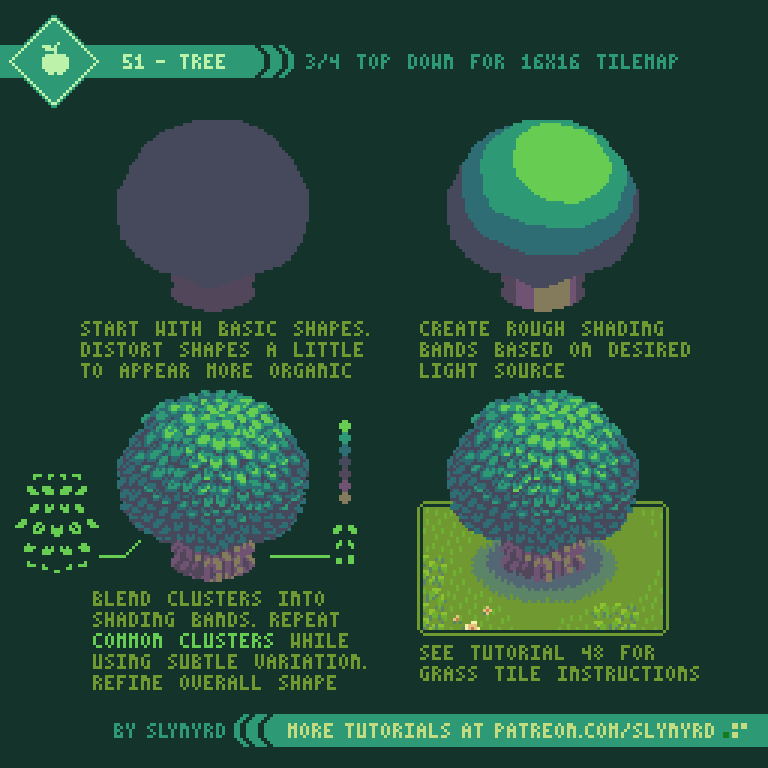
The ball shape design is a cute approach, but more importantly, simple shapes with symmetrical balance create visual stability, fit together nicely onto the tilemap, and look good when used in repetition. Furthermore, they can be placed in staggered overlapping rows to create a solid forest pattern with no odd gaps or noisy pixels. To keep the asset feeling fresh, try a simple color swap here and there. A more unique, asymmetrically shaped tree looks good when used sparingly to create a point of interest, but will look odd if often repeated on the same screen. This is a general rule for any kind of objects used in repetition.
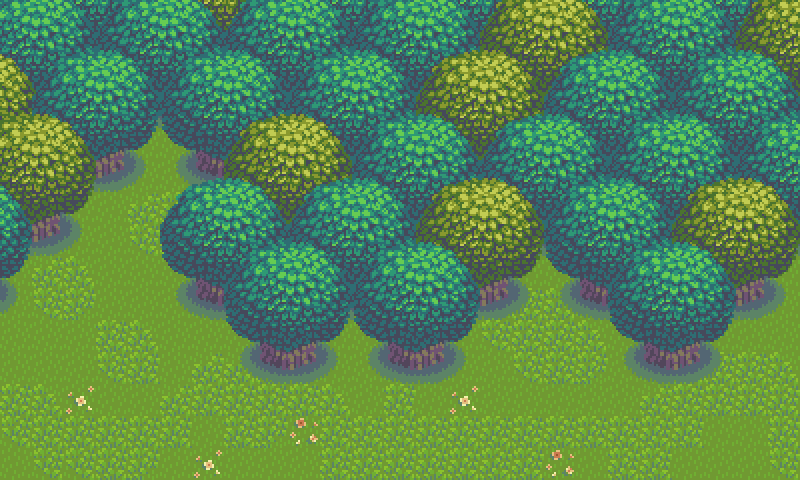
Using simple shapes and visual symmetry, a pleasing canopy of dense forest can be made with a single base asset.
Rocks
Well, we have grass, dirt, and trees. What next? You guessed it, rocks of course!

This approach exhibits a blocking technique, which is basically throwing down the basic shapes with solid colors and progressively refining the details as you introduce more colors. I usually use this technique if the sprite is not very big(low res). However, for larger sprites that are especially angular I sometimes start with an outline approach.
When designing your rocks it’s good to think about the geology of the area and what type of rocks you would realistically find in the environment. I imagine my rocks are some kind of limestone found in a prairie land. Moreover, I use warm colored blocky forms with a hint of smoothness, as these sedimentary rocks are susceptible to erosion and oxidization. Whatever the style of rock they will often share some of the same, or very closely related hues found in the dirt. Otherwise they are likely to look out of place. For more about rocks check out Pixelblog 13.
Man Made Objects
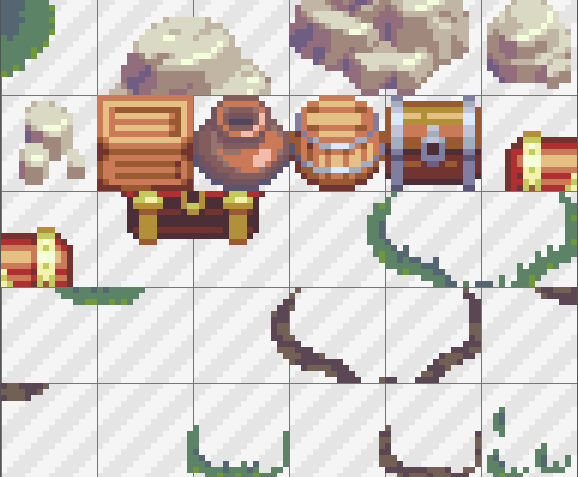
No matter what the environment, it seems treasure chests just seem to pop up out of no where. Curious, isn’t it? May as well cover some other common man made objects while we’re at it. I’m sure a village can’t be far away.
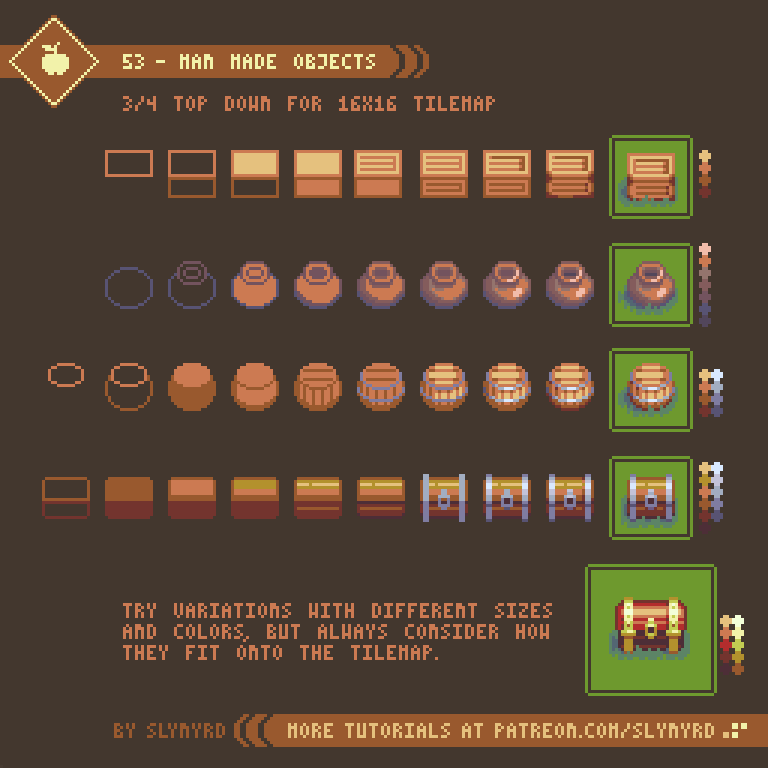
Here are some common man made objects you often find scattered around human settlements in top down rpgs. All except the large treasure chest snuggly fit into a 16x16 tile. This makes it so they can be cleanly placed on the tilemap, and fit together nicely when used in repetition. The large treasure chest is a bit irregular, sort of half filling a 32x32 space. However, in this case I think it’s okay, as it would be a rare object, usually placed off on it’s own.
Due to the precise geometry of man made objects the consistency of the sense of perspective is especially apparent. Make sure all your objects adhere to the same projection rules. For more about graphical projection, and 3/4 top down in particular, check out Pixelblog 3.
Cast Shadows
Cast shadows help make objects feel like they actually connect with the ground. It’s best to keep them subtle and not cast out long in any particular direction, as to minimize conflicts with overlapping adjacent tiles. In some cases where the shadow can easily be contained within the frame of the sprite, such as my tree, it’s okay to bake the shadow into the same asset. However, in most cases I make the shadows on separate tiles and place them on a different layer than the sprites. This allows me to just have one base sprite, and create shadows for different surfaces as I need them.
Final Thoughts
After creating the base ground tiles in the previous blog the real fun is just beginning. It can be tedious at first, but once you start to develop a substantial set of assets it becomes addictive to create tiled environments. I find myself wanting to flesh out this world with more and more assets! In the next Pixelblog, this world will truly come to life with the introduction of character assets.
RESOURCES
Was this article helpful? If you find value in my content please consider becoming a Patreon member. Among many other rewards, Pixel Insider members get extra resources to compliment my tutorials. But most importantly, you allow me to continue making new content.
Assets featured in this Pixelblog are available in Top Down RPG Starter Asset Pack
Source files used in the making of this Pixelblog are available in Basic Nature Source Files
Get caught up on all my downloads
If you're not ready to commit to the subscription model of Patreon, make a one-time donation and receive exclusive art and resources. Help continue the content by providing me a living. Thank you!
-By Raymond Schlitter